The Open Book Feather e-reader

Joey Castillo has created an awesome open hardware reading device:

6740051575408481594

The Open Book Feather

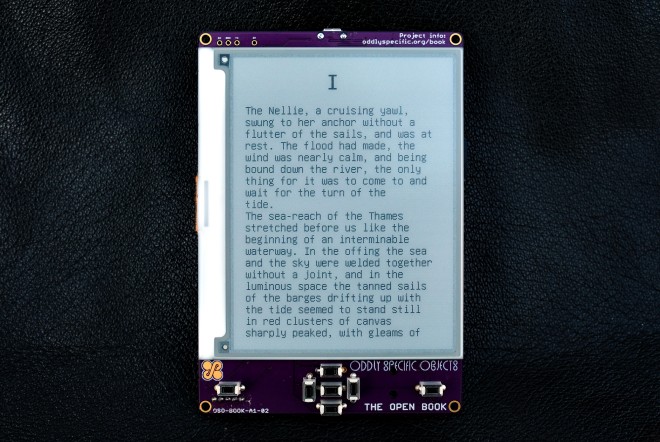
The Open Book is an open-hardware device for reading books in all the languages of the world. It includes a large screen and buttons for navigation, as well as audio options for accessibility and ports to extend its functionality. Its detailed silkscreen, with the all the manic energy and quixotic ambition of a Dr. Bronner’s bottle, aims to demystify the Open Book’s own design, breaking down for the curious reader both how the book works, and how they can build one for themselves.

9562961575408621144

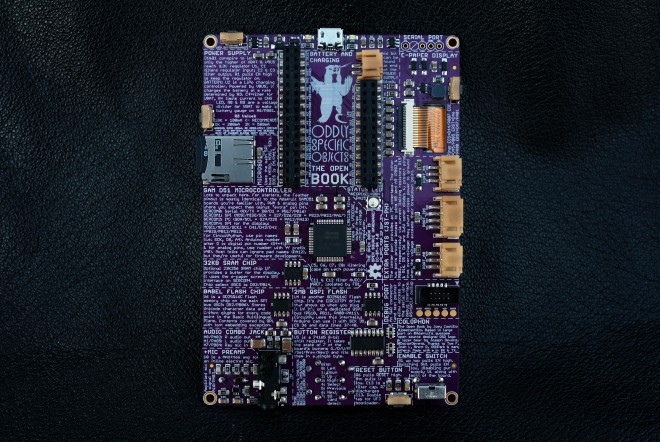
At the core of the Open Book is a SAMD51J19A microcontroller, a powerful ARM Cortex M4 with 512 KB of Flash and 192 KB of RAM. It has 51 pins of GPIO, and the Open Book uses all of them for peripherals and possibilities:

A 400×300 black and white e-paper screen enables the core experience of, y’know, reading.

A MicroSD slot allows for plenty of external storage for files. An offline copy of Wikipedia fits in 64 gigs — Hitchhiker’s Guide, anyone?

User input comes from seven buttons on a shift register, plus an eighth button tied directly to one of the SAMD51’s interrupt pins.

A dedicated flash chip for languages gives the book room to store glyphs and Unicode data for every language in the Basic Multilingual Plane (which is most of the languages in use today).

A 3.5mm audio jack

Screenshot from 2019-12-05 19-15-14.png

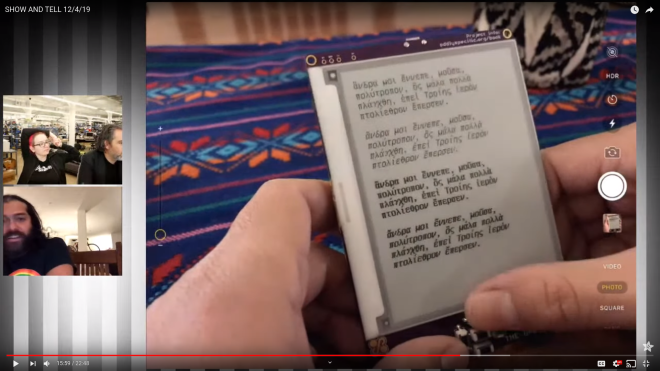
Joey (@josecastillo) did a demo of the the Open Book e-reader on Adafruit Show-n-Tell last night (jump to 15 min 59 sec):


The Open Book Feather e-reader

Make your own PCB with Eagle, OSH Park, and Adafruit

Bryan Siepert has published a new Adafruit guide on creating custom circuit boards with EAGLE:

manufacturing_finished_image.jpg

Make your own PCB with Eagle, OSH Park, and Adafruit!

This guide will introduce you to the basic process I use to build PCBs based on Adafruit and other open source designs. We will extract parts of the board files as what Eagle calls “Design Blocks” and then we will use them along with a fundamental workflow in Eagle to create a featherwing-like board for the Trinket M0. This board will allow you to securely attach the Adafruit INA219 current sensor breakout to a Trinket without having to use jumper wires to connect them together. We’re starting with this modest goal to keep things simple as we learn some fundamental concepts, while hopefully also ending up with a useful circuit.

This guide will cover using a Trinket M0 and INA219 breakout, however these same methods can be used to make a PCB to replace the breadboard or protoboard. These techniques can be used to extract useful pieces from open source boards to use in your own completely new circuit boards.

Make your own PCB with Eagle, OSH Park, and Adafruit

#badgelife add-on adapter for Adafruit LED matrix

Dqu6j8vX0AAwGG4

Adapter board to attach Adafruit 8×8 LED Matrix board as #badgelife add-on (using the DC26 SAO 2×2 pin header)

KiCad design files:

OSH Park shared project:

#badgelife add-on adapter for Adafruit 8×8 LED matrix

d68231e20e8a38d08579fd6c33f80553 (1)

Order from OSH Park

MicroPython support:


Resources:

#badgelife add-on adapter for Adafruit LED matrix

GlowSaber

Carlos Vadillo and Bx Dawes created the GlowSaber project to help kids in Alameda learn about physics, engineering and programming:

screenshot-from-2016-12-23-21-27-09

Building the GlowSaber main board

All the logic, sound and light effects of the GlowSaber are performed by a small microprocessor board. In this tutorial I will explain, step by step how to put together the main board of a GlowSaber.

DSC_0695-2016-09-11_17-41-42-864-1024x680.jpg

Building the GlowSaber handle

One premise that I had while designing the GlowSaber was that I should be able to build all of it with tools that I already have. That limited the materials I could choose to those that I could cut, drill and glue with just the basic tools:

228-1024x518

GlowSaber RGB LED assembly

The GlowSaber uses a Vollong 3 watts RGB LED. It is very bright and more than enough to light the length of the blade. When designing the GlowSaber I found that I needed a way to connect the LED to the main PCB and I designed a LED break out

11068412_1603898416534244_4239972562777874584_n.jpg

How to use a potentiometer to change the behavior

The GlowSaber has a switch assembly, that controls the on/off functions. It also has a LED to show that the GlowSaber is ready to start, and finally has a small 1 kΩ potentiometer. The following is a schematic of the switch assembly:

11999092_1652403508350401_7697716071713430521_n-300x225

cvadillo has shared the board on OSH Park:

GlowSaber

Untitled.png
Order from OSH Park

GlowSaber

Arduino Pro Trinket Bubble Display

6258141443734981847

davedarko wrote in his LED displays on Arduinos – a collection project log on hackaday.io:

Arduino Pro Trinket – bubble display

With 4 of HP QDSP-6064 bubble displays in a drawer I felt ready to do something with them and the “Clocks for Social Good” – call on hackaday.com finally got me going

7551951475502128886

The design files are available on GitHub:

davedarko has shared the board on OSH Park:

ProTrinket Bubble Display shield

04bc624f503303d6e746bb4707c4a299.png

Order from OSH Park

Arduino Pro Trinket Bubble Display

Capacitive touch with Teensy

The Teensy 3 and Teensy LC have several pins that can be used as capacitive touch inputs.  I designed this board in KiCad to experiment with cap touch buttons:

Teensy LC cap touch demo

teensy-touch-combo

Order from OSH Park

I used the CAPSENSE_CIRCLE component and footprint from the Wickerlib KiCad library to create the cap touch buttons:capsense-combo

Bill of Materials:

GitHub


Capacitive touch with Teensy

SHARP Memory LCD and Teensy

I created this board in KiCad to try out a SHARP memory display with the Teensy LC:

Screenshot at 2016-08-24 01-21-03

Design Files:

Shared Project:

SHARP memory display and Teensy LC

85f58bd4f89e130b8273481f97f92d28

Order from OSH Park


SHARP Memory LCD and Teensy

LoRaWAN FeatherWing for Adafruit Feather

lorawanfw1.jpg

Dan Watson has designed a new FeatherWing that adds the MicroChip RN2483/RN2903 LoRaWAN module to Adafruit Feather:

LoRaWAN FeatherWing for Adafruit Feather

Help your Feather fly into the IoT clouds with this awesome LoRaWAN module from MicroChip.

The design files are hosted on GitHub:

lorawanfw_sch

SyncChannelBlog has shared the board on OSH Park:

LoRaWAN FeatherWing

7523f414b831ee13c5acd91ffd5c18c2.png
Order from OSH Park

LoRaWAN FeatherWing for Adafruit Feather