Raspberry Pi OS Fan Control

Jeremy Cook writes about a simple project to keep the Raspberry Pi 4 cool:

Raspberry Pi OS Fan Control

While passive cooling options are often good enough to avoid overheating and thermal throttling–and I do love a ridiculously oversized heat sink–at some point you’ll need to think about using a cooling fan. The problem is that the Raspberry Pi’s GPIO pins don’t supply enough power to get one going.

One alternative is to hook the fan up to a 5V and ground pin, and just have it run continuously. However, this seems slightly wasteful power-wise, and potentially quite annoying. As outlined previously, you can also use a transistor and temperature-reactive Bash script to turn a fan on and off via the processor’s temperature. Things have changed since mid-2020, however, and Raspberry Pi OS now has this functionality built-in. Making things even more convenient, if you’re using a fan with a PWM input, you don’t actually need to add an extra transistor!

Read more…

Raspberry Pi OS Fan Control

TO-220 Buck Converter: drop-in replacement for linear regulator

Ketan Desai designed this tiny PCB to be a DC-DC converter that works as a drop in replacement for old TO-220 linear regulators:

TO-220 Buck Converter

Swap out your LDO for a switcher today, with these designs for a modern take on the TO-220 mounted LM1117 and 78xx series LDO regulators!
This project is my take on a quick and easy replacement for the 3-pin LDO. The aim is to replace TO-220 linear regulators with a switching converter, in pursuit of higher efficiencies and current capacity.

Using a Recom RPX series DC-DC module for its small size and incorporating SMD feedback resistors and bulk capacitance on board allows for a drop-in replacement to existing LDO designs, while remaining in the same overall footprint as the counterpart.

As LM1117 LDOs have a different pinout to the 78xx series of regulators, I designed two versions of the layout.

TO-220 Buck Converter: drop-in replacement for linear regulator

When Toasters Fly…

We love this nod to the After Dark screensaver, back when displays came with degauss buttons. Naturally, Electric Crowbar used our “After Dark” service (clear solder mask on black substrate).

The board is available for order as a shared project:

When Toasters Fly…

Hackaday Remoticon: learn to solder surface mount in style!

The annual Hackaday Supercon is taking place as Remoticon this year on November 6th to 8th. The talented Thomas Flummer has design a PCB badge based on the SMD challenge that can be further customized in KiCad.

There is still time before November 6th to order the board from the shared project page in “After Dark”:

NOTE: make sure to check “After Dark” in the cart

Hackaday Remoticon: learn to solder surface mount in style!

Unofficial Remoticon 2020 badge by Thomas Flummer in “After Dark”

The annual Hackaday Supercon is taking place as Remoticon this year and the talented Thomas Flummer has design a PCB badge based on the SMD challenge that can be further customized in KiCad!

The board can be ordered from the shared project page in “After Dark”:

NOTE: make sure to check “After Dark” in the cart

Unofficial Remoticon 2020 badge by Thomas Flummer in “After Dark”

KiCad 3D Viewer can now render “After Dark”

Thanks to KiCad developer Mario Luzeiro for enabling our “After Dark” service to be rendered, which features clear solder mask on black fiberglass:

Development Highlight: 3D Viewer Improvements

The KiCad 3D Viewer has seen a few incremental improvements during the course of V6 development:

Plated and Non-Plated Copper

A subtle change has been made in MR#405 by Mario Luzeiro that affects how copper is rendered. The visual difference between plated copper pads and non-plated copper pads will now be visible as well as copper in general.

This image shows a ENIG plated copper hole compared to the surrounding copper traces when the soldermask was turned off.

KiCad 3D Viewer can now render “After Dark”

“After Dark” now looks great in KiCad

“After Dark” 3D render now looks great in KiCad v5.99 (the nightly development build) thanks to Mario Luzeiro!

Here are the settings for the KiCad 3-D viewer:

  • To view the plated SMD pads and through hole vias, then uncheck the solder paste layers and uncheck the options to render 3D models:
  • Set solder mask color to 0% opacity:
  • Set “Copper/Surface Finish” color to Gold:
  • Set board body color to Black:

“After Dark” now looks great in KiCad

Custom 16×16 matrix display PCB

Erik van Zijst writes about their latest project made with our “After Dark” service:
EdUOhStU0AAK80C
For a previous project I explored what it would take to create a text marquee on an 8×8 LED matrix display without microcontroller, using only 7400 chips, an old EEPROM and breadboard components. Matrix Displays I was interested in using an LED matrix display and I picked up some cheap 8×8 ones on Amazon. medium.com That worked, but 8×8 is very small to do anything interesting and so I wanted to give it another go, create a larger 16×16 panel, design a custom PCB and ultimately hook it up to a microcontroller this time to write some games for it.

View at Medium.com

Custom 16×16 matrix display PCB

Raybeacon 1.4 is out

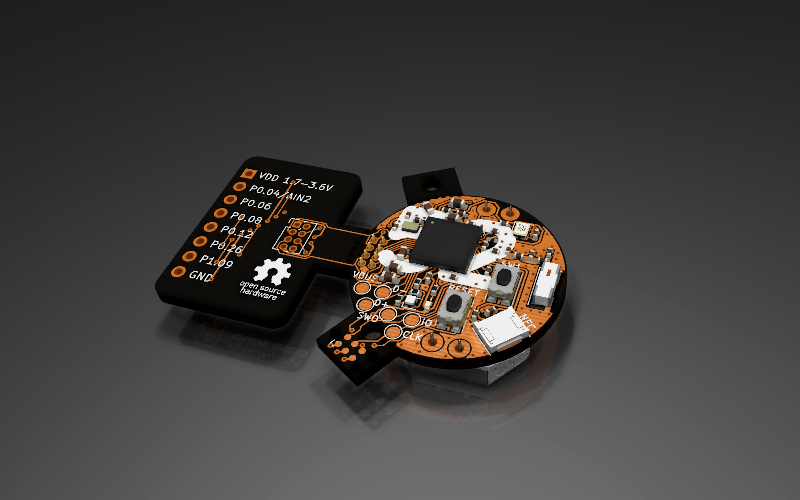
The rayBeacon by Mike M. Volokhov is a Nordic nRF52 on-the-go development kit:

raybeacon-afterdark

Shared Project: Raybeacon 1.4

The Raybeacon is full-featured nRF52 based wearable, ultra-low power, multiprotocol development board designed for variety of embedded applications. Due to modular design, the device can be used to build your own production-ready appliance with minimal hardware modifications.

Key features include:

  • Coin sized – the board is only 25 mm in diameter
  • Works from a single CR2032 / CR2025 3V button cell
  • Nordic nRF52 high-end multiprotocol SoC supporting Bluetooth 5.x, Bluetooth mesh, Thread and Zigbee; of your choice:
    • nRF52833: Cortex-M4F 64MHz, 512KB flash, 128KB RAM, Bluetooth® 5.1 Direction Finding, 105°C temperature qualification
    • nRF52840: Cortex-M4F 64MHz, 1MB flash, 256KB RAM, Bluetooth® 5.0, ARM TrustZone® CryptoCell cryptographic unit
  • Automotive grade BOM components – ready for harsh environment
  • 2 x tactile buttons IP67
  • 1 x RGB LED
  • 1 x infrared LED (850 nm) 0402 size
  • Socket for NFC flex antenna, compatible with Nordic FPC antenna and Liard 0600-00061. Can be configured as extra 2xGPIO.
  • Programmable through SWD port (removable Tag-Connect socket, on-board solder pads)
  • 1.27mm pitch 2×4 receptacle to connect custom extension boards:
    • 6 x GPIO ports
    • 1 x 12-bit ADC input
    • pass-through VDD and GND pins
  • 2.54mm pitch 1×8 pin header for fast breadboard prototyping; can be reused as 1.27 to 2.54 adapter
  • USB interface (on-board solder pads)
  • Minimal fabrication cost due to simple, two-layers only design

For detailed description, including information on custom boards and source files, please refer to the project repository on Bitbucket. Also, feel free to share your thoughts, or submit a request for a new slice or report an issue!


Raybeacon 1.4 is out