Open Hardware Summit 2018 badge

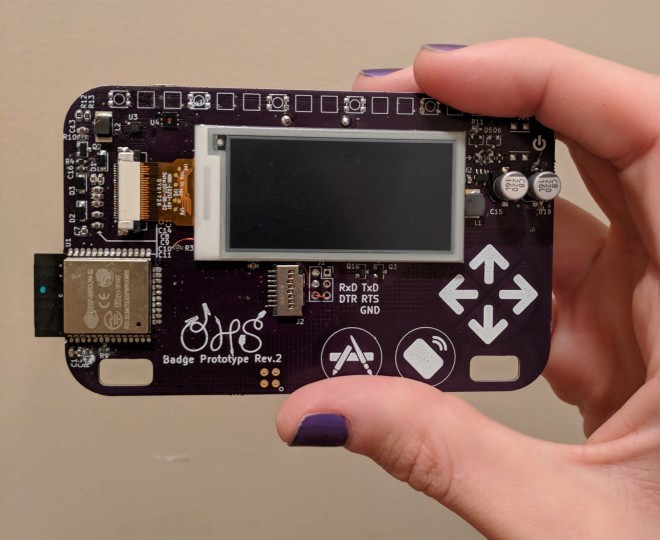
OSH Park is producing electronic conference badges for the 2018 Open Hardware Summit.  The hardware has been designed Alex Camilo, based on concepts from the ESP trINKet by Mike Rankin.  The badge features an ESP32 microcontroller and a 2.13″ E-Paper display.

6202441533283525215

OSH Park shared project for the Rev 3 by Alex Camilo :

https://oshpark.com/shared_projects/8yeLK5gd

Order from OSH Park

a

b

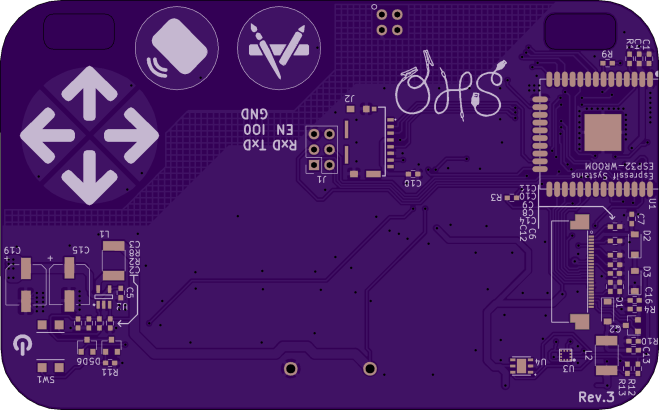
We expect this to be the final revision.

Timeline:

It is ordered on Super Swift today and should be validated next weekend.  This will allow us to order the full quantity PCB panels in August 13th.  Assembly is estimated to be 10 business days from the day when all components and PCBs are received.

Rev 2 photos:

And for those interested, here is a link to a gallery:

https://photos.app.goo.gl/UhCUX7eRN38tAhsF7

IMG_20180805_031614

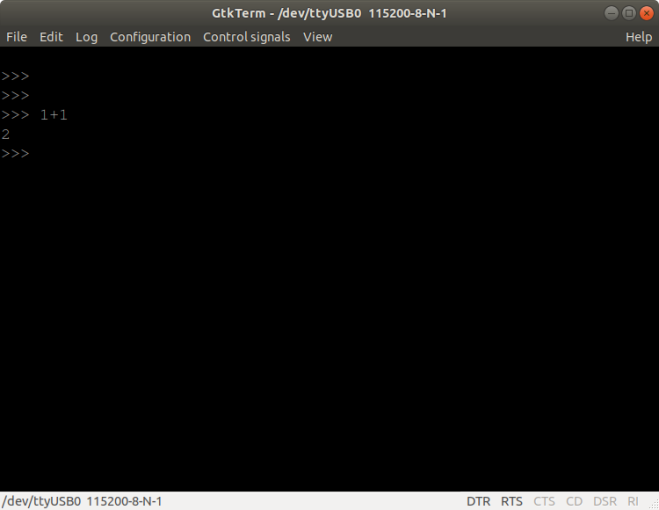
Terminal output on Rev 2 prototypes:

The Rev 2 prototypes have NodeMCU boards soldered on to the back to serve as a USB to serial adapter.

One of the Rev 2 prototype boards that Alex sent me has the default e-paper demo:

3633741533555804296

The other has MicroPython installed! 🙂

1079331533555818375

Resources for the 2018 Open Hardware Summit badge:

Open Hardware Summit 2018 badge

Micro TV-B-Gone

From Nicholas Junker on Hackaday.io

6009271515082893441.jpg

Micro TV-B-Gone

The Micro TV-B-Gone is based off of Adafruit’s original TV-B-Gone kit, except made to be as small as possible, using an LIR-2032 coin cell.


I based this project off of the Adafruit TV-B-Gone kit. I wanted to start getting into using surface mount components on my projects, and seeing as the TV-B-Gone was my first foray into soldering, I figured that it would be a great project to work on.

The device takes a rechargeable LIR-2032 battery, and is activated pressing the single button on top. It will run through all TV power codes, and then go into a low power mode, waiting for the next button press. The battery will last around 40 full cycles, before being reduced down to 3.5 volts.

Micro TV-B-Gone

PCB Artwork Hack Chat Transcript

The transcript has been posted from the Hack Chat last Friday with Andrew Sowa about Circuit Board artwork:

739811524251396115.png

PCB Artwork & Photo Conversions Hack Chat Transcript

PCB Art is likely as old as the manufacturing process itself. It has evolved over time from engineers hiding easter eggs in wasted space to whole companies devoted to the intricate authentic design. Andrew has created his own style by using each layer of the PCB to make multi-color images from computer generated designs.  In this chat he will talk about his process of turning photos into PCBs as well as tricks to getting high resolution results with KiCad.


In this chat, we’ll be talking about PCB artwork:

  • Bitmap to SVG Converstion (Inkscape and Illustrator)
  • Kicad Footprint creation
  • PCB Fabrication Limits
  • Backlighting
  • Halftones
PCB Artwork Hack Chat Transcript

Simple Mechanism Gives Support for SMT Assembly

 on the Hackaday blog:

pick-and-place-e1523119167760.png

Simple Mechanism Gives Support for SMT Assembly

To fight the shakes, you can do one of two things: remove the human, or improve the human. Unable to justify a pick and place robot for the former, [Tom] opted to build a quick hand support for surface-mount work, and the results are impressive considering it’s built entirely of scrap.

It’s just a three-piece arm with standard butt hinges for joints; mounted so the hinge pins are perpendicular to the work surface and fitted with a horizontal hand rest, it constrains movement to a plane above the PCB. A hole in the hand rest for a small vacuum tip allows [Tom] to pick up a part and place it on the board — he reports that the tackiness of the solder paste is enough to remove the SMD from the tip.

Simple Mechanism Gives Support for SMT Assembly

Neon Display for a Vacuum Tube Calculator

From  on Hackaday blog:

Neon Display for a Vacuum Tube Calculator

When it comes to vintage displays, everyone gravitates to Nixies. These tubes look great, but you’re dealing with a certain aesthetic with these vintage numeric tubes. There is another option. For his Hackaday Prize entry, [castvee8] is making seven-segment displays out of vintage neon lamps. It looks great, and it’s the basis of an all-vacuum tube calculator.

The core of this build are a few tiny NE-2 neon bulbs. These are the same type of bulbs you’ll find in old indicators, and require somewhere around 100 volts to fire. These bulbs are then installed in a 3D-printed frame, giving [castvee] a real seven-segment display, a plus or minus sign, and an equals sign. It’s the beginnings of a calculator, right there.

One of the recent updates to this project is controlling these displays with modern logic. That might be a bit of a misnomer, because [castvee] is using diode steering and a TTL chip to cycle through the numbers 1 to 4. The actual code to do this is running on a microcontroller, though, so that might get a pass. This is just a test, though, and the real project looks to be an all-vacuum calculator. The project is still in its early stages, but there are still months to go in the Hackaday Prize, and we can’t wait to see what comes out of this project.

Neon Display for a Vacuum Tube Calculator

Microgamer Is A Micro:Bit Handheld Console

From on the Hackaday blog:

Screenshot from 2018-02-27 18-25-39.png

 Microgamer Is A Micro:Bit Handheld Console

The BBC micro:bit single board ARM computer aimed at education does not feature as often as many of its competitors  in these pages. It’s not the cheapest of boards, and interfacing to it in all but the most basic of ways calls for a slightly esoteric edge connector. We’re then very pleased to see that edge connector turned from a liability into a feature by [Fabien Chouteau] with his handheld console, he uses micro:bits preprogrammed with different games in the manner of game cartridges in commercial consoles.

Screenshot from 2018-02-27 18-24-23.png

The micro:bit sits in its edge connector on the underside of a handheld PCB above a pair of AAA batteries, while on the other side are an OLED display and the usual set of pushbuttons. It’s a particularly simple board as the micro:bit contains all the circuitry required to support its peripherals.


He’s coded the games using the Arduino IDE with a modified version of the Arduboy2 library that allows him to easily port Arduboy games written for Arduino hardware. It’s a work in progress as there are a few more features to incorporate, but the idea of using micro:bits as cartridges is rather special. There is a video of the console in action, which we’ve placed below the break.

Screenshot from 2018-02-27 18-25-10.png

Microgamer Is A Micro:Bit Handheld Console

TritiLED Flashes for 20 Years on a Single Coin Cell

From  on Tindie blog:

tritiled

TritiLED Flashes for 20 Years on a Single Coin Cell

Ted Yapo had a small problem. As an amateur atronomer and astrophotographer, he needed a way to mark his expensive equipment so that he wouldn’t trip over it in the dark. Glow-in-the-dark materials were out because of they only glow for a short time, and glow sticks were also less than ideal because of their single-use nature. Tritium light sources would be perfect, barring the small details that they’re radioactive, expensive, and in the US only a few uses are allowed, most are prohibited by law.

tritiled1

So Yapo instead came up with an LED light that can run for not 20 hours, or even 20 days, but 20 yearson a single CR2032 coin cell battery!

TritiLED Flashes for 20 Years on a Single Coin Cell

Cyborg Ring

From zakqwy on Hackaday.io:

3687361516059943194

Cyborg Ring

cordwood + smt + jewelry + blinkies + zinc-air batteries

This project evolved from Splinter, the SMT cordwood project I did last summer/fall. The ring is powered by tiny size 10 hearing aide batteries which should give 4-6 weeks of intermittent use, once I come up with a design that doesn’t break after a few days of wear and update the firmware to put the ATtinyx5 to sleep. The first rev (labelled ‘blink-ring’) used deep red 650nm LEDs. Searching for particular component lengths gave me an excuse to use strange 0508 resistors. And somehow, this is my first Charlieplexing project. Yaay novelty soldering!
Cyborg Ring