A Breadboard Loving RP2040 Dev Board

The BREAD 2040 from Oak Dev Tech is now on sale for only $6.76:

What is it?

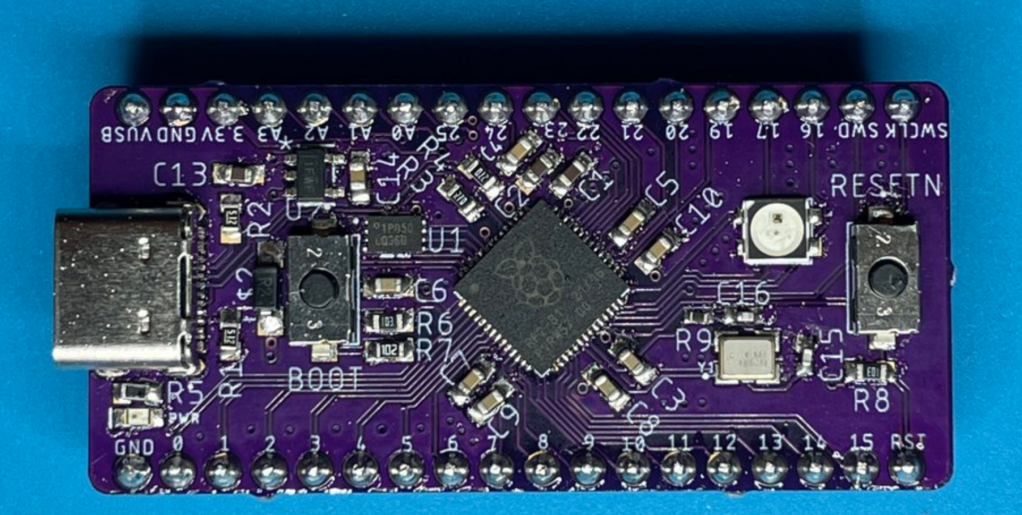
BREAD 2040 is a compact and breadboard friendly development board which features the Raspberry Pi RP2040, a NeoPixel compatible SK6812mini, Reset button, and all GPIO and SWD pins broken out in an easily breadboard able design. No weird pins on the ends! This board is also CircuitPython compatible meaning you can develop your projects faster with python.

Why did you make it?

The BREAD2040 was designed in an inspirational burst of energy while watching the CircuitPython Day Adafruit Board Tour.

What makes it special?

The BREAD 2040 takes an old fashion approach to this design, keeping in mind bread board friendliness as well as providing modern USB style plugs with the USB Type-C connector.

Read more on Tindie…

A Breadboard Loving RP2040 Dev Board

EZ Fan2 Tiny Raspberry Pi Fan Controller

Jeremy Cook created this tiny PCB for controlling small cooling fans or other motors:

What is it?

PCB originally designed to control cooling fans on Raspberry Pi boards, but can be used with other small motors or DC loads. Includes a flyback diode to safely dissipate inductive voltage spikes.

Can also work with Arduino and other such dev boards.Why did you make it?

Wanted a way to control cooling fans off of a Raspberry Pi. While some fans have PWM inputs, some do not and cannot normally be controlled. This transistor board works well with the GPIO fan control option in Raspberry Pi OS (which turns it fully on and fully off).

Not a full motor driver (i.e. it only drives in one direction) but can be used with other simple DC motors as well. Includes a resistor and flyback diode.

What makes it special?

It’s very, very small, even compared to a prior THT version. It should therefore be able to fit inside nearly any case. The optional 90º headers are even spec’d out to be low profile.

Boards come fully assembled with or without headers depending on the option selected, and appearance of the boards may vary. Options also available for female-female wires as needed, and/or clear heat shrink.

Read more on Tindie…

EZ Fan2 Tiny Raspberry Pi Fan Controller

Raspberry Pi Pico Oscilloscope

As you dive deeper into the world of electronics, a good oscilloscope quickly is an indispensable tool. However, for many use cases where you’re debugging low voltage, low speed circuits, that expensive oscilloscope is using only a fraction of its capabilities. As a minimalist alternative for these use cases [fhdm-dev] created Scoppy, a combination of firmware for the Raspberry Pi Pico and an Android app to create a functional oscilloscope.

Read more on Hackaday…
Raspberry Pi Pico Oscilloscope

PiMod Zero: Raspberry Pi Zero RF Video Modulator

We excited to see this Raspberry Pi Zero RF Video Modulator on Crowd Supply:

PiMod Zero

Dust Off That Old TV

PiMod Zero brings old tech back to life by allowing a Raspberry Pi Zero to display color or B&W video – and play audio – on vintage televisions. It provides a super-compact way to watch old movies, play retro games, present digital art, or navigate your operating system using any television that receives standard NTSC broadcasts on VHF channels 2 and 3 (55.25 MHz and 61.25 MHz).

In the past, you would have needed a cumbersome RF modulator box to adapt the HDMI signal from a Pi Zero. Now, with this convenient HAT snapped on top of your Pi Zero, no additional dongles are required. In fact, once the Pi is powered up, the only other cable you need is a piece of coax to connect PiMod Zero to your TV.

Configuring the Raspberry Pi to output composite video and stereo audio to PiMod Zero is extremely simple. Handy scripts and thorough documentation will be available in our GitHub repo.

PiMod Zero: Raspberry Pi Zero RF Video Modulator

Raspberry Pi OS Fan Control

Jeremy Cook writes about a simple project to keep the Raspberry Pi 4 cool:

Raspberry Pi OS Fan Control

While passive cooling options are often good enough to avoid overheating and thermal throttling–and I do love a ridiculously oversized heat sink–at some point you’ll need to think about using a cooling fan. The problem is that the Raspberry Pi’s GPIO pins don’t supply enough power to get one going.

One alternative is to hook the fan up to a 5V and ground pin, and just have it run continuously. However, this seems slightly wasteful power-wise, and potentially quite annoying. As outlined previously, you can also use a transistor and temperature-reactive Bash script to turn a fan on and off via the processor’s temperature. Things have changed since mid-2020, however, and Raspberry Pi OS now has this functionality built-in. Making things even more convenient, if you’re using a fan with a PWM input, you don’t actually need to add an extra transistor!

Read more…

Raspberry Pi OS Fan Control

OBS controller using CircuitPython on RPi Pico

The Pico Producer designed by Pete Gallagher is an OBS Controller using a Raspberry Pi Pico and Circuit Python:

pjgpetecodes/pico-streamdeck

This project is an OBS Controller using a Raspberry Pi Pico and CircuitPython.

OBS controller using CircuitPython on RPi Pico

EZ Fan2 Tiny Raspberry Pi Fan Controller

From Jeremy S Cook on Tindie:

EZ Fan2 Tiny Raspberry Pi Fan Controller

What is it?

PCB originally designed to control cooling fans on Raspberry Pi boards, but can be used with other small motors or DC loads. Can also work with Arduino and other such dev boards.

Why did you make it?

Wanted a way to control cooling fans off of a Raspberry Pi. While some fans have PWM inputs, some do not. Notably, this works well with the GPIO fan control option in Raspberry Pi OS.

Not a full motor driver (i.e. it only drives in one direction) but can be used with other simple DC motors as well. Also, can be used with Arduino et al.

What makes it special?

It’s very, very small, even compared to the first version. In fact, and should therefore be able to fit inside nearly any case. The 90º headers are even spec’d out to be low profile.

EZ Fan2 Tiny Raspberry Pi Fan Controller

How to make a RPi CM carrier board in KiCad

The wonderful Shawn Hymel has a new video on designing a base board for the new Raspberry Pi compute module:

How to Make a Raspberry Pi Compute Module 4 Carrier Board in KiCad – Part 2 | Digi-Key Electronics

Raspberry Pi released the Compute Module 4 (CM4) in October, which is a single board computer with all of the processing power of the Raspberry Pi 4, but in a tiny form factor! It removes many of the connectors (USB, HDMI, etc.), as the intention is for you to add your own with a custom board and enclosure.

In this series, we’ll show you how to create your own, custom Raspberry Pi CM4 carrier board with KiCad!

How to make a RPi CM carrier board in KiCad

Raspberry Pi Cooling Fan Control with Bash Scripting

In a previous post, I did a very brief introduction to the world of Bash scripting in the context of Raspberry Pi single-board computers. It’s an amazingly powerful tool, capable of administrative tasks like batch file renaming, making decisions, and more. While this scripting interface is available for any Linux system, the Raspberry Pi’s GPIO pins make it even more powerful, allowing it to control physical devices, like an LED directly, or even motors and other higher current devices indirectly via a transistor.

As it just so happens, the Raspberry Pi doesn’t come with any sort of active or even passive, cooling solution, and it’s pretty common to simply hook up a fan to run at all times to its 5V power supply. This seems to work fine, but when I noticed the Pi that runs my 3D printer (in a hot Florida garage) was overheating, running it all the time seemed a little silly. After all, power is applied to the Pi constantly, but it’s actually used on a very intermittent basis when I’m printing something.

(Script and PCB design available on GitHub)

Raspberry Pi Cooling Fan Control with Bash Scripting

Adding PCIe To Your Raspberry Pi 4, The Easier Way

raspberry_pi_4_installed_pcie_bridge

Ever since people figured out that the Raspberry Pi 4 has a PCIe bus, the race was on to be the first to connect a regular PCIe expansion card to a Raspberry Pi 4 SBC. Now [Zak Kemble] has created a new approach, using a bridge PCB that replaces the VL805 USB 3 controller IC. This was also how the original modification by [Tomasz Mloduchowski] worked, only now it comes in a handy (OSHPark) PCB format.

rpi4_bridge_chip-1024x454-1

After removing the VL805 QFN package and soldering in the bridge PCB, [Zak] confirmed that everything was hooked up properly and attempted to use the Raspberry Pi 4 with a PCIe extender. This showed that the Raspberry Pi would happily talk with a VL805-based USB 3.0 PCIe expansion card, as well as a Realtek RTL8111-based Ethernet card, but not a number of other PCIe cards. Exactly why this is is still unclear at this point.

raspberry_pi_4_pcie_expander

As a bonus, [Zak] also found that despite the removal of the VL805 IC from the Raspberry Pi rendering its USB 3 ports useless, one can still use the USB-C ‘power input’ on the SBC as a host controller. This way one can have both PCIe x1 and USB on a Raspberry Pi 4.

This is the third iteration we’ve seen for using PCIe with the Pi. If you’re building on the work of [Thomasz Mloduchowski], which inspired [Colin Riley] to add expanders, and now this excellent hack by [Zak], we want to hear about it!

via Adding PCIe To Your Raspberry Pi 4, The Easier Way — Hackaday

Quote