Finding RF Cable Impedance

From Al Williams on Hackaday:

Finding RF Cable Impedance

At DC and low frequency, we can pretend wires are perfect conductors. At radio frequencies, though, there are many effects that you need to take into account for wires and cables. One of these is characteristic impedance. If you have a marked cable, you can look it up on the Internet, of course. But what if you don’t know what kind of wire it is? With help from [The Offset Volt], you can measure it as he shows in the video below.

This is one of those things that used to take exotic test equipment like an LCR bridge, but these days meters that measure inductance and capacitance are commonplace. The trick is simple: measure the capacitance and then short one end of the cable and measure the inductance.

Once you have those numbers, it is easy to do a little math and determine the impedance. It doesn’t matter how long the cable is. The length will change the individual readings, but the ratio of the two readings will remain relatively constant.

Quote

Atomized Annoy-O-Tron with Flex PCB

Been working on a tiny version of the Annoy-o-tron ThinkGeek’s prank device.

My design is based on Geppetto Electronics version from tindie… https://www.tindie.com/products/nsayer/annoy-o-tron-tiny/

My version is just over 0.25in round.. so tiny! Even found a tiny piezo to go with it and 3d printed a holder for 2 watch batteries and PCB.

via Atomized Annoy-O-Tron — AtomSoftTech

This slideshow requires JavaScript.

Quote

Official Arduboy Upgrade Module Nears Competition

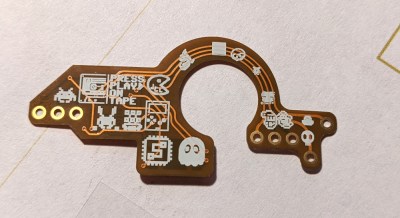
We’ve been big fans of the Arduboy since [Kevin Bates] showed off the first prototype back in 2014. It’s a fantastic platform for making and playing simple games, but there’s certainly room for improvement. One of the most obvious usability issues has always been that the hardware can only hold one game at a time. But thanks to the development of an official add-on, the Arduboy will soon have enough onboard storage to hold hundreds of games

Even the rear silkscreen was a community effort.

The upgrade takes the form of a small flexible PCB that gets soldered to existing test points on the Arduboy. Equipped with a W25Q128 flash chip, the retrofit board provides an additional 16 MB of flash storage to the handheld’s ATmega32u4 microcontroller; enough to hold essentially every game and program ever written for the platform at once.

Of course, wiring an SPI flash chip to the handheld’s MCU is only half the battle. The system also needs to have its bootloader replaced with one that’s aware of this expanded storage. To that end, the upgrade board also contains an ATtiny85 that’s there to handle this process without the need for an external programmer. While this is a luxury the average Hackaday reader could probably do without, it’s a smart move for an upgrade intended for a wider audience.

The upgrade board is currently available for pre-order, but those who know their way around a soldering iron and a USBasp can upgrade their own hardware right now by following along with the technical discussion between [Kevin] and the community in the “Project Falcon” forum.

via Official Arduboy Upgrade Module Nears Competition — Hackaday

Quote

Hackaday Remoticon: Our 2020 Conference is Packed with Workshops and We’re Calling for Proposals

We’re proud to announce the Hackaday Remoticon, taking place everywhere November 6th – 8th, 2020. It’s a weekend packed with workshops about hardware creation, held virtually for all to enjoy.

But we can’t do it without you. We need you to host a workshop on that skill, technique, or special know-how that you acquired through hard work over too many hours to count. Send in your workshop proposal now!

What is a remoticon?

The Hackaday Remoticon achieves something that we just couldn’t do at the Hackaday Superconference: host more workshops that involve more people. Anyone who’s been to Supercon over the past six years can tell you it’s space-limited and, although we do our best to host a handful of workshops each day, those available seats are always in high demand.

We’re sad that we can’t get together in person for Supercon this year, but now we have an opportunity to host more workshops, engaging more live instructors and participants because they will be held virtually. This also means that we can make recordings of them available so that more people can learn from the experience. This is something that we tried way back during the first Supercon with Mike Ossmann’s RF Circuit Design workshop and 140,000 people have watched that video. (By the way, that link is worth clicking just to see Joe Kim’s excellent art.)

Now I’m not saying that your workshop will have a view count into six digits. What I am saying is that you have skills worth sharing, and people are hungry to learn. Since traveling to massive conferences is on pause for a while, spinning up a way to share your experience with others is a superb use of your time.

We need you to submit a workshop proposal! This can take any shape that makes sense for your topic, but here’s the gist of how this might work. Each accepted workshop makes a list of necessary materials and where to get them so that participants can order ahead of time and follow along. Live workshops will be held via video conference, with periods of instruction, work time, and recap that lets participants ask questions and show results as they go.

SUBMIT YOUR WORKSHOP NOW!

Wait, wait, wait. Before you click away to the next awesome Hackaday article, don’t assume you have nothing to teach. In fact, do the opposite. Assume you have rare and specialized knowledge on something (because you do!) and seek that out. Then unleash your mind to form a workshop idea around it. Hackaday is filled with weird, wild, and interesting projects, and we always want to see more of them. Share the wealth so that more people begin to walk the path of the hardware hacker

via Hackaday Remoticon: Our 2020 Conference is Packed with Workshops and We’re Calling for Proposals — Hackaday

Quote

2020: Everything is Virtual

It’s like the dystopian future arrived out of the blue. From one year to the next we went from holing up in overly air-conditioned hotel ballrooms and actually meeting our fellow meatbags in the flesh, to huddling in our pods and staring at the screens. I’m looking for the taps to hook me in to the Matrix at this point.

But if you haven’t yet received your flying car or your daily Soma ration, you can still take comfort in one thing: all of the hacker conferences are streaming live, as if it were some fantastic cyber-future! In fact, as we type this, someone is telling you how to print your way to free drinks on USAir flights as part of HOPE’s offering, but the talks will continue for the next few days. (Go straight to live stream one.)

If retrocomputing is more your thing, Saturday marks the start of the virtual Vintage Computer Festival West of which Hackaday is a proud sponsor. (Here’s the schedule.)

And next weekend is DEF CON in Safe Mode with Networking. While we can totally imagine how the talks and demo sessions will work, the Villages, informal talks and hack-togethers based on a common theme, will be a real test of distributed conferencing.

via 2020: Everything is Virtual — Hackaday

Quote

The Simplest TS100 Upgrade Leads Down A Cable Testing Rabbit Hole

By now, I must have had my Miniware TS100 soldering iron for nearly three years. It redefined what could be expected from the decent end of the budget soldering iron spectrum when it came on the market, and it’s still the one to beat even after those years. Small, lightweight, powerful, and hackable, it has even spawned direct imitations.

If the TS100 has a fault, it comes not from the iron itself but from its cable. A high-grade iron will have an extra-flexible PVC or silicone cable, but the TS100 does not have a cable of its own. Instead it relies on whatever cable comes on its power supply, which is frequently a laptop unit built with portable computing rather than soldering in mind. So to use it is to be constantly battling against its noticable lack of flexibility, a minor worry but one that I find irksome. I determined to find a solution, making a DC extension cable more flexible than that on my power supply.

via The Simplest TS100 Upgrade Leads Down A Cable Testing Rabbit Hole — Hackaday

Quote

Printed TS100 Case Beats the Heat with a Bearing

As we’ve said many times in the past, the creation of custom cases and enclosures is one of the best and most obvious applications for desktop 3D printing. When armed with even an entry-level printer, your projects will never again have to suffer through the indignity of getting hot glued into a nondescript plastic box. But if you’re printing with basic PLA, you need to be careful that nothing gets too hot inside.

Which was a problem when [Oleg Vint] started work on this 3D printed case for the popular TS100 soldering iron. But with the addition of a standard 608 bearing, the case provides a safe spot for the iron to cool off before it gets buttoned back up for storage. Of course, you can also use the flip-out perch to hold the iron while you’re working.

As [Oleg] explains on the Thingiverse page for the case, he actually blended a few existing projects together to arrive at the final design. Specifically, the idea of using the 608 bearing came from a printable TS100 stand originally designed in 2017 by [MightyNozzle]. Released under Creative Commons, [Oleg] was able to mash the bearing stand together with elements from several other printable TS100 cases to come up with his unique combined solution.

via Printed TS100 Case Beats the Heat with a Bearing — Hackaday

Quote

Jerry Lawson: Father of the Video Game Cartridge

Jerry Lawson was an engineer from New York who had arrived at Fairchild Semiconductor in 1970 after having worked at various companies in the defense electronics industry. Working as part of their customer engagement effort, he achieved prominence in the company by revolutionising the point of contact with the customer using an RV (yes, a camping vehicle) converted as a demonstration lab for Fairchild products. He was lucky enough to be in the right place at the right time to be a member of the famous Homebrew Computer Club, cradle of so much of the later microcomputer industry, which put him at the center of a web of contacts covering the games business as it was in the early 1970s.

Though his employer was not involved in gaming, Jerry got his start in that field as a side project. When his friend Allan Alcorn installed the first Pong machine in Andy Capp’s Tavern it suffered from customers interfering with its coin mechanism to score free plays, so Jerry produced a game cabinet of his own called Demolition Derby that had a more robust system. This led to Fairchild Semiconductor International offering him the chance to start their new video game division, and the road to the Channel F was laid.

[..]

There are many names from the annals of computing history who roll off the tongue. People such as Jobs and Wozniak, Bushnell, Dabney, Sinclair, Miyamoto, or Miner. We should also add Jerry Lawson to that list, as his vision to make one console and sell multiple games, done inexpensively with the use of the PCB edge connector, set the standard for decades to come.

via Jerry Lawson And The Fairchild Channel F; Father of the Video Game Cartridge — Hackaday

Quote

Roboticist Grant Imahara has passed away

We are saddened to read the news today that Grant Imahara has passed away.  Mike Szczys writes more on Hackaday:

We awake this morning to sad news of the premature passing of Grant Imahara at the age of 49 due to a brain aneurysm. Grant was best known for his role on the wildly popular Mythbusters television show on which he starred and built test apparatus for seasons three through twelve. He landed this role because he was a badass hardware hacker as much as he was an on-camera personality.

Grant received his degree in electrical engineering from USC in 1993 and landed a job with Lucasfilm, finding his way onto the Industrial Light and Magic team to work on blockbuster films like the Star Wars prequels (R2-D2 among other practical effects) and sequels to Terminator and The Matrix. Joining the Mythbusters team in 2005 was something of a move to rapid prototyping. Each of the 22-minute episodes operated on a 10-day build and a film cycle in which Grant was often tasked with designing and fabricating test rigs for repeatable testing with tightly controlled parameters.

After leaving the show, Grant pursued several acting opportunities, including the Kickstarter funded web series Star Trek Continues which we reported on back in 2013. But he did return to the myth busting genre with one season of The White Rabbit Project on Netflix. One of the most genuinely geeky appearances Grant made was on an early season of Battlebots where his robot ‘Deadblow’ sported a wicked spiked hammer. Video of his appearance in the quarter-finals is like a time-capsule in hacker history and guaranteed to bring a smile to your face.

Grant Imahara’s legacy is his advocacy of science and engineering. He was a role model who week after week proved that questioning how things work, and testing a hypothesis to find answers is both possible and awesome. At times he did so by celebrating destructive force in the machines and apparatus he built. But it was always done with observance of safety precautions and with a purpose in mind (well, perhaps with the exception of the Battlebots). His message was that robots and engineering are cool, that being a geek means you know what the heck you’re doing, and that we can entertain ourselves through creating. His message lives on through countless kids who have grown up to join engineering teams throughout the world.

Grant was the headliner at the first Hackaday Superconference in San Francisco back in 2015. I’ve embedded the fireside chat below where you can hear in his own words what inspired Grant, along with numerous stories from throughout his life.

via Roboticist Grant Imahara of Mythbusters Fame Dies of Aneurysm at Age 49 — Hackaday

Quote

AtomSoft uses flex for tiny DimeDuino

From the AtomSoftTech blog:

DimeDuino

This time around i give you the DimeDuino. Its a Flex PCB based which utilizes the ATMEGA328P. Using this MCU allows for the installation of the Arduino bootloader. Hence the Duino in the name. These will come pre-programmed with the bootloader. One portion of the circle is just for programming. There is a GND, VCC,RXI, TXO and DTR & RST depending on your programmer.

As soon as its available ill post it here and on Twitter.

Specs:

  • Atmega328 running at 3.3v/8MHz or 5v/16MHz
  • Power LED (Green)
  • User LED (D13– Color may vary but mainly Blue)
  • Reset Button
  • 3.3v(AP2112K) or 5v (AP7335A) Linear step down
  • Flash 32KB (2KB is Bootloader)
  • SRAM 2KB
  • EEPROM 1KB
  • 20 I/O Pins (A6 & A7 are not used here. Input Only anyway)
    • 1 UART D0 (RX) and D1 (TX)
    • 1 SPI D10 (SS), D11 (MOSI), D12 (MISO), D13 (SCK)
    • 1 I2C A4 (SDA) and A5 (SCL)
    • 6 PWM D3, D5, D6, D9, D10, and D11
    • 14 I/O D0-D13


Quote