Mike Harrison’s Reverse Engineering Workshop

Hardware teardowns are awesome when guided by experts. One of our favorites over the years has been [Mike Harrison], who has conquered teardowns of some incredibly rare and exquisitely engineered gear, sharing the adventure on his YouTube channel: mikeselectricstuff. Now he’s putting on a workshop to walk through some of the techniques he uses when looking…

via Mike Harrison’s Reverse Engineering Workshop — Hackaday

Mike Harrison’s Reverse Engineering Workshop

BeagleLogic Standalone

Kumar Abhishek just announced on his blog a project that he has been working on the past four months:

beaglelogic-standalone-top (1)

Announcing: BeagleLogic Standalone

BeagleLogic Standalone is a specialized version of the BeagleBone which is intended to be used a logic analyzer based on BeagleLogic.

Screenshot-from-2017-10-10-09-37-04

This logic analyzer has networking capabilities (10/100/1000Mbps Ethernet); it can be used to used to debug circuits remotely. And as it is a full-featured Linux computer, you can run the sigrok set of tools directly on the BeagleLogic Standalone board (they come preinstalled in the BeagleLogic system image), or on your host PC. It has 16 channels and can sample up to 1.5 seconds of data at the maximum sample rate, which is 100MSamples/sec (3 seconds of data if using only the first 8 channels).

Screenshot-from-2017-10-06-14-45-03

I designed and 3D printed a snug fit “open” case for the BeagleLogic standalone board. I’ve written more about it in a Hackaday.io project log.

bls-3dprintedcase

BeagleLogic Standalone is one of the 20 finalists in the Best Product round of the Hackaday Prize. The results are awaited on the 11th of November. It’s been a great journey taking BeagleLogic standalone from a concept to a prototype and giving a glimpse as to what it could be as a finished product and the experience I gained during the process is invaluable, and I wish to thank Hackaday for providing me with this opportunity.

If enough people sign up, I plan on organizing a group buy for BeagleLogic Standalone boards. If you want to get one, please do not hesitate and sign up here.

The documentation for the board is available at standalone.beaglelogic.net. You can also follow the project on Hackaday.io here.

BeagleLogic Standalone

µGame by Radomir Dopieralski

Radomir Dopieralski has created handheld game console programmable with (Micro/Circuit)Python:

2179411509287391232.jpg

µGame

A small game console directly programmable in Python. I always wanted to make this, and after my work on #PewPew FeatherWing I finally decided that I’m ready.

The first version may be a bit of a stretch — I tried to make it as small as possible, fitting in the 5x5cm limit of PCB manufacturers, so that it will be cheap to make the PCBs. Using the cheap ST7735 TFT display, and a cheap ATSAMD21E chip. I also tried to put all the components on one side of the board, but failed with that — the power and reset switch had to go on the back, as well as the buzzer.


µGame by Radomir Dopieralski

Hackaday Prize Entry: Global Positioning Clock

For one of [Nick]’s Hackaday Prize entries, he’s building a minimalist GPS clock. First up, the centerpiece of every clock, the display. There are eight seven-segment displays, two each for the hours, minutes, and seconds, and a smaller digit for tenths of a second. These displays are controlled by an ATXmega32E5, an upgrade on an earlier version of this project that only used an ATtiny and a MAX6951 LED driver.

via Hackaday Prize Entry: Global Positioning Clock — Hackaday

Hackaday Prize Entry: Global Positioning Clock

Particle Electron Carrier for Outdoor IoT Applications

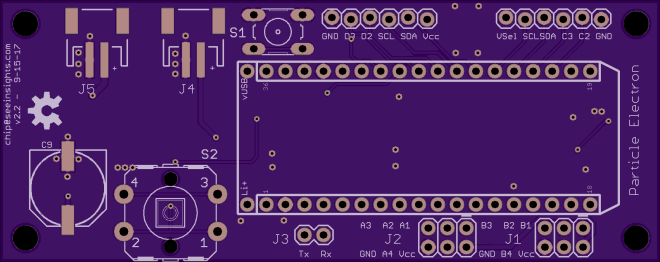
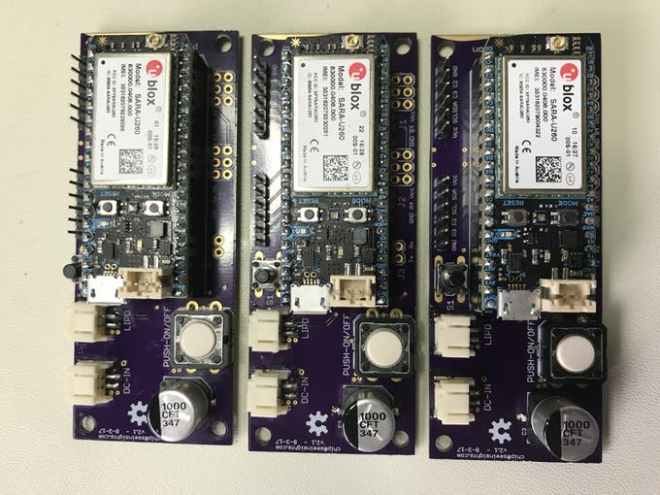
Chip McClelland designed this Particle Electron carrier board to enhance the reliability and capabilities his outdoor IoT project:

img_1520_v9mPqNoPF1.jpeg

Particle Electron Carrier for Outdoor IoT Applications

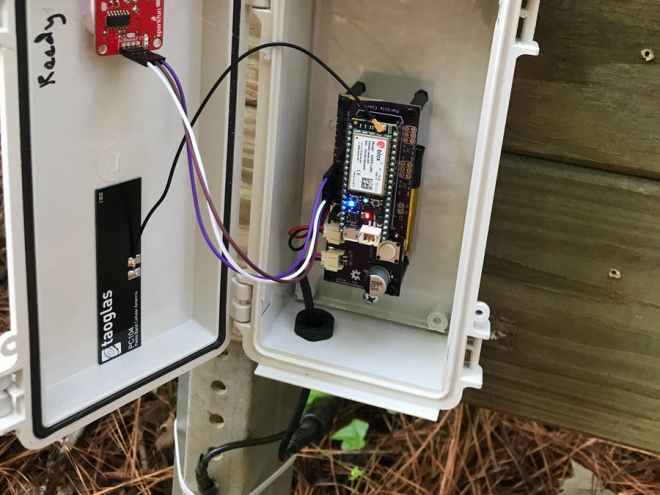
I have been building IoT sensors for outdoor use for a few years now. Most of my focus has been on helping local parks better count and report the cars, bikers, joggers and hikers which use their facilities each day. By giving them an accurate and automatic way to measure park utilization, They can save significant labor costs, get a more complete count and facilitate reporting. My hope is that this work will show how important our parks are and help preserve and even expand funding for these vital community resources.

screen_shot_2017-10-23_at_1_35_54_pm_3cr2TIB6Xg

Longer term, I also want to collect environmental and health data with these devices and I realized that a general purpose enhancement to the Particle Electron would be useful in all manner of applications that I – or the community – might dream up. This project, developed in collaboration with the Particle community (see Team link) is open source and available to anyone who can wants to deploy IoT devices where there is no WiFi or utility power.

img_1429_HmAgiGVOWW

These carriers have proved to be very reliable and have survived 6 months so far in the North Carolina Summer. I have started working on a Solar Implementation and have some ideas for future improvement. Please let me know if this is helpful and if you have any comments or suggestions that could help improve the carrier.

chipmc has shared the board on OSH Park:

Electron Carrier Board v2.2

c137311fa7865309872ad0faf89bb732

Order from OSH Park

Particle Electron Carrier for Outdoor IoT Applications

Rotary Encoder with I2C Interface and RGB Lighting

From Jeremy S. Cook on the Tindie blog:

encoder (1).jpg

Rotary Encoder with I2C Interface and RGB Lighting

Makernet Knob’s makes the point that “Rotary encoders are cool but hard to wire into your projects.” Having wired up a custom input device for my computer using an encoder, I can attest to both of these statements. In my case, it took me quite a bit of time simply to figure out how each encoder pin was used!

2017-10-06T21_08_06.531Z-GM1200PTH pic4.jpg.855x570_q85_pad_rcrop.jpg

To help alleviate complicated wiring issues, this custom knob features a built-in I2C interface, which allows several (even hundereds) of knobs to be chained together without issue. Additionally, the top of the encoder can be depressed as a pushbutton, and it even has an RGB LED integrated inside of it to give you feedback right on the knob!

Rotary Encoder with I2C Interface and RGB Lighting

Hackaday Prize Entry: Pyrotechnics Sequencer with Wireless Control

[visualkev]’s friend was putting on his own fireworks show by lighting each one in turn, then running away. It occurred to [visualkev] that his friend wasn’t really enjoying the show himself because he was ducking for cover instead of watching the fun. Plus, it was kind of dangerous. Accordingly, he applied his hacker skills to…

via Hackaday Prize Entry: Pyrotechnics Sequencer with Wireless Control

Hackaday Prize Entry: Pyrotechnics Sequencer with Wireless Control

These Twenty Projects Won $1000 In The Hackaday Prize

For the last several months, we’ve been hosting the greatest hardware competition on Earth. This is the Hackaday Prize, and we’ve just wrapped up the last of our five hardware challenges. For the Anything Goes challenge in this year’s Hackaday Prize, we’re asking hardware hackers to build the best, the coolest thing. No, it doesn’t matter what…

via These Twenty Projects Won $1000 In The Hackaday Prize

These Twenty Projects Won $1000 In The Hackaday Prize

Micro SD Extension Cable

 writes on the Tindie blog:

extension1-wb

Micro SD Extension Cable

Weirdly, one problem with memory now being so small is that these drives can be placed in areas that are difficult to access. Usually this means some sort of USB adapter (another amazing improvement over serial or parallel ports), but if you just want an actual SD extension cable in the form of a micro SD card, here it is! This device was conceived of when programming a BeagleBone Black, and could have lots of other applications.

extension2

I designed this little tool while compiling a software installation on BeagleBone Black. I needed to repetitively remove/inset the micro SD card. The BeagleBone was installed in a hard-to-reach area. So much time was wasted trying to inset the card with tweezers.

This simple tool plugs into the hard-to-reach socket, and provides a flexible extension.

Length: 3.5″

Screenshot from 2017-10-19 12-47-58.png

Micro SD Extension Cable

Learn to Surface Mount Solder with Sean Hodgins

Sean Hodgins has a great tutorial on surface mount soldering:

FU374UFJ8UGW6FR.MEDIUM

Learn to Surface Mount Solder Using an SMD Challenge PCB

I feel like surface mount soldering has a bad reputation. It can seem daunting to someone who has never tried it. Since a lot of my project involve using surface mount components, I thought it would be a good idea to make something to inspire people to try it out (without risking expensive components or their custom project).

 FA8FTR9J8UGW710.ANIMATED.MEDIUM

Decide how you want to assemble your SMD Challenge Kit (re, the video) you can choose to use a soldering iron, or a reflow oven. They take about the same amount of time but using the soldering iron can be a little more challenging and doesn’t require a cheap toaster oven. 

FAMPGL9J8UGW6FZ.ANIMATED.MEDIUM

Parts:

Tools:

Learn to Surface Mount Solder with Sean Hodgins