Laptop Battery Charge Controller

Frank Adams details this interesting project on Hackster:

Laptop Battery Charge Controller

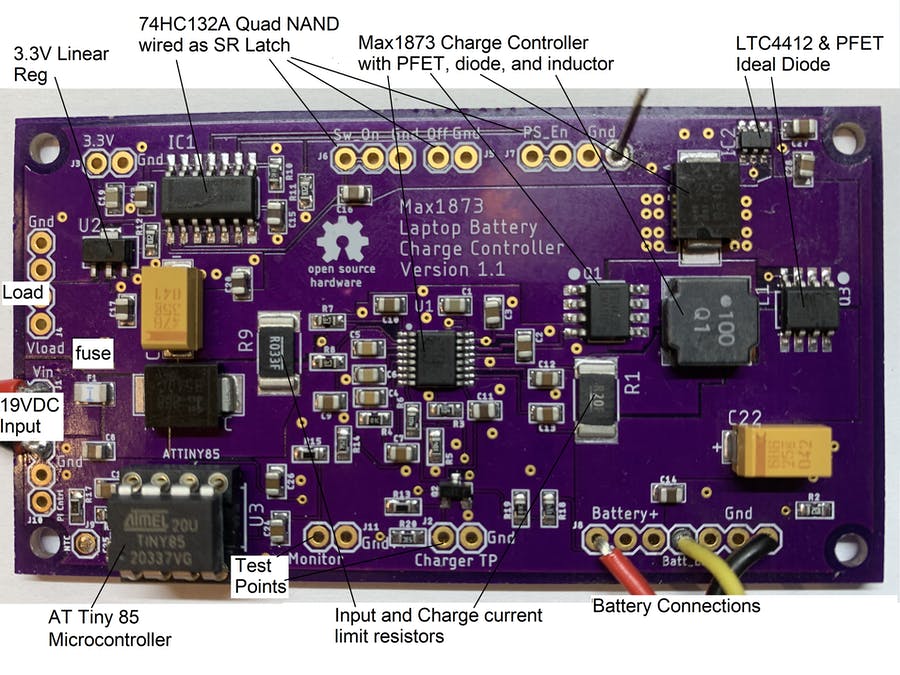
his project is for those that want to turn an old laptop into a portable Raspberry Pi. My previous Hackster.io projects showed how to connect the keyboard and touchpad. The LCD is easy to convert to HDMI with a video card from EBay. The missing piece has been a way to charge the original lithium battery pack. To solve this problem, I designed a circuit board in Eagle that uses a Max1873 charge controller with an ATtiny85 as a supervisor. The board shown below was fabricated by OSH Park. The Eagle board and schematic files plus the ATtiny code can be downloaded below.

OSH Park Circuit Board "Charge_Controller"

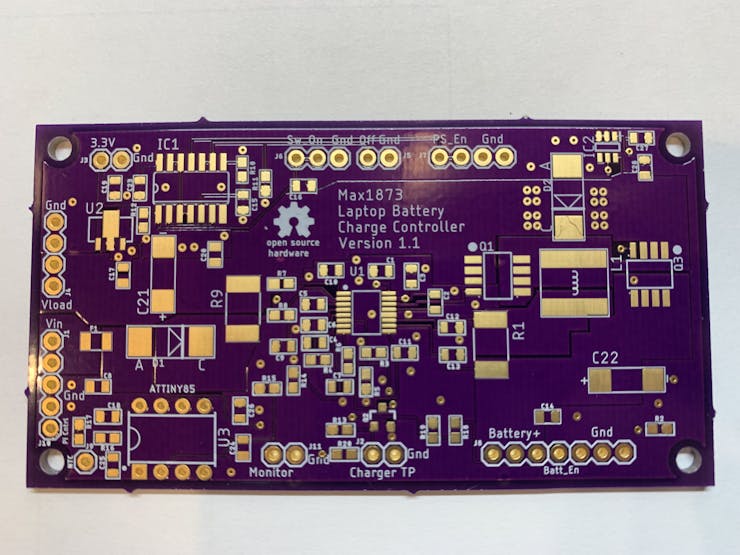
The Max1873 has been around a long time and needs a microcontroller to handle the tasks that a newer charger IC would have, built in. I have prior experience with this chip and found it to be fairly simple and easy to get working. The schematic below shows how the ATtiny85 is powered from the 5.4 volt regulator in the Max1873. This means the ATtiny is only operating if the wall supply is plugged in. The ATtiny outputs a logic signal that turns on an NFET which in turn disables the Max1873. This 5.4 volt logic signal is attenuated to a 3.3 volt level so it can be monitored by the Pi. If the ATtiny is not installed in it’s socket, the Max1873 will be enabled. The Pi could drive the “Charger_TP” signal to disable the charger if the battery values read over the SMBus show it’s necessary.

Laptop Battery Charge Controller

Avoiding PCB Crosstalk

Now that it is relatively cheap and easy to create a PCB, it is a common occurrence for them to be used in projects. However, there are a lot of subtleties to creating high-performance boards that don’t show up so much on your 555 LED blinker. [Robert Feranec] is well-versed in board layout and he recently highlighted an animation on signal crosstalk with [Eric Bogatin] from Teledyne LeCroy. If you want a good understanding of crosstalk and how to combat it, you’ll want to see [Eric’s] presentation in the video below.

Simplifying matters, the heart of the problem lies in running traces close together so that the magnetic fields from one intersect the other. The math is hairy, but [Eric] talks about simple ways to model the system which may not be exact, but will be close enough for practical designs.

The models use inductors and capacitance to represent different modes of crosstalk, and it’s likely you already know how to deal with those quantities. The video shows some simulations and also suggests methods to control the problem.

Even though the topic is PC boards, some of the same ideas apply to cables. Ethernet cables, for example, have specifications for FEXT for similar reasons.

Read more on Hackaday…

Avoiding PCB Crosstalk

CERN Open Hardware License approved by OSI

You may soon see the CERN Open Hardware License as a choice the next time you create a repo on GitHub:

A dedicated licence for open-source hardware: CERN OHL approved by OSI

The OSI (Open Source Intitiative) has approved version 2 of CERN’s Open Hardware License (OHL), meaning it conforms to its Open Source Definition and respects the ideals and ethos of the movement.

Geneva-based CERN (Conseil Européen pour la Recherche Nucléaire) says it has an open-source culture. “Our main mandate at CERN is to conduct basic research. But there is a lesser-known part of our mandate, which is to make things that we do available for the public… very often these are engineering things that we develop,” Javier Serrano, head of the hardware and timing section, Beam Controls Group, told The Register.

The desire to share hardware designs publicly led to the creation of the OHL, for which version 2.0 was released last year. But why not use existing licences like GPL, MIT or Apache 2.0?

“There were no adequate open-source licences that we could rely on to share our hardware designs,” said Serrano.

In hardware, working with commercial companies is a necessity, because “you need somebody who’s going to manufacture it, assemble it to test and sell it to you,” he said. “Companies don’t like the legal risk, so there was a need for a licence to bring clarity as to what the conditions would be.”

CERN ended up with three variants. There is a strong reciprocal licence (CERN-OHL-S), which is for designs that remain free along with all their derivatives, a copyleft principle similar to GPL.

There is a weak reciprocal licence where the design can be used as a component in other designs without the whole becoming open source, but if the design of the component is modified, that must be shared back (CERN-OHL-W). And there is a permissive licence, CERN-OHL-P, which lets users mix the design freely with proprietary designs provided it is acknowledged, similar to Apache 2.0 in the software world.

CERN Open Hardware License approved by OSI

Adorably small frequency probe

Awesome project from the Technoblogy blog:

Frequency Probe

The Frequency Probe is a handheld tool designed to help you debug your circuits by giving a visual indication of the frequency or voltage at the probe. For a periodic waveform it gives a digital readout of the frequency, with a range of about 1Hz to 5MHz and an accuracy of better than 0.3%. For a voltage level it gives a readout of the voltage:

The obvious way to implement a frequency meter is to count the number of pulses within one second; this then directly gives the frequency. I refer to this as Frequency Mode. The disadvantage of this method is that a long sample time is needed to measure low frequencies accurately.

The other way is to measure the interval between two pulses of the input signal; the reciprocal of this then gives the frequency. I call this Interval Mode. For example, if the interval between pulses is one second the frequency is 1Hz. The disadvantage of this method is that for high frequencies you need to measure the interval very accurately.

The ideal solution is to use Frequency Mode for high frequencies, and Interval Mode for low frequencies, which is the approach I’ve adopted with the Frequency Probe. I explain below how to calculate the best point at which to switch between modes.

I originally started work on this project a couple of years ago, but it turned out to be a lot trickier than I anticipated, and so decided to put it to one side. I revisited it earlier this year, and fortunately managed to solve all the issues.

Adorably small frequency probe

Enabling American Science through Open Source Hardware

New post from OSHWA executive director Alicia Gibb in the Journal of OpenHW:

Enabling American Science through Open Source Hardware

The US is primed and ready for open source hardware to accelerate scientific breakthroughs, but open source hardware needs a cemented place on the intellectual property landscape within the sciences enabling a faster, more efficient acceleration. If we can cement science using open source hardware, we’ve got a path to expanding American manufacturing. Many businesses profit from open source hardware, demonstrating that it is a lucrative business model. The field of science needs equipment for all sorts of experiments and lab work. Let’s apply the groundwork already laid in the United States for open source hardware to be the default for science.

Read more…

Enabling American Science through Open Source Hardware

Open Hardware Authenticator Powered by ESP32


Cabe Atwell writes on Hackster about Open Authenticator by Vedant Parajape which uses an ESP32 to secure data and features an OLED display, 300mAh LiPo battery, and a USB Type-C port for charging:

TOTP-Based Open Hardware Authenticator Powered by an ESP32 Microcontroller_

“I fired up google and tried to search about it, and surprisingly it used a pretty amazing concept. It had a shared key with the server, and then it did some computation on the shared key and current UTC time to get a 6-digit number. So, the remote device just had to be accurate at timekeeping,” Parajape noted in his project log. He then took that information and designed his initial Open Authenticator prototype using a development kit he had on hand and an ESP32 module. It worked well enough, but he wanted a more streamlined platform, similar to RSA’s SecureID Key FOB.

Some people like to use hardware authenticators or security keys when working with public or company computers to keep their data private, certainly so when hackers can easily steal unprotected information. There are many great authenticators on the market that can be had for cheap, but others such as developer Vedant Parajape have designed their own platforms using readily-available hardware. Parajape became interested in authenticators after seeing his dad’s security keys and wondered how they could generate code without being connected to a network.

Open Hardware Authenticator Powered by ESP32

What Makes A Good Antenna?

From Jenny List on Hackaday:

What Makes A Good Antenna?

It sometimes seems as though antennas and RF design are portrayed as something of a Black Art, the exclusive preserve of an initiated group of RF mystics and beyond the reach of mere mortals. In fact though they have their difficult moments it’s possible to gain an understanding of the topic, and making that start is the subject of a video from [Andreas Spiess]. Entitled “How To Build A Good Antenna”, it uses the design and set-up of a simple quarter-wave groundplane antenna as a handle to introduce the viewer to the key topics.

What Makes A Good Antenna?

New features coming in KiCad V6

This epic thread on the KiCad forum tracks new features that are in the upcoming V6 release:

Post-v5 new features and development news

I thought many would be interested in the development status and new features of pre-v6/post-v5 now when 5.1.0 has been released and version 6 development has begun. Add your favorite here if someone else hasn’t done it already.

The most recent post describes curved tracks:

New features coming in KiCad V6

Feather Flipper

Lex Kravitz designed a small PCB for flipping the orientation of a feather board that is useful for flipping the orientation of a camera or screen wing:

Feather Flipper

I wanted to use an Adafruit AMG8833 thermal camera feather wing with the mini color TFT feather wing.  Stacking them together with a Feather doubler board works fine (and the AMG8833 data looks very nice on the tiny screen!) but the problem is that the thermal camera is looking in the same direction as the screen.  When you look at the screen all you see is…. you!

Feather Flipper

A Few Of My Favorite Things: Amateur Radio

From Jenny List on Hackaday:

A Few Of My Favorite Things: Amateur Radio

Hackaday has among its staff a significant number of writers who also hold amateur radio licenses. We’re hardware folks at heart, so we like our radios homebrew, and we’re never happier than when we’re working at high frequencies.

Amateur radio is a multi-faceted hobby, there’s just so much that’s incredibly interesting about it. It’s a shame then that as a community we sometimes get bogged down with negativity when debating the minutia. So today let’s talk about a few of my favourite things about the hobby of amateur radio. I hope that you’ll find them interesting and entertaining, and in turn share your own favorite things in the comments below.

A Few Of My Favorite Things: Amateur Radio