A short but highly technical history of DRAM

Great Twitter thread from our friend Eric Schlaepfer of TubeTime.us:

“A short but highly technical history of DRAM – dynamic random access memory!”

but first: dynamic?
static – a logic circuit that operates down to 0Hz clock.
dynamic – a logic circuit with a minimum clock frequency.

static RAM is made of two cross-connected inverters along with two pass gate transistors that connect and disconnect the memory cell to the bit lines. you need 6 transistors to make a cell that can store one bit of information.

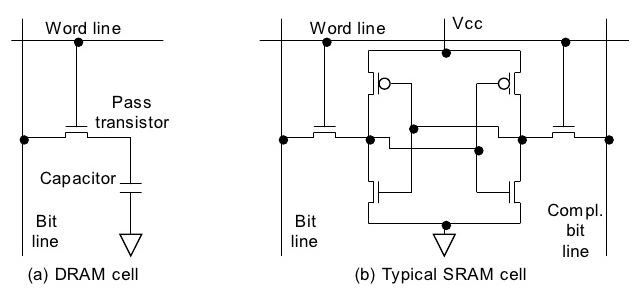
dynamic RAM cheats a little and uses a capacitor to store the bit instead. over time, this charge drains away so you have to periodically read the current state and then write it back again. it’s like refilling a leaky bucket.

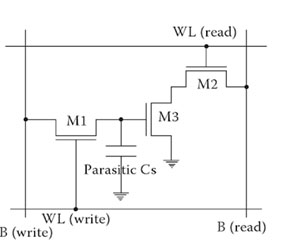
here’s a more detailed diagram of the basic DRAM cell (3 transistor). the bit is stored in the gate capacitance of transistor M3 (shown as “parasitic C”). M1 is closed to write to the cell and M2 is closed to read from the cell.

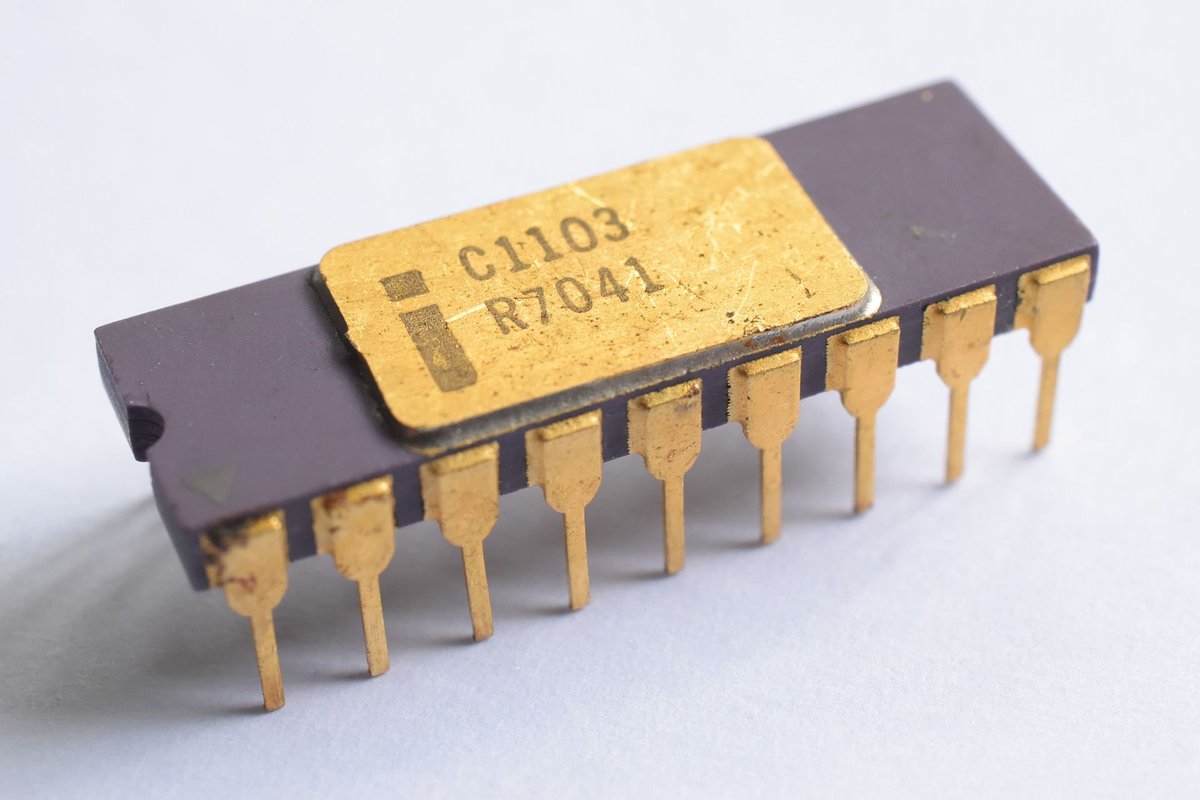
now back to the history: this is the first practical DRAM chip, the Intel 1103, which they introduced in 1970. it was expensive at 1 cent per bit (1024 bits total). that’s about $7 now. you’d need two of these chips to store the text in this tweet!

here’s the pinout. address lines, chip enable, data out (inverted?), data in, read/write, precharge (similar to a clock line), and then three (!) power rails: VSS=+16V!, VDD=GND (PMOS is weird) and VBB=+19.5V(!!!)

Originally tweeted by Tube Time (@TubeTimeUS) on February 27, 2021.

A short but highly technical history of DRAM

Listen to your muscles!

Upside Down Labs has this neat kit on Tindie that lets you listen to your muscles!

BioAmp v1.5 kit

BioAmp v1.5 is a single chip biopotential amplifier. It can record any biopotential signal non-invasively and doesn’t require any microcontroller to sample the signal. You just plug 9v Battery to board, Electrodes to body and Audio jack to Mobile/Laptop and you are ready to record signals like EMG, ECG, EOG, and EEG. You can record the signals on a pc using audacity OR on mobile using Backyard Brain’s spike recorder app.

Listen to your muscles!

Switch Your SID Up!

The SID Chip is one of the most hallowed components of electronic equipment, housed inside the original Commodore 64 and responsible for some of the most iconic chiptunes ever made. The Commodore 64 & 128 GOLD SID Sound Interface Device is a direct replacement for the original SID chip which will ensure the rare and valuable chip is safe, while accurately replicating its output and performance.

The chip installation will include desoldering the original chip, which will require some advanced soldering skills – but there are many tutorials online which will help you with this and it can be done however scary it may seem! The SID chip in the Commodore 64 came in two versions – the MOS 6581 and the 8580, both of which can be replaced by this neat board.

Read more on the Tindie blog…

Switch Your SID Up!

30 FPS Flip-Dot Display Uses Cool Capacitor Trick

Most people find two problems when it comes to flip-dot displays: where to buy them and how to drive them. If you’re [Pierre Muth] you level up and add the challenge of driving them fast enough to rival non-mechanical displays like LCDs. It was a success, resulting in a novel and fast way of controlling flip-dot displays.

Read more: 30 FPS Flip-Dot Display Uses Cool Capacitor Trick — Hackaday
30 FPS Flip-Dot Display Uses Cool Capacitor Trick

TO-220 Buck Converter: drop-in replacement for linear regulator

Ketan Desai designed this tiny PCB to be a DC-DC converter that works as a drop in replacement for old TO-220 linear regulators:

TO-220 Buck Converter

Swap out your LDO for a switcher today, with these designs for a modern take on the TO-220 mounted LM1117 and 78xx series LDO regulators!
This project is my take on a quick and easy replacement for the 3-pin LDO. The aim is to replace TO-220 linear regulators with a switching converter, in pursuit of higher efficiencies and current capacity.

Using a Recom RPX series DC-DC module for its small size and incorporating SMD feedback resistors and bulk capacitance on board allows for a drop-in replacement to existing LDO designs, while remaining in the same overall footprint as the counterpart.

As LM1117 LDOs have a different pinout to the 78xx series of regulators, I designed two versions of the layout.

TO-220 Buck Converter: drop-in replacement for linear regulator

Google-Inspired USB-PD Sniffer for the DIY Crowd

If you want to hack around with the communication protocol that USB Power Delivery devices use to negotiate their power requirements with the upstream source, a tool like Google’s Twinkie really helps. With it you can sniff data off the line, analyze it, and even inject your own packets. Luckily for us, the search giant made the device open source so we can all have one of our own.

Unfortunately, as [dojoe] found out, the Twinkie isn’t particularly well suited for small-scale hobbyist manufacturing. So he came up with a revised design he calls Twonkie that replaces the six layer PCB with a much more reasonable four layer version that can be manufactured cheaply by OSHPark, and swaps out the BGA components with QFP alternatives you can hand solder.

Read more: Google-Inspired USB-PD Sniffer for the DIY Crowd

Google-Inspired USB-PD Sniffer for the DIY Crowd

Stochastic Markov Beats

From Matthew Carlson on Hackaday:

Stochastic Markov Beats

[Attoparsec] has been building intriguing musical projects on his YouTube channel for a while and his latest is no exception. Dubbed simply as “Node Module”, it is a rack-mounted hardware-based Markov chain beat sequencer. Traditionally Markov chains are software state machines that transition between states with given probabilities, often learned from a training corpus. That same principle has been applied to hardware beat sequencing.

Each Node Module has a trigger input, four outputs each with a potentiometer, and a trigger out. [Attoparsec] has a wonderful explanation of all the different parts and theories that make up the module at the start of his video, but the basic operation is that a trigger input comes in and the potentiometers are read to determine the probabilities of each output. One is randomly selected and fired. As you can imagine, there are loops and even dead-end nodes and for some musical pieces there is a certain number of beats expected, so a clever reset signal can be sent to pull the chain back to the initial starting state at a regular interval. The results are interesting to listen to and even better to imagine all the possibilities.

The module itself is an Arduino-based custom PCB that is laid out quite cleanly. The BOM, code, and KiCad files are available on GitHub if you want to make one yourself. This isn’t the first instrument we’ve seen [Attoparsec] make, and we’re confident it won’t be the last.

Stochastic Markov Beats

AtomIO: New design from AtomSoftTech

Update from Jason at AtomSoft:

AtomSoftTech: New Stuff

I have a couple of new PCBs being made by OSHPark . They are awesome as usual and have kept up during this pandemic. Which is a tuff thing to do. The first PCB is my IOBuddy shrunk down to smaller size. Its called the AtomIO

As you can see from the render it has 3 Outputs (LED) and 2 Inputs (BTN). It’s tiny as heck and will help keep breadboards less full. The LEDs are tied to GND with a Resistor so all you have to do is supply 2v to 6v to turn them on. The buttons are pulled low via 10k – 22k ohm. So when pressed they output a HIGH signal. What ever is on the power rail it is connected to.

The next board I have on the way is more of an internal use PCB but may sell it if wanted enough. its a simple breakout for those memory LCDs from sharp. The LS027B7DH01 to be exact. I call it the AtomSharp.

AtomIO: New design from AtomSoftTech