A 3D-Printed Bowl Feeder for Tiny SMD Parts

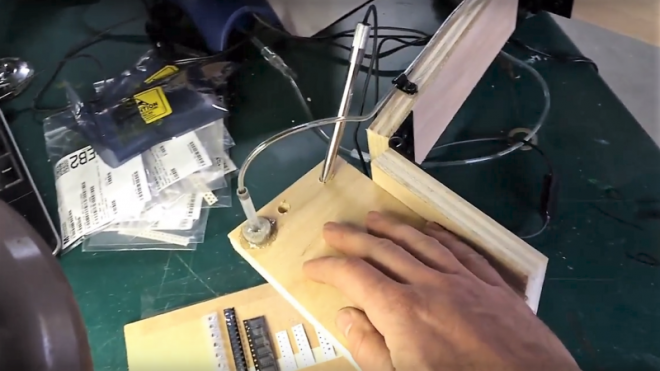
[Andrzej Laczewski] has something big in mind for small parts, specifically SMD resistors and capacitors. He’s not talking much about that project, but from the prototype 3D-printed bowl feeder he built as part of it, we can guess that it’s going to be a pretty cool automation project.

Bowl feeders are common devices in industrial automation, used to take a big pile of parts like nuts and bolts and present them to a process one at a time, often with some sort of orientation step so that all the parts are the right way around. They accomplish this with a vibratory action through two axes, which [Andrzej] accomplishes with the 3D-printed ABS link arms supporting the bowl.

via A 3D-Printed Bowl Feeder for Tiny SMD Parts — Hackaday

Quote

Reflowduino: Put That Toaster Oven To Good Use

From  on the Hackaday blog:

Reflowduino: Put That Toaster Oven To Good Use

There are few scenes in life more moving than the moment the solder paste melts as the component slides smoothly into place. We’re willing to bet the only reason you don’t have a reflow oven is the cost. Why wouldn’t you want one? Fortunately, the vastly cheaper DIY route has become a whole lot easier since the birth of the Reflowduino – an open source controller for reflow ovens.

This Hackaday Prize entry by [Timothy Woo] provides a super quick way to create your own reflow setup, using any cheap means of heating you have lying around. [Tim] uses a toaster oven he paid $21 for, but anything with a suitable thermal mass will do. The hardware of the Reflowduino is all open source and has been very well documented – both on the main hackaday.io page and over on the project’s GitHub.

sidekick-e1525981389910

The board itself is built around the ATMega32u4 and sports an integrated MAX31855 thermocouple interface (for the all-important PID control), LiPo battery charging, a buzzer for alerting you when input is needed, and Bluetooth. Why Bluetooth? An Android app has been developed for easy control of the Reflowduino, and will even graph the temperature profile.

When it comes to controlling the toaster oven/miscellaneous heat source, a “sidekick” board is available, with a solid state relay hooked up to a mains plug. This makes it a breeze to setup any mains appliance for Arduino control.


Reflowduino: Put That Toaster Oven To Good Use

Simple Mechanism Gives Support for SMT Assembly

 on the Hackaday blog:

pick-and-place-e1523119167760.png

Simple Mechanism Gives Support for SMT Assembly

To fight the shakes, you can do one of two things: remove the human, or improve the human. Unable to justify a pick and place robot for the former, [Tom] opted to build a quick hand support for surface-mount work, and the results are impressive considering it’s built entirely of scrap.

It’s just a three-piece arm with standard butt hinges for joints; mounted so the hinge pins are perpendicular to the work surface and fitted with a horizontal hand rest, it constrains movement to a plane above the PCB. A hole in the hand rest for a small vacuum tip allows [Tom] to pick up a part and place it on the board — he reports that the tackiness of the solder paste is enough to remove the SMD from the tip.

Simple Mechanism Gives Support for SMT Assembly

Reflowduino: Circuit Board Assembly for Everyone

Timothy Woo has launched a Indiegogo campaign to manufacture his open-source, Arduino-compatible, wireless PCB reflow oven controller:

vwqlvw1alqs19g9mq16x.jpg.png

Reflowduino: Circuit Board Assembly for Everyone!

Reflowduino is the first completely open-source, Arduino-compatible reflow oven controller of its kind that enables practically anyone to assemble their own beautiful circuit boards at home!

Reflowduino comes loaded with features, all in a compact Arduino-compatible package, with full documentation, example code, demo app, and comprehensive wiki on Github.

ecriw1wwk9mpio5pmbz4

Reflowduino is designed to be extremely easy to use! The general concept is to switch the power of the appliance on or off with a solid-state relay as shown below, measuring the temperature by placing the thermocouple tip inside the oven during the whole process.

If nothing else, please share this campaign to your friends, family, and anyone who might be interested on social media! Remember that every view counts for me, and I’m depending on you to make this happen!

arynyhrvcfd87k9omiwx

Reflowduino: Circuit Board Assembly for Everyone

Micro SD Extension Cable

 writes on the Tindie blog:

extension1-wb

Micro SD Extension Cable

Weirdly, one problem with memory now being so small is that these drives can be placed in areas that are difficult to access. Usually this means some sort of USB adapter (another amazing improvement over serial or parallel ports), but if you just want an actual SD extension cable in the form of a micro SD card, here it is! This device was conceived of when programming a BeagleBone Black, and could have lots of other applications.

extension2

I designed this little tool while compiling a software installation on BeagleBone Black. I needed to repetitively remove/inset the micro SD card. The BeagleBone was installed in a hard-to-reach area. So much time was wasted trying to inset the card with tweezers.

This simple tool plugs into the hard-to-reach socket, and provides a flexible extension.

Length: 3.5″

Screenshot from 2017-10-19 12-47-58.png

Micro SD Extension Cable

Want to try flex?

UPDATE 2018-01-03:

We are still testing our flex process. We just sent our second round off to fab this week.

The previous round was delivered to folks starting Hackaday Supercon weekend back in November 2017. Here some more information:

Flex Beta Service Info + FAQ

We were pleased to see Trammell Hudson’s creative Catalan design:

DOZLsL_U8AA9bc9

Screenshot from 2018-01-05 10-06-52

For more information, please email: [email protected]


We’re looking for a variety of flex designs to test.  The specs will be the same as our normal 2 layer service but on Kapton:

  • 6 mil minimum trace width
  • 6 mil minimum trace spacing
  • 10 mil minimum drill
  • 5 mil annular ring

Please send us an email with “flex” in the subject: [email protected]

Want to try flex?

ATXMega32E5 adapted for a breadboard

2017-07-04T23:35:25.015Z-IMG_8570.jpg.855x570_q85_pad_rcrop.jpg

ATXMega32E5 breakout board

The ATXMega32E5 is the next step up for those experienced with the AVR series of microcontrollers from Microchip (formerly Atmel). They use the same compilers and libraries as the rest of the AVR 8- and 16-bit families, but they can run at 32 MHz and have an amazingly powerful set of internal peripherals that can take your projects to the next level and beyond.

2017-07-04T23:35:25.015Z-IMG_8571.jpg.855x570_q85_pad_rcrop.jpg

For prototyping, however, the disadvantage is that the XMega chips are not available as through-hole parts. That’s where this breakout board comes into play.

nsayer has shared the board on OSH Park:

ATXMega_E5 breakout v1.0

9ccb24bd9f9b447019c3a97cfa9dd06b.png
Order from OSH Park

ATXMega32E5 adapted for a breadboard

EasyPWR

From mcu_nerd on Hackaday.io:

1456891490358322562.JPG

EasyPWR

A small, easy to assemble board that makes use of old wall warts.


Like many of us, I had a bunch of various wall-warts lying around, but sadly though none of them produced a regulated 5V/3.3V. I had some 78xx regulators around, so I went into KiCad and made a board to make those wall-warts useful! Changing the world by saving old wall warts from the dumpster!

EasyPWR

Ultrasound Imaging with Raspberry Pi

 writes on the Hackaday blog:20170529_203924_notes

Best Product Entry: A HSDK for Ultrasound Imaging

As an entry into this year’s Best Product portion of the Hackaday Prize, [kelu124] is developing a hardware and software development kit for ultrasound imaging.

Ultrasound is one of the primary tools used in modern diagnostic medicine. Head to the doctor with abdominal pain, and you can bet you’ll be seeing the business end of an ultrasound system. While Ultrasound systems have gotten cheaper, they aren’t something everyone has in the home yet.

AD9200

[kelu124] is working to change that by building a hardware and software development kit which can be used to explore ultrasound systems. This isn’t [kleu124’s] first rodeo. HSDK builds upon and simplifies Murgen, his first open source ultrasound, and an entry in the 2016 Hackaday prize. [kelu124’s] goal is to “simplify everything, making it more robust and more user-friendly”.

setup.png

The system is driven by a Raspberry Pi Zero W. A custom carrier board connects the Pi to the pulser block, which sends out the ultrasonic pings, and the analog front end, which receives the reflected signals. The receiver is called Goblin, and is a custom PCB designed [kelu124] designed himself. It uses a variable gain amplifier to bring reflected ultrasound signals up out of the noise.


Ultrasound Imaging with Raspberry Pi