We’ve been big fans of the Arduboy since [Kevin Bates] showed off the first prototype back in 2014. It’s a fantastic platform for making and playing simple games, but there’s certainly room for improvement. One of the most obvious usability issues has always been that the hardware can only hold one game at a time. But thanks to the development of an official add-on, the Arduboy will soon have enough onboard storage to hold hundreds of games
Even the rear silkscreen was a community effort.
The upgrade takes the form of a small flexible PCB that gets soldered to existing test points on the Arduboy. Equipped with a W25Q128 flash chip, the retrofit board provides an additional 16 MB of flash storage to the handheld’s ATmega32u4 microcontroller; enough to hold essentially every game and program ever written for the platform at once.
Of course, wiring an SPI flash chip to the handheld’s MCU is only half the battle. The system also needs to have its bootloader replaced with one that’s aware of this expanded storage. To that end, the upgrade board also contains an ATtiny85 that’s there to handle this process without the need for an external programmer. While this is a luxury the average Hackaday reader could probably do without, it’s a smart move for an upgrade intended for a wider audience.
We’re proud to announce the Hackaday Remoticon, taking place everywhere November 6th – 8th, 2020. It’s a weekend packed with workshops about hardware creation, held virtually for all to enjoy.
But we can’t do it without you. We need you to host a workshop on that skill, technique, or special know-how that you acquired through hard work over too many hours to count. Send in your workshop proposal now!
What is a remoticon?
The Hackaday Remoticon achieves something that we just couldn’t do at the Hackaday Superconference: host more workshops that involve more people. Anyone who’s been to Supercon over the past six years can tell you it’s space-limited and, although we do our best to host a handful of workshops each day, those available seats are always in high demand.
We’re sad that we can’t get together in person for Supercon this year, but now we have an opportunity to host more workshops, engaging more live instructors and participants because they will be held virtually. This also means that we can make recordings of them available so that more people can learn from the experience. This is something that we tried way back during the first Supercon with Mike Ossmann’s RF Circuit Design workshop and 140,000 people have watched that video. (By the way, that link is worth clicking just to see Joe Kim’s excellent art.)
Now I’m not saying that your workshop will have a view count into six digits. What I am saying is that you have skills worth sharing, and people are hungry to learn. Since traveling to massive conferences is on pause for a while, spinning up a way to share your experience with others is a superb use of your time.
We need you to submit a workshop proposal! This can take any shape that makes sense for your topic, but here’s the gist of how this might work. Each accepted workshop makes a list of necessary materials and where to get them so that participants can order ahead of time and follow along. Live workshops will be held via video conference, with periods of instruction, work time, and recap that lets participants ask questions and show results as they go.
Wait, wait, wait. Before you click away to the next awesome Hackaday article, don’t assume you have nothing to teach. In fact, do the opposite. Assume you have rare and specialized knowledge on something (because you do!) and seek that out. Then unleash your mind to form a workshop idea around it. Hackaday is filled with weird, wild, and interesting projects, and we always want to see more of them. Share the wealth so that more people begin to walk the path of the hardware hacker
🎊 DIN SPEC 3105 "open source hardware, requirements for technical documentation" is out 🎊 ! Check it out in the GitLab repo of this community initiative 👉🏻 https://t.co/c1wGEa9Zre (1/5)
The icing on the cake: this is the first standard to be published by DIN under cc license and to adopt an open and community based process for any of the new version to come! It’s both a progress for open source hardware AND for standardisation processes as such!
The icing on the cake: this is the first standard to be published by DIN under cc license and to adopt an open and community based process for any of the new version to come! It's both a progress for open source hardware AND for standardisation processes as such! (5/5)
Standardisation is an important component in the maturation of any field of technology. It contributes to the formation of a recognisable identity and enables interactions with a wider community. This article reviews past and current standardisation initiatives in the field of Open Source Hardware (OSH). While early initiatives focused on aspects such as licencing, intellectual property and documentation formats, recent efforts extend to ways for users to exercise their rights under open licences and to keep OSH projects discoverable and accessible online. We specifically introduce two standards that are currently being released and call for early users and contributors, the DIN SPEC 3105 and the Open Know How Manifest Specification. Finally, we reflect on challenges around standardisation in the community and relevant areas for future development such as an open tool chain, modularity and hardware specific interface standards.
We are saddened to read the news today that Grant Imahara has passed away. Mike Szczys writes more on Hackaday:
We awake this morning to sad news of the premature passing of Grant Imahara at the age of 49 due to a brain aneurysm. Grant was best known for his role on the wildly popular Mythbusters television show on which he starred and built test apparatus for seasons three through twelve. He landed this role because he was a badass hardware hacker as much as he was an on-camera personality.
Grant received his degree in electrical engineering from USC in 1993 and landed a job with Lucasfilm, finding his way onto the Industrial Light and Magic team to work on blockbuster films like the Star Wars prequels (R2-D2 among other practical effects) and sequels to Terminator and The Matrix. Joining the Mythbusters team in 2005 was something of a move to rapid prototyping. Each of the 22-minute episodes operated on a 10-day build and a film cycle in which Grant was often tasked with designing and fabricating test rigs for repeatable testing with tightly controlled parameters.
After leaving the show, Grant pursued several acting opportunities, including the Kickstarter funded web series Star Trek Continueswhich we reported on back in 2013. But he did return to the myth busting genre with one season of The White Rabbit Project on Netflix. One of the most genuinely geeky appearances Grant made was on an early season of Battlebots where his robot ‘Deadblow’ sported a wicked spiked hammer. Video of his appearance in the quarter-finals is like a time-capsule in hacker history and guaranteed to bring a smile to your face.
Grant Imahara’s legacy is his advocacy of science and engineering. He was a role model who week after week proved that questioning how things work, and testing a hypothesis to find answers is both possible and awesome. At times he did so by celebrating destructive force in the machines and apparatus he built. But it was always done with observance of safety precautions and with a purpose in mind (well, perhaps with the exception of the Battlebots). His message was that robots and engineering are cool, that being a geek means you know what the heck you’re doing, and that we can entertain ourselves through creating. His message lives on through countless kids who have grown up to join engineering teams throughout the world.
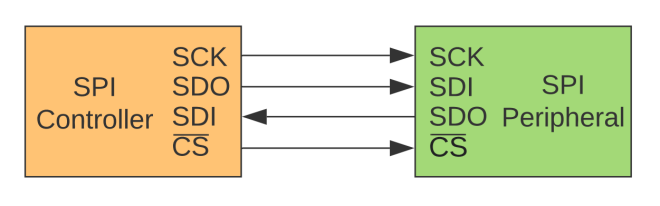
We, the undersigned, encourage educators, engineers, designers, and community members to discontinue the use of the terms MOSI/MISO/SS and in their place use SDO/SDI/CS.
New signal names:
SDO – Serial Data Out. An output signal on a device where data is sent out to another SPI device.
SDI – Serial Data In. An input signal on a device where data is received from another SPI device.
CS – Chip Select. Activated by the controller to initiate communication with a given peripheral.
COPI (controller out / peripheral in). For devices that can be either a controller or a peripheral; the signal on which the device sends output when acting as the controller, and receives input when acting as the peripheral.
CIPO (controller in / peripheral out). For devices that can be either a controller or a peripheral; the signal on which the device receives input when acting as the controller, and sends output when acting as the peripheral.
SDIO – Serial Data In/Out. A bi-directional serial signal.
Deprecated signal names:
MOSI – Master Out Slave In
MISO – Master In Slave Out
SS – Slave Select
MOMI – Master Out Master In
SOSI – Slave Out Slave In
Signal names unchanged:
SCK – Serial Clock. The clock for the bus generated by the controller.
Designers should avoid signal names MOSI/MISO and instead use SDO/SDI. The SDI signal is defined by the perspective of the device. For example, the SDI signal on a sensor is the pin that receives data from the controller. Similarly, the SDO pin on a controller is the output pin that sends data to a peripheral.
It is best practice to use SDO/SDI and Controller/Peripheral. Change the way you write tutorials, create schematics, and diagrams. This is the best way to educate the next generation of users and engineers.
A process design kit (PDK) is a by now fairly standard part of any transformation of a new chip design into silicon. A PDK describes how a design maps to a foundry’s tools, which itself are described by a DRM, or design rule manual. The FOSSi foundation now reports on a new, open PDK project launched by Google and SkyWater Technology. Although the OpenPDK project has been around for a while, it is a closed and highly proprietary system, aimed at manufacturers and foundries.
The SkyWater Open Source PDK on Github is listed as a collaboration between Google and SkyWater Technology Foundry to provide a fully open source PDK and related sources. This so that one can create manufacturable designs at the SkyWater foundry, that target the 130 nm node. Open tools here should mean a far lower cost of entry than is usually the case.
We recognize it’s difficult to secure work in uncertain times. That’s why we have created a whole new category for the 2020 Hackaday Prize known as Dream Team Grants.
Dream Team challenges represent an opportunity to join a three-person task force. We are essentially recruiting top talent for our nonprofit partners, to help them solve some of their most pressing challenges. Each dream team member will be awarded two $3,000 grants for their work throughout the months of June and July.
24 Hours of Presentations, Workshops, Demos, and Exhibits Across All Time Zones
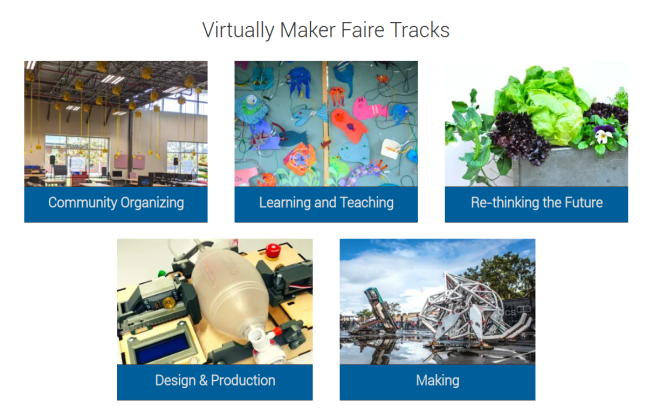
Across the world, makers have responded to shortages of medical supplies and equipment with agile designs, adaptive distributed manufacturing, and community organizing. Virtually Maker Faire will be a stage to share the projects and learn from the people behind this extraordinary civic response.
Virtually Maker Faire will take place online through video sessions and an exhibit showcase on Make: Projects
It was only last August that PJRC released Teensy 4.0. At that time, the 4.0 became the fastest microcontroller development board on the planet, a title it still holds as of this writing — or, well, not exactly. Today the Teensy 4.1 has been released, and using the same 600 MHz ARM Cortex M7 under the hood, is now also the fastest microcontroller board. What the 4.1 brings to the table is more peripherals, memory, and GPIOs. While Teensy 4.0 used the same small form factor as the 3.2, Teensy 4.1 uses the larger board size of the 3.5/3.6 to expose the extra goodies.
The now slightly older Teensy 4.0 — released on August 7th of last year — is priced at $19.95, with the new 4.1 version offered at $26.85. It seems that the 4.1 isn’t intended as a replacement for the 4.0, as they serve different segments of the market. If you’re looking for an ultra-fast affordable microcontroller board that lives up to its Teensy name, the 4.0 fits the bill. On the other hand, if you need the additional peripherals broken out and can afford the space of the larger board, the not-as-teensy-sized 4.1 is for you. How big is it? The sample board I measured was 61 x 18 mm (2.4 x 0. 7″), not counting the small protrusion of the micro-usb jack on one end.
Let’s have a look at all the fun stuff PJRC was able to pack into this space.
100 MBPS ETHERNET
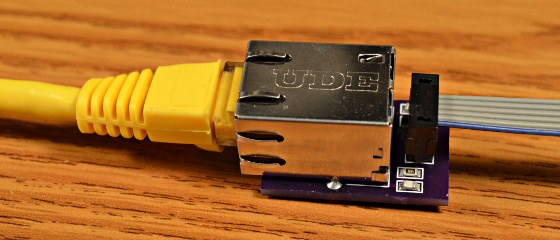
The big news is that Teensy 4.1 comes with 100 Mbps Ethernet support. To use the Ethernet port, you need to supply external magnetics and an RJ-45 jack. These were left off the board for obvious reasons — even using a jack with integrated magnetics (magjack), it wouldn’t fit on the PCB. Instead, a 6-pin header on the board can connect to an external interface. This also helps keep the price low for those who need the other features of the 4.1 without Ethernet connectivity.
PJRC will likely sell a DIY kit of the required parts in the future, but they don’t have a release date or pricing yet. For now, you can easily build your own using this OSH Park shared project. The parts list is in the project’s description, with the key part being the magjack, which will set you back around $2.55 in single quantities. Those building a board should note that this is an early version, and it turns out that only the 0.1 uF capacitor is necessary. Paul Stoffregen of PJRC told me that he just received a simpler PCB for testing, and will publish the design once it’s has been thoroughly verified.
The Ethernet port is capable of full 100 Mbps speed and supports the IEEE 1588 precision time protocol, which allows synchronization of clocks to within 100 ns over wired connections, enabling some very interesting possibilities. But, aside from that, just the inclusion of Ethernet on a microcontroller board is a big deal. Before this, you basically had two choices if you needed this kind of connectivity: use a powerful single-board-computer like a Raspberry Pi with all the latency and headaches the required operating system brings for doing low-level or real-time tasks, or add a slow SPI-interfaced Ethernet board to an existing microcontroller. Instead, you can now use the 600 MHz Cortex-M7 on this new board to run high-bandwidth, low-latency embedded applications without fighting an OS.