DIY 5V-3V Switching Converter in the Space of a TO-220 Package

From  on the Hackaday blog:

DIY 5V-3V Switching Converter in the Space of a TO-220 Package

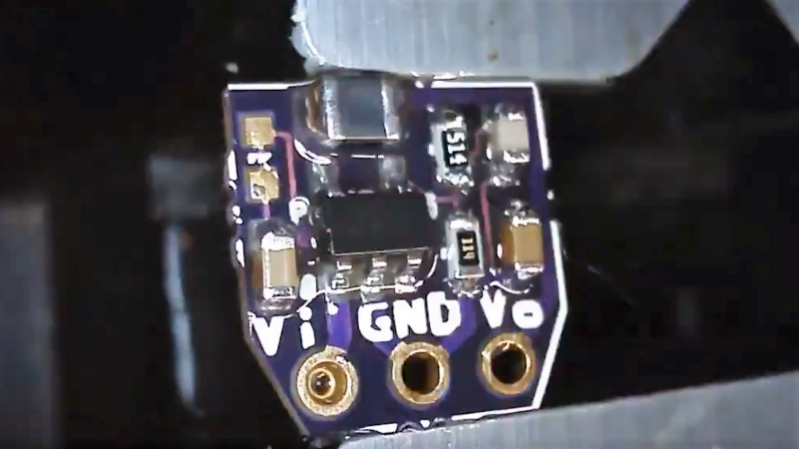
We’re suckers for miniaturization projects. Stuff anything into a small enough package and you’ve probably got our attention. Make that something both tiny and useful, like this 5-volt to 3.3-volt converter in a TO-220 sized package, and that’s something to get excited about. It’s a switch mode power supply that takes the same space as a traditional linear regulator.

Granted, the heavy lifting in [Kevin Hubbard]’s diminutive buck converter is done by a PAM2305 DC-DC step-down converter chip which needs only a few supporting components. But the engineering [Kevin] put into this to squeeze everything onto a scrap of PCB 9-mm on a side is impressive. The largest passive on the board is the inductor in 0805. Everything else is in 0603, so you’ll be putting your SMD soldering skills to the test if you decide to make this. Check the video after the break for a speedrun through the hand soldering process

The total BOM including the open-source PCB only runs a buck or two, and the end result is a supply with steady 750-mA output that can handle a 1-A surge for five seconds. We wonder if a small heatsink tab might not help that; along with some black epoxy potting, it would at least complete the TO-220 look.

[Kevin]’s Black Mesa Labs has a history of turning out interesting projects, from a legit video card for Arduino to a 100-watt hotplate for reflow work that’s the size of a silver dollar. We’re looking forward to whatever’s next — assuming we can see it.

DIY 5V-3V Switching Converter in the Space of a TO-220 Package

Nicely Engineered Boost Converter Powers Nixies from USB Charger

Love them or hate them, Nixies are here to stay. Their enduring appeal is due in no small part to the fact that they’re hardly plug-and-play; generating the high-voltage needed to drive the retro displays is part of their charm. But most Nixie power supplies seem to want 9 volts or more on the input side, which can make integrating them into the typical USB-powered microcontroller project difficult.

Fixing that problem is the idea behind [Mark Smith]’s 5-volt Nixie power supply. The overall goal is simple: 5 volts in, 170 volts out at 20 mA. But [Mark] paid special care to minimize the EMI output of the boost converter through careful design, and he managed to pack everything into a compact 14-cm² PCB. He subjected his initial design to a lot of careful experimentation to verify that he had met his design goals, and then embarked on a little tweaking mission in KiCad to trim the PCB’s footprint down by 27%. The three separate blog posts are well worth a read by anyone interested in learning about electronics design.

Now that [Mark] has his Nixie power supply, what will become of it? We can’t say for sure, but it’ll be a clock. It’s always a clock. Unless it’s a power meter or a speedometer.

via Nicely Engineered Boost Converter Powers Nixies from USB Charger — Hackaday

Nicely Engineered Boost Converter Powers Nixies from USB Charger

Optimizing the 5v to 170v Nixie Tube Power Supply Design

From Mark Smith on the Surf ‘n Circuits blog:

img_5710-e1517644972331

Optimizing the 5v to 170v Nixie Tube Power Supply Design

A few years ago, while managing the power management product line at work, I started an initiative with the development team to optimize new products by achieving ESE.  ESE stands for Equations = Simulations = Experimentation.   The idea is centered on the engineering goal of product design to verify that the systems design equations match the simulation results and ultimately the experimental results.

When these three items match, not only do you understand a system, but you have the best chance to optimize a better solution.  I’ll have to say that in today’s mad dash to get new products out the door, achieving ESE is not always possible.    But to break through the ordinary and have a chance for the extraordinary, I would say this is a requirement.    Since this power supply is just a fun design for an upcoming nixie tube clock project of mine, I have the time to achieve ESE.

The updated schematic, BOM, Kicad Layout, and design files are located at Github:

Screenshot from 2018-02-20 12-51-12

surfncircuits has shared the board on OSH Park:

NixieSupply5vto160vDCMBoost_Rev2_1804

a33e35e34768a5ee94a5a2c05456fffd
Order from OSH Park

Here is a quick video showing six IN-4 Nixie tubes being powered by a 5v iPhone charger:

Optimizing the 5v to 170v Nixie Tube Power Supply Design

Tindie Seller Interview: Jakub Polonský and His “MightyWatt” Load

mightywatt-676x451

Jakub Polonský and His “MightyWatt” Load

There are people of diverse backgrounds selling on Tindie, but as far as I know, Jakub Polonský is the only one here with a PhD in electrochemistry. Though this gave him a good background in testing of electronic quantities for electrochemical systems, as far as designing electronics, he’s self taught. He graduated in 2012, but started with Arduino boards in 2010, allowing him to use this versatile tool for research purposes.

Check out our previous blog post for more information on the project:

The MightyWatt: a 70W Electronic Load Kit

2015-08-22t171951-401z-disassembled2-5-855x570_q85_pad_rcrop.jpg

Tindie Seller Interview: Jakub Polonský and His “MightyWatt” Load

USB-C PD Buddy Sink

From Clayton G. Hobbs on Hackaday.io:

7865191490032430260.JPG

PD Buddy Sink

USB Power Delivery for everyone

USB Power Delivery is a cool standard for getting lots of power—up to 100 W—from a USB Type-C port. Being an open standard for supplying enough power to charge phones, laptops, and just about anything else under the sun, USB PD is poised to greatly reduce the amount of e-waste produced worldwide from obsolete proprietary chargers. Unfortunately, like all USB standards, it’s quite complex, putting it out of reach of the average electronics hobbyist.

PD Buddy Sink solves this problem, letting any hacker or maker use USB PD in their projects. Think of it as a smart power jack. To use it, first configure a voltage and current via the USB configuration interface. Then whenever the Sink is plugged in to a USB PD power supply, it negotiates the power your project needs and provides it on the output connector.

The KiCad design files are available on his website:

pd-buddy-sink

USB-C PD Buddy Sink