Alvaro Prieto’s Chaac Weather Station

image_DRZubHKyGA

From Gareth Halfacree on Hackster:

Alvaro Prieto Walks Through a Year of Chaac Weather Station Designs, Upgrades, and Enhancements

Alvaro Prieto has published a write-up of his latest weather station board, the Chaac v4.0, which adds Bluetooth connectivity to his existing XBee-based design.

The Chaac project has been ongoing for some time: Prieto documented his original efforts to build a weather station a year ago, walking through a range of improvements that went from an nRF52-based Bluetooth Low Energy prototype through to a breakout board for the Nucleo development board, and the integrated Chaac board versions 1.0 through 1.2 — the latter adding in solar panel voltage monitoring.

In the year since, Prieto has been working on upgrading the Chaac design — and has gathered all the improvements into a single write-up, beginning with the Chaac v2.0 which combined the existing XBee-based communication system with an nRF52811 for Bluetooth connectivity.

Alvaro Prieto’s Chaac Weather Station

Printed It: Print-in-Place PCB Gripper

The goal of Printed It is to showcase creations that truly embrace the possibilities offered by desktop 3D printing. The most obvious examples are designs that can be printed quickly and cheaply enough that they’re a valid alternative to commercially available products. But as previous entries into the series have shown, there are also technical considerations. […]

Printed It: Print-in-Place PCB Gripper
Printed It: Print-in-Place PCB Gripper

AtomSoft uses flex for tiny DimeDuino

From the AtomSoftTech blog:

DimeDuino

This time around i give you the DimeDuino. Its a Flex PCB based which utilizes the ATMEGA328P. Using this MCU allows for the installation of the Arduino bootloader. Hence the Duino in the name. These will come pre-programmed with the bootloader. One portion of the circle is just for programming. There is a GND, VCC,RXI, TXO and DTR & RST depending on your programmer.

As soon as its available ill post it here and on Twitter.

Specs:

  • Atmega328 running at 3.3v/8MHz or 5v/16MHz
  • Power LED (Green)
  • User LED (D13– Color may vary but mainly Blue)
  • Reset Button
  • 3.3v(AP2112K) or 5v (AP7335A) Linear step down
  • Flash 32KB (2KB is Bootloader)
  • SRAM 2KB
  • EEPROM 1KB
  • 20 I/O Pins (A6 & A7 are not used here. Input Only anyway)
    • 1 UART D0 (RX) and D1 (TX)
    • 1 SPI D10 (SS), D11 (MOSI), D12 (MISO), D13 (SCK)
    • 1 I2C A4 (SDA) and A5 (SCL)
    • 6 PWM D3, D5, D6, D9, D10, and D11
    • 14 I/O D0-D13


Quote

Tablet Oscilloscope Claims 100 MHz, But Is It?

[LearnElectronics] was skeptical of the 100 MHz claim and it looks like it is more like a 30 MHz analog bandwidth. Despite that, it does seem like a pretty capable 30 MHz scope in a very handy form factor and a very cheap price: as little as $120 or so, depending on where you shop.

via Tablet Oscilloscope Claims 100 MHz, But Is It? — Hackaday

https://www.youtube.com/watch?time_continue=360&v=xXOjb54F9JE&feature=emb_title

Quote

Olimex designing powerful Linux board with KiCad

Gareth Halfacree writes on Hackster about Olimex’s new project:

image_E9ubjjH3kO

Olimex’s Tukhla, Built Around the i.MX8QuadMax, Targets Open-Hardware Linux Power Users

Bulgarian open-hardware specialist Olimex has revealed details of what it describes as its “most complex OSHW board yet:” an NXP iMX8QuadMax-based single-board computer dubbed the Tukhla.

“[A] company from EU which values the OSHW [Open Source Hardware] recognized the absence of high-end open source Linux board and asked us to design one,” Olimex’s Tsvetan Usunov explains. “They offered to cover all associated design costs. They specially requested this to be not yet another [Rockchip] RK3399 board, but based on SoC with proper documentation and software support. NXP’s high end iMX8QuadMax matched their requirements perfectly.”

“Currently all powerful Cortex-A72 comes from Chinese or Korean origin and are always closed projects, the only published info in best case is PDF schematic which can’t be verified i.e. the final product may or may not match what they publish. The popular Raspberry Pi goes even further and their ‘schematics’ are just connector diagrams.”

The Tukhla, by contrast, will be a fully open design, Usunov promises — built in the open source KiCad electronic design automation (EDA) package. Aside from the iMX8 SoC itself — which includes two Arm Cortex-A72 cores, four Cortex-A53 cores, two Cortex-M4F cores, and a quad-core graphics processor with 32 OpenGL ES 3.2 and Vulkan compatible compute units — the board will include up to 16GB of LPDDR4 memory, microSD support, eMMC and QSPI flash storage, a SATA connector, two single-lane PCI Express connectors with NVMe support, HDMI input and output, USB 2.0 OTG and USB 3.0 Host support, two gigabit Ethernet ports, and two MIPI CSI camera connectors.

Olimex designing powerful Linux board with KiCad

Dream Team Members Announced for the 2020 Hackaday Prize

The Dream Team program is an exciting new element of the 2020 Hackaday Prize, with twelve people accepted to work full-time on a specific problem for each of our non-profit partners this summer. Each team of three is already deep into an engineering sprint to pull together a design, and to recognize their efforts, they’ll be receiving a $3,000 monthly microgrant during the two-month program.

Join us after the break to meet the people that make up each of the teams and get a taste of what they’re working on. We’ll be following along as they publish detailed work logs on the Dream Team project pages.

via Dream Team Members Announced for the 2020 Hackaday Prize

Quote

Qwiic GPIO expander based on PCF8574

Greg Steiert (@fpgahelper) has shared this Qwiic GPIO expander on Hackaday.io:

7879121594264360690 (1)

QGPIO: Qwiic GPIO expander based on PCF8574

This is a handy general purpose input/output Qwiic board. It provides 8 GPIO each with an LED indicator, and goes to a pin in a dual row 100mil header. The LEDs provides a nice visual output. The second row on the header is grounded, so jumpers can be used to drive the pins low for basic inputs. The 100mil pitch headers are also convenient for connecting to external circuits as well. The interrupt and VCC pins also have their own LEDs and header pins. There are two Qwiic connectors for pass through connections.

EcSsosvUEAE0DC4

Qwiic GPIO expander based on PCF8574

Give the gift of a personalized PCB keychain

From n°Garage offers personalized one square-inch keychains on Tindie:

2020-04-24T17_06_18.039Z-dolphin-bot

n°Keychain

This n°Keychain family consists of a series of one-square-inch keychains or pendants. These little beauties are perfect gifts for festival, graduation and remembrance. And more, write lovely words to make it unique and personal.

One order will have two keychains or pendants. To customize it, please choose the option from the drop down above if you would like to add personalized text.

  • Background Words(0~15chars): BRAVE / KIND / Curious / Hindsight 2020
  • Time Mark (0~15chars): Happy New Year / Happy Birthday / Class 2020
  • Name Tag (0~25chars): Alice / Rob / Queen Elizabeth School

If ordering the customizable option, please leave the details of the above inside the field of Additional Instructions at checkout. Please do not exceed the maximum number of characters for each field.

For personalized keychain, it may take about 5 to 9 workdays to ship after ordering. An email notification will be sent to you once shipped. Usually the shipping takes about 10 work-days.

Give the gift of a personalized PCB keychain

Build Your Own RF Lab: Scalar Network Analyzer

Whitney Knitter writes on Hackster about a simple scalar network analyzer that can be controlled by a Raspberry Pi for measuring the frequency response of filters and networks:

screen_shot_2020-06-21_at_12_39_16_am_QwvfFybZEx

Build Your Own RF Lab: Scalar Network Analyzer

With the popularity of wireless applications having become such a staple in the hobbyist community, the need for RF testing capabilities in the hobbyist realm has also increased. Anyone familiar with traditional RF test equipment knows that it is expensive. But challenges like this are what bring out the engineering creativity in this community. Steven Merrifield designed and laid out his own simple scalar network analyzer (SNA) using just a few IC chips. SNAs are handy for testing the frequency response of filters or networks.

A scalar network analyzer is used to test the amplitude of a device’s frequency response by outputting a sine wave sweeping over a certain frequency range (bandwidth) then measuring the amplitude of each incremental output frequency.

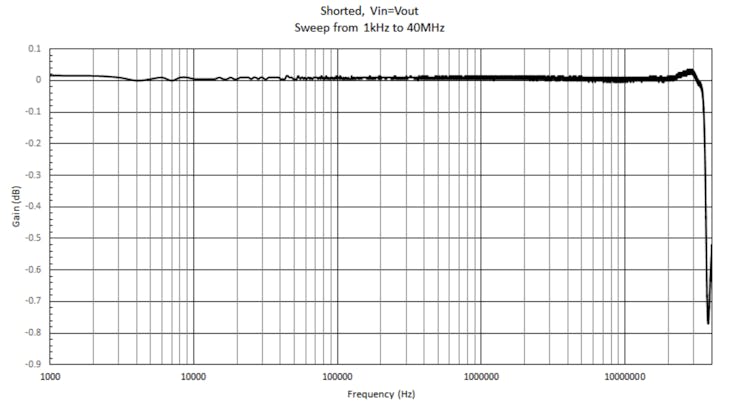
Thus if you directly connect the sine wave output of an SNA to its measurement input, then it will read a flat line of the same amplitude for each incremental output frequency of the sweep:

When a device is connected to the SNA, the amplitude of the sine wave at each frequency after going through the device will reflect the device’s frequency response over that bandwidth.

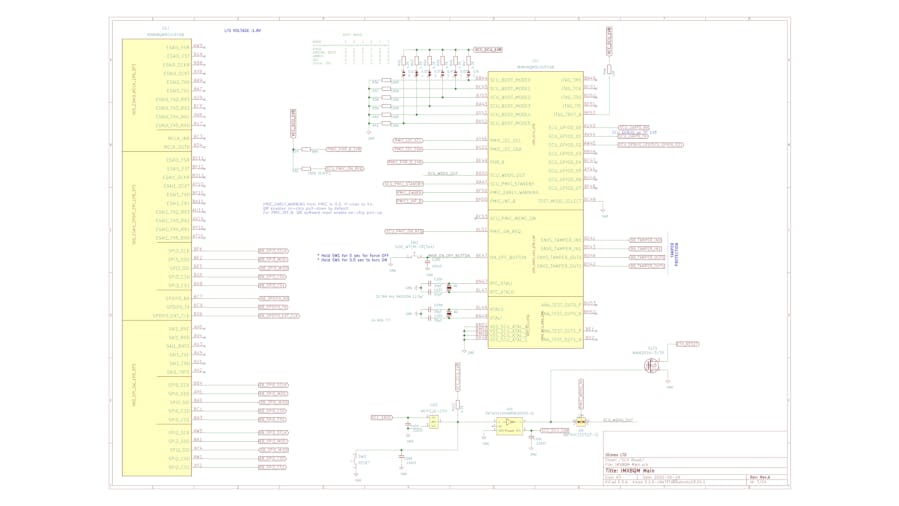
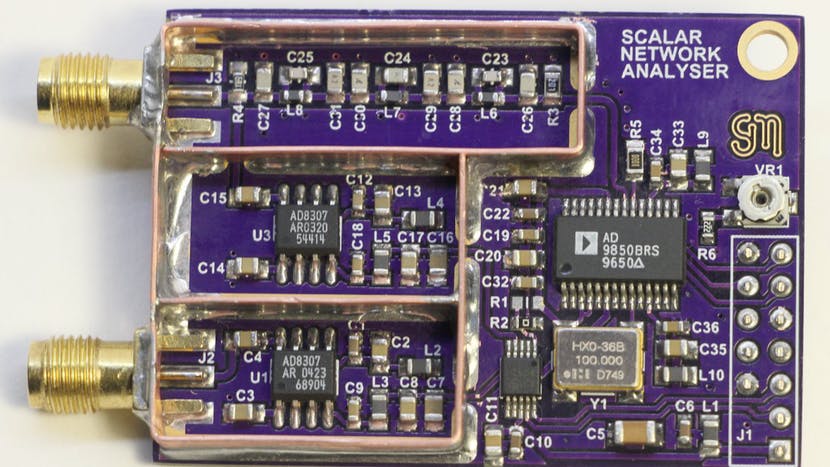
Merrifield’s design accomplishes an SNA’s functionality via implementation of a DDS Synthesizer chip, an ADC, and a logarithmic amplifier chip. The AD9850 DDS is responsible for outputting the sweeping sine wave while the AD8307 logarithmic amplifier conditions the signal input into the SNA for the log of the signal’s envelope before passing it on to the ADC for digitizing. A second AD8307 also conditions the output of the DDS and outputs it to a second channel of the ADC so that it can be used in software for compensation of any variations on the DDS’s output due to the effects of various loads of devices being tested.
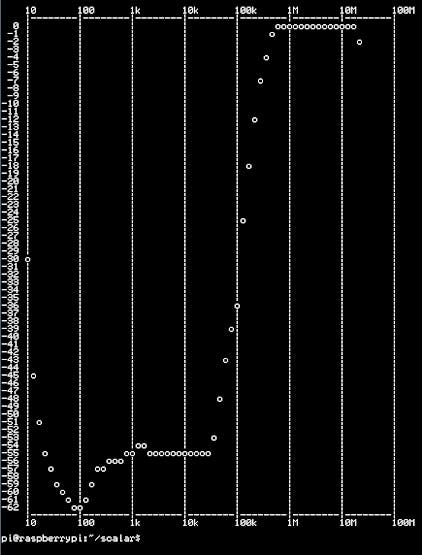
The ADC outputs its digital measurements via an I2C interface to a GPIO header that matches the Raspberry Pi’s GPIO header pinout, but any desired MCU or FPGA could be used. The source code Merrifield wrote is in C, making it easy for porting across different platforms.
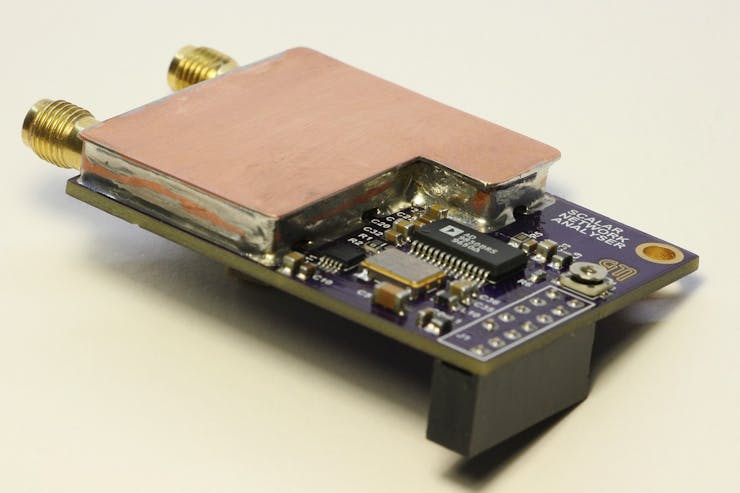
Check out Merrifield’s project logs here. He linked his PCB layout on OSH Park if you’re interested in ordering it and putting one of these together for your own lab!

Build Your Own RF Lab: Scalar Network Analyzer

KiCad class starts July 7th

Anool Mahidharia will be teaching an introduction to KiCAD and FreeCAD:
https___cdn.evbuc.com_images_103358060_360176848959_1_original

Classes are Tuesdays at 19:00 IST. Classes are recorded and released on the course page within a few weeks so you can learn at your convenience. Office Hours are Fridays at 1630 IST and limited to 30 people per session. A second session in evening PDT will be offered August 2020.

The complete course is 4 classes long. For those who would like to attend each class, please sign up for each class individually.

Overview: We’ll start off with a hand drawn schematic, and progress from schematic capture to creating production files such as Gerbers, BoM, and 3D CAD export. We’ll then switch to FreeCAD and do a simple enclosure design for our project.

Schedule: The course will consist of four sessions total. Each section will contain a video component and an office hour component where the instructor will be available for questions.

Prerequisites: It will help to have a good understanding of electronics and some basic understanding of engineering drawing.

KiCad class starts July 7th