Nick Pool has created an easy way to create silkscreen labels in EAGLE:
SparkFun Buzzard Label Generator
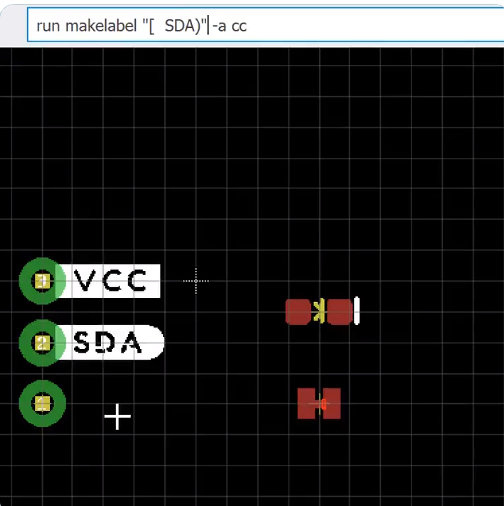
Greg Davill is now working on a version for KiCad:
Nick Pool has created an easy way to create silkscreen labels in EAGLE:
SparkFun Buzzard Label Generator
Greg Davill is now working on a version for KiCad:
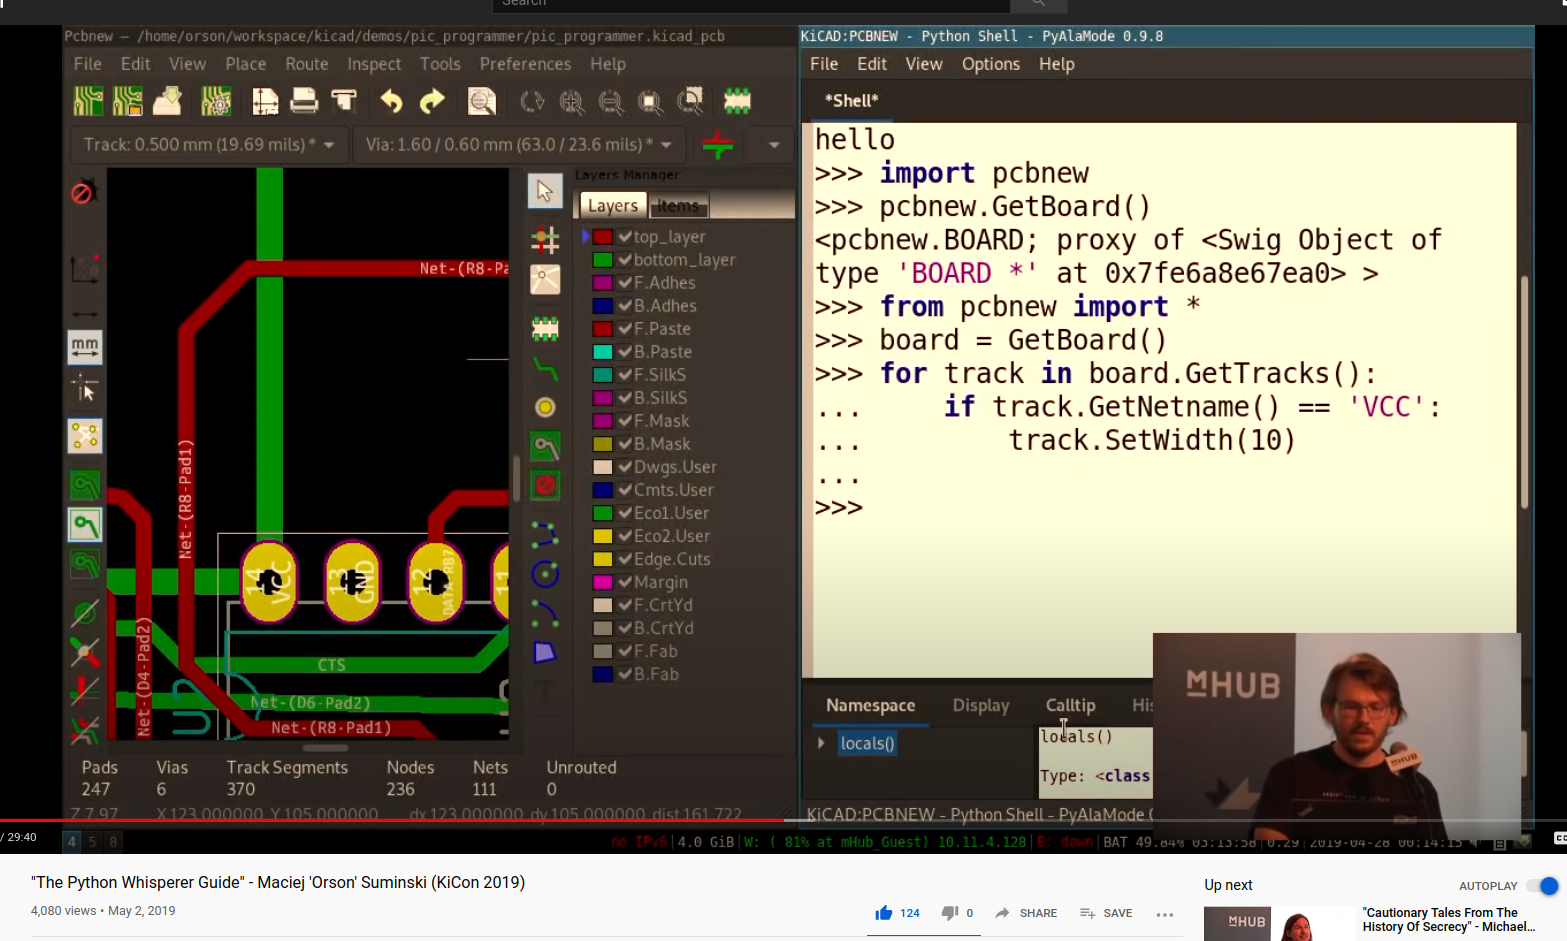
Great introduction to Python scripting in KiCad from Maciej ‘Orson’ Suminski:
The Python scripting interface in KiCad is a powerful tool that can relieve you from repetitive and tedious tasks. It is also a great method to address issues that are specific to your workflow and are not likely to be solved in the upstream code. In this talk, I will show you how to start your scripting adventure with KiCad by explaining the principles of python scripting and exploring a few examples. Do not be afraid…pythons are not venomous.
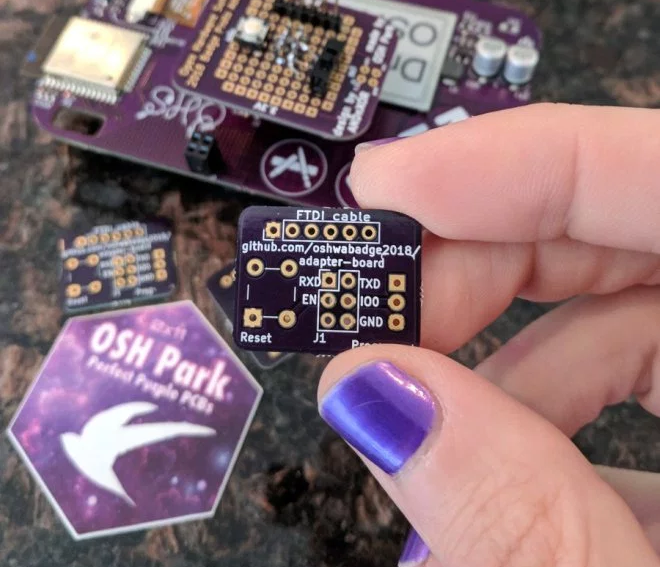
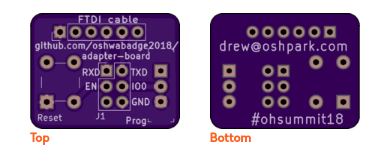
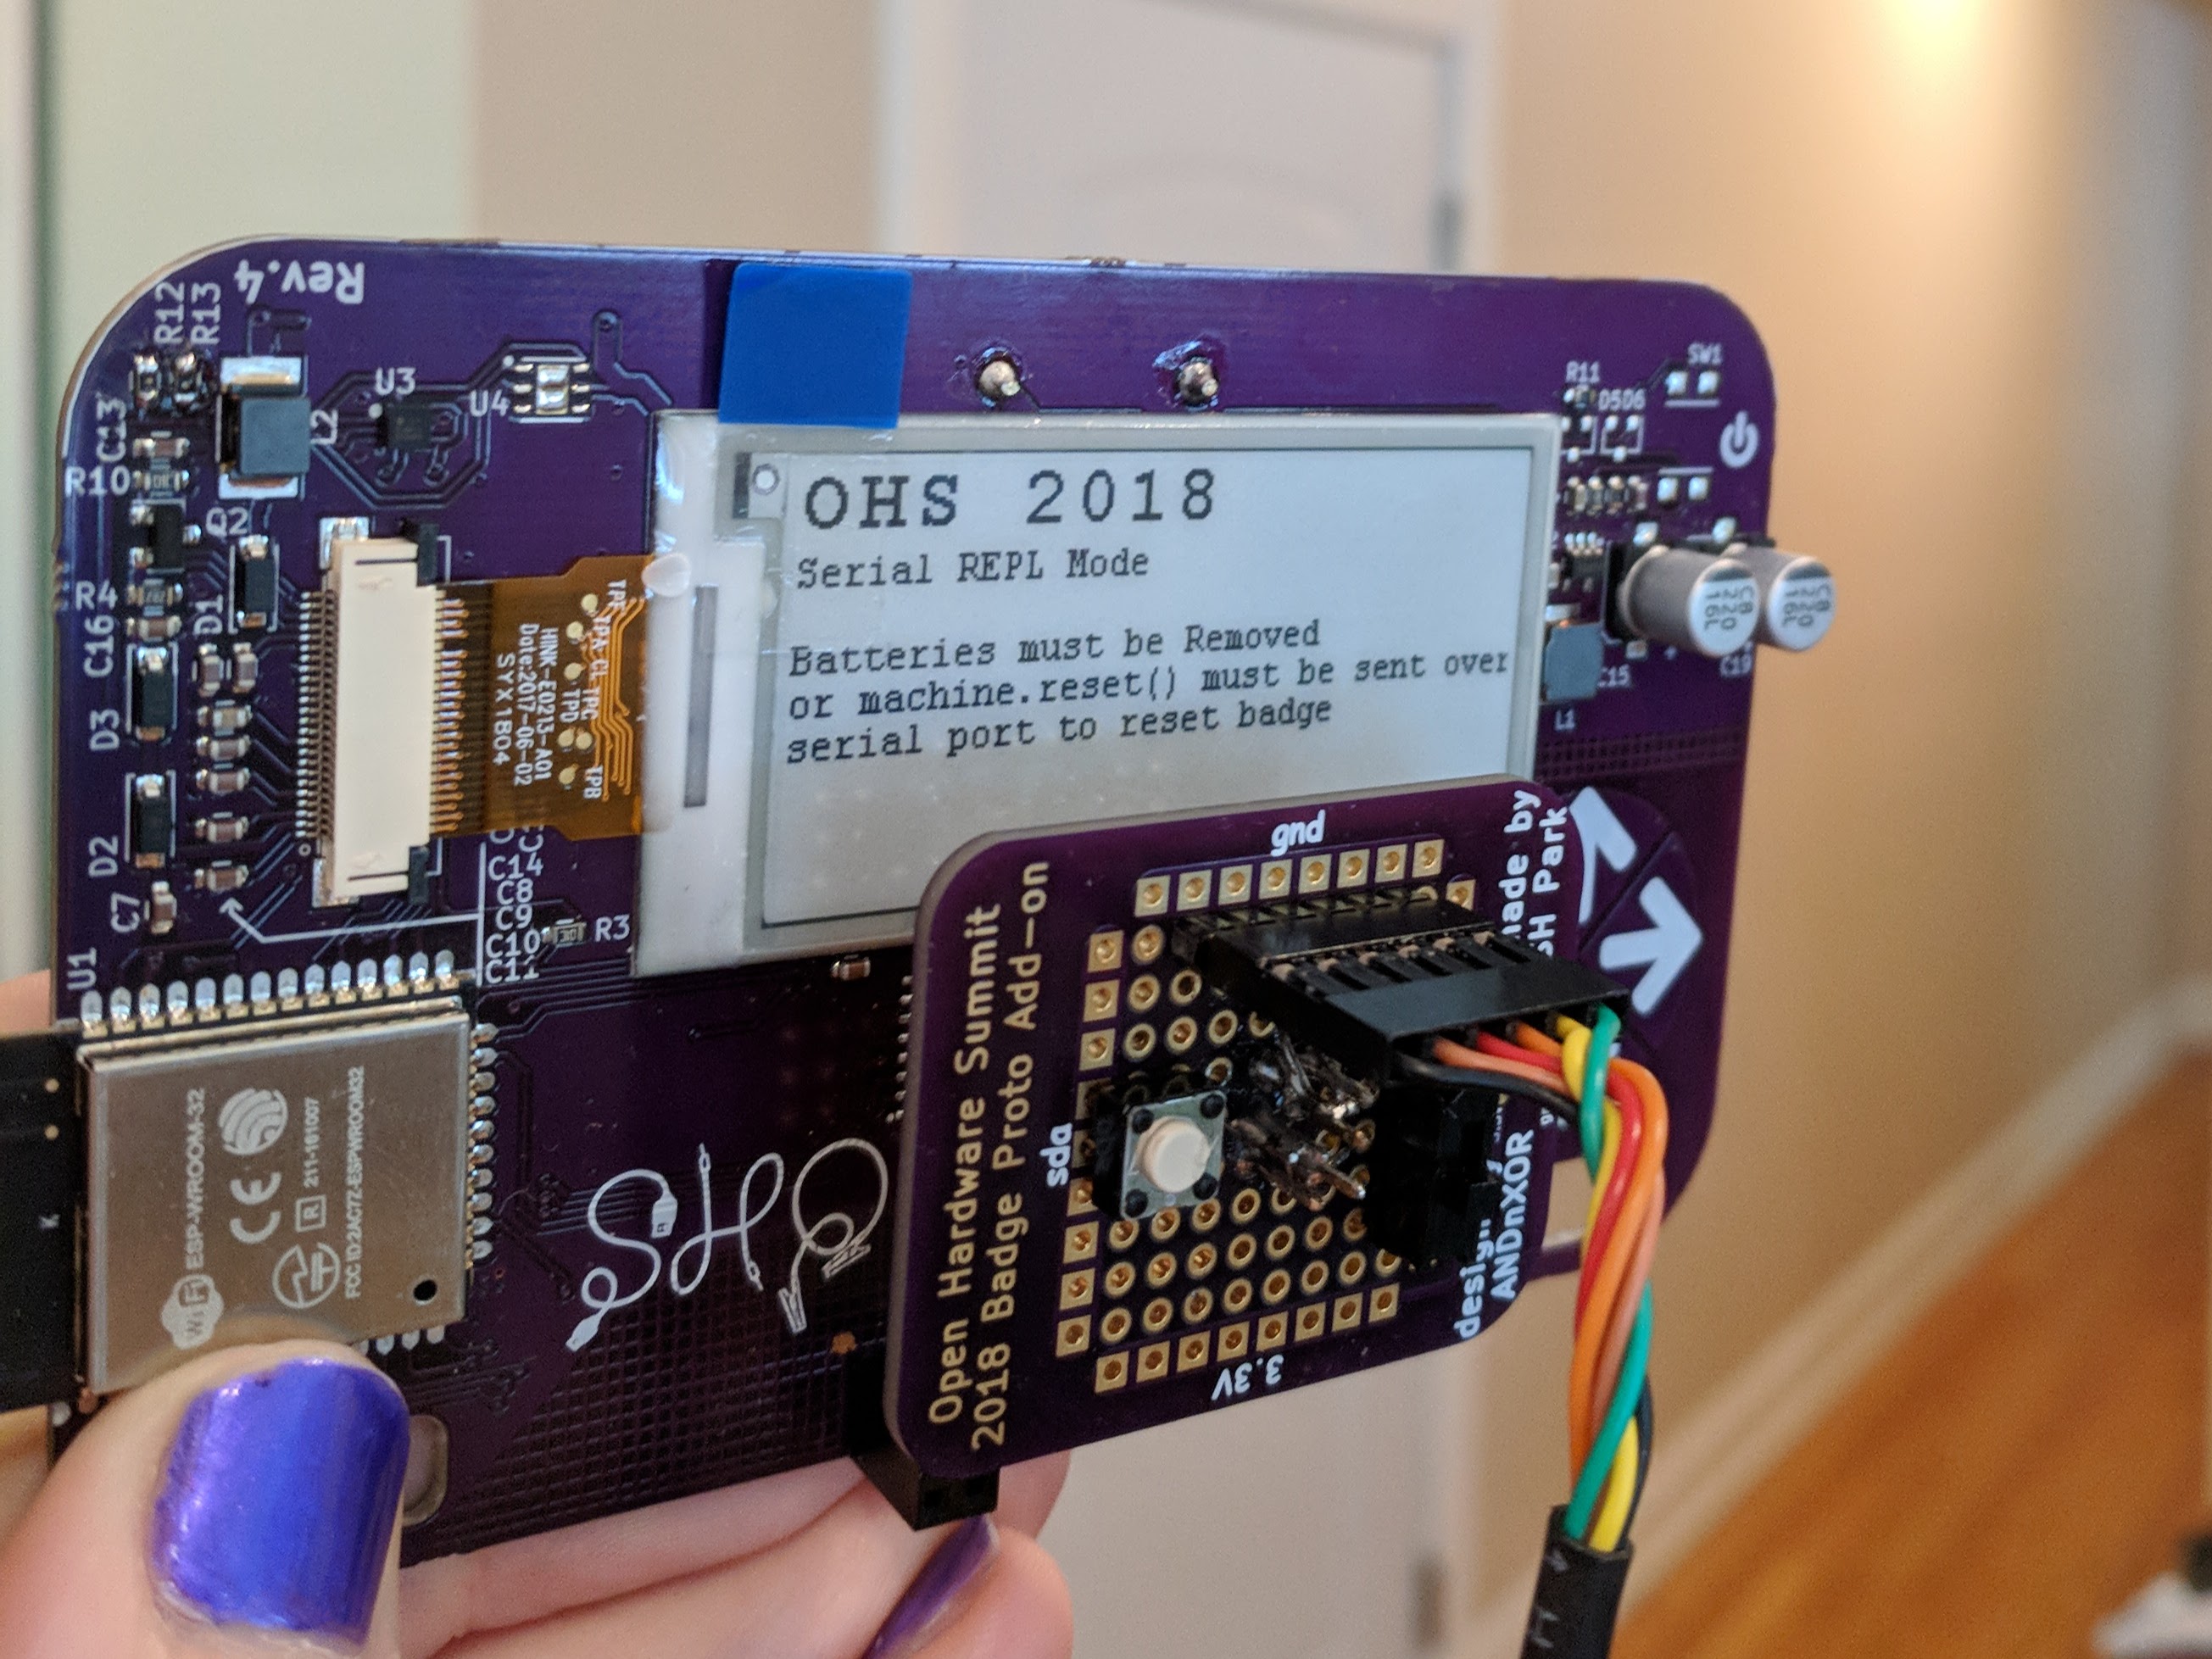
This adapter board to connects a USB-to-serial cable to the 2018 Open Hardware Summit badge.
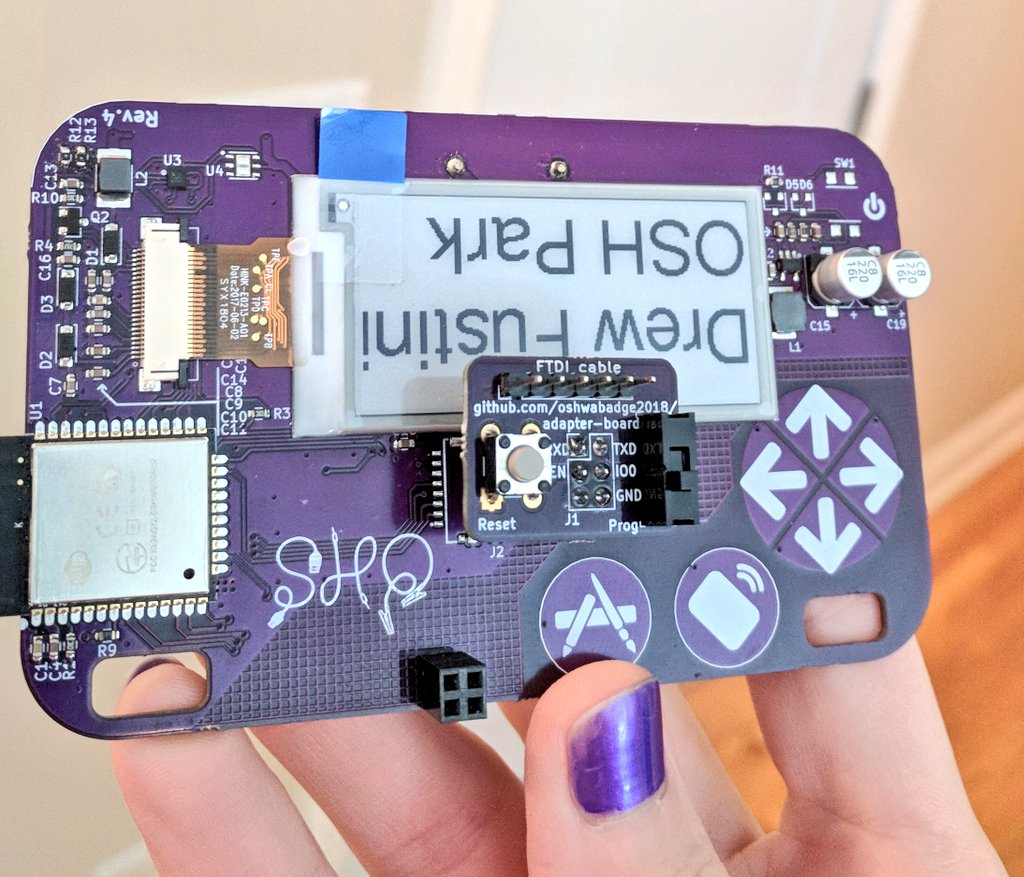
The badge features an ESP32 microcontroller running MicroPython firmware. The firmware provides a Python interpreter prompt (REPL) on the serial port which allows interactive programming of the badge!
A previous blog post describes how to build and flash new MicroPython firmware to the badge:
The KiCad design files are shared on GitHub:
 The board has been shared on OSH Park:
![]()

Resources:

UPDATE: this PCB design replaces the perf board version
The 2018 Open Hardware Summit badge features an ESP32 microcontroller running MicroPython firmware. The firmware provides a Python interpreter prompt (REPL) on the serial port which allows interactive programming of the badge!
This post describes how to connect an FTDI 3.3V USB to serial cable to the J1 header on the badge. In addition to the serial console, this adapter board for the J1 header enable new MicroPython firmware to be flashed on to the badge.
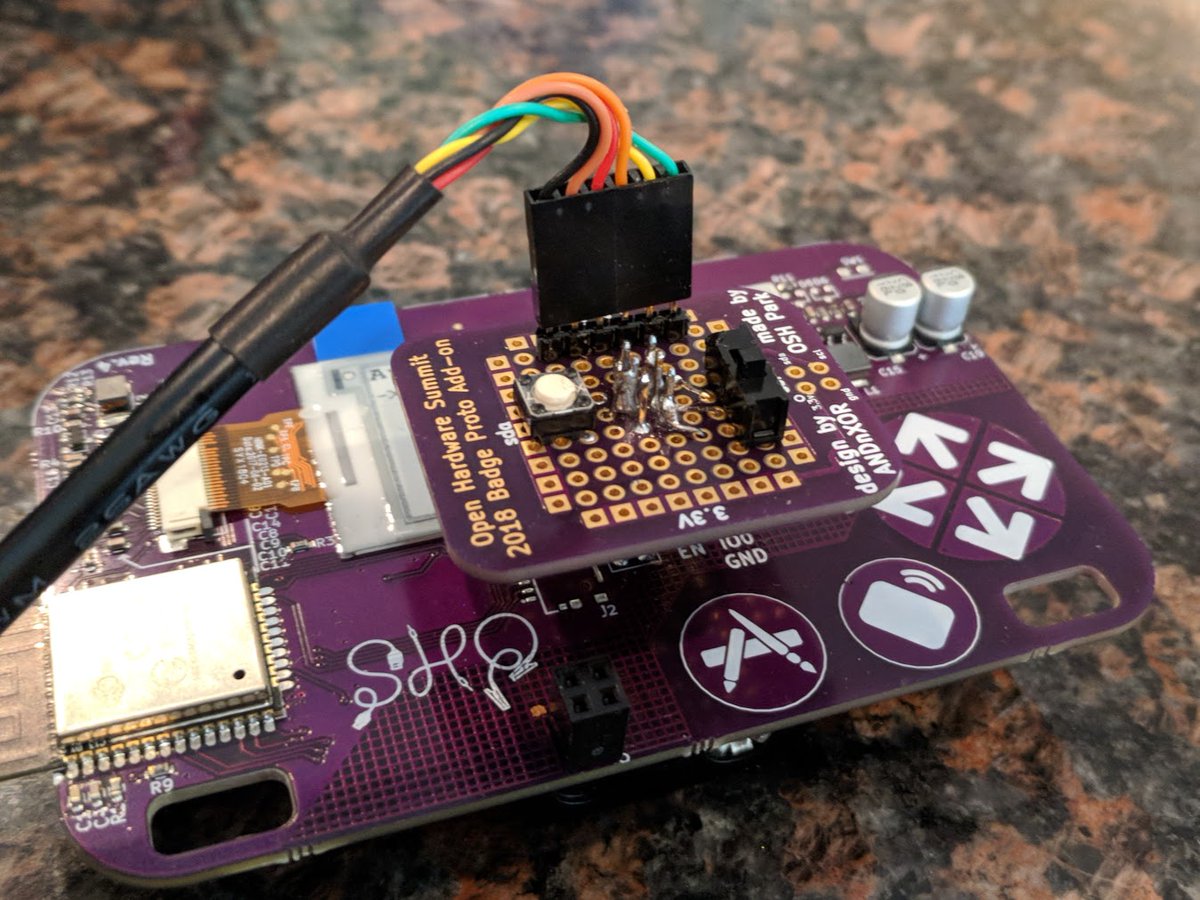
First, solder a 2×3 pin header socket on to the badge at the J1. Alternatively, a strip of 0.1″ header sockets could be cut into two 1×3 pieces.
Here is a Fritzing diagram (PDF) of how to solder this J1 adapter board onto a perf board:
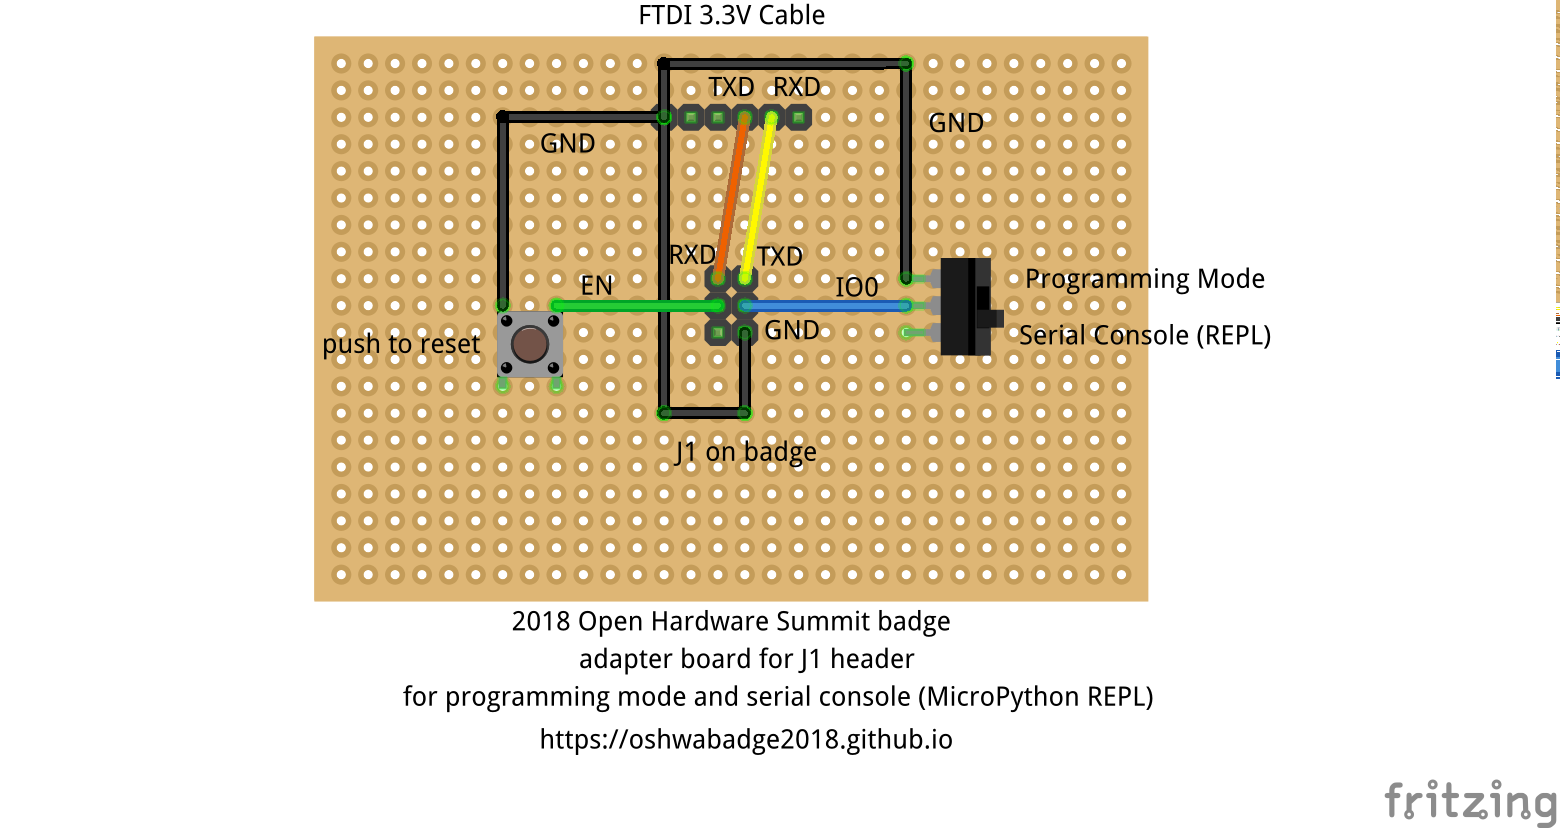
Note: I re-purposed the OHS18 badge add-on proto dev board to act as a generic perf board.
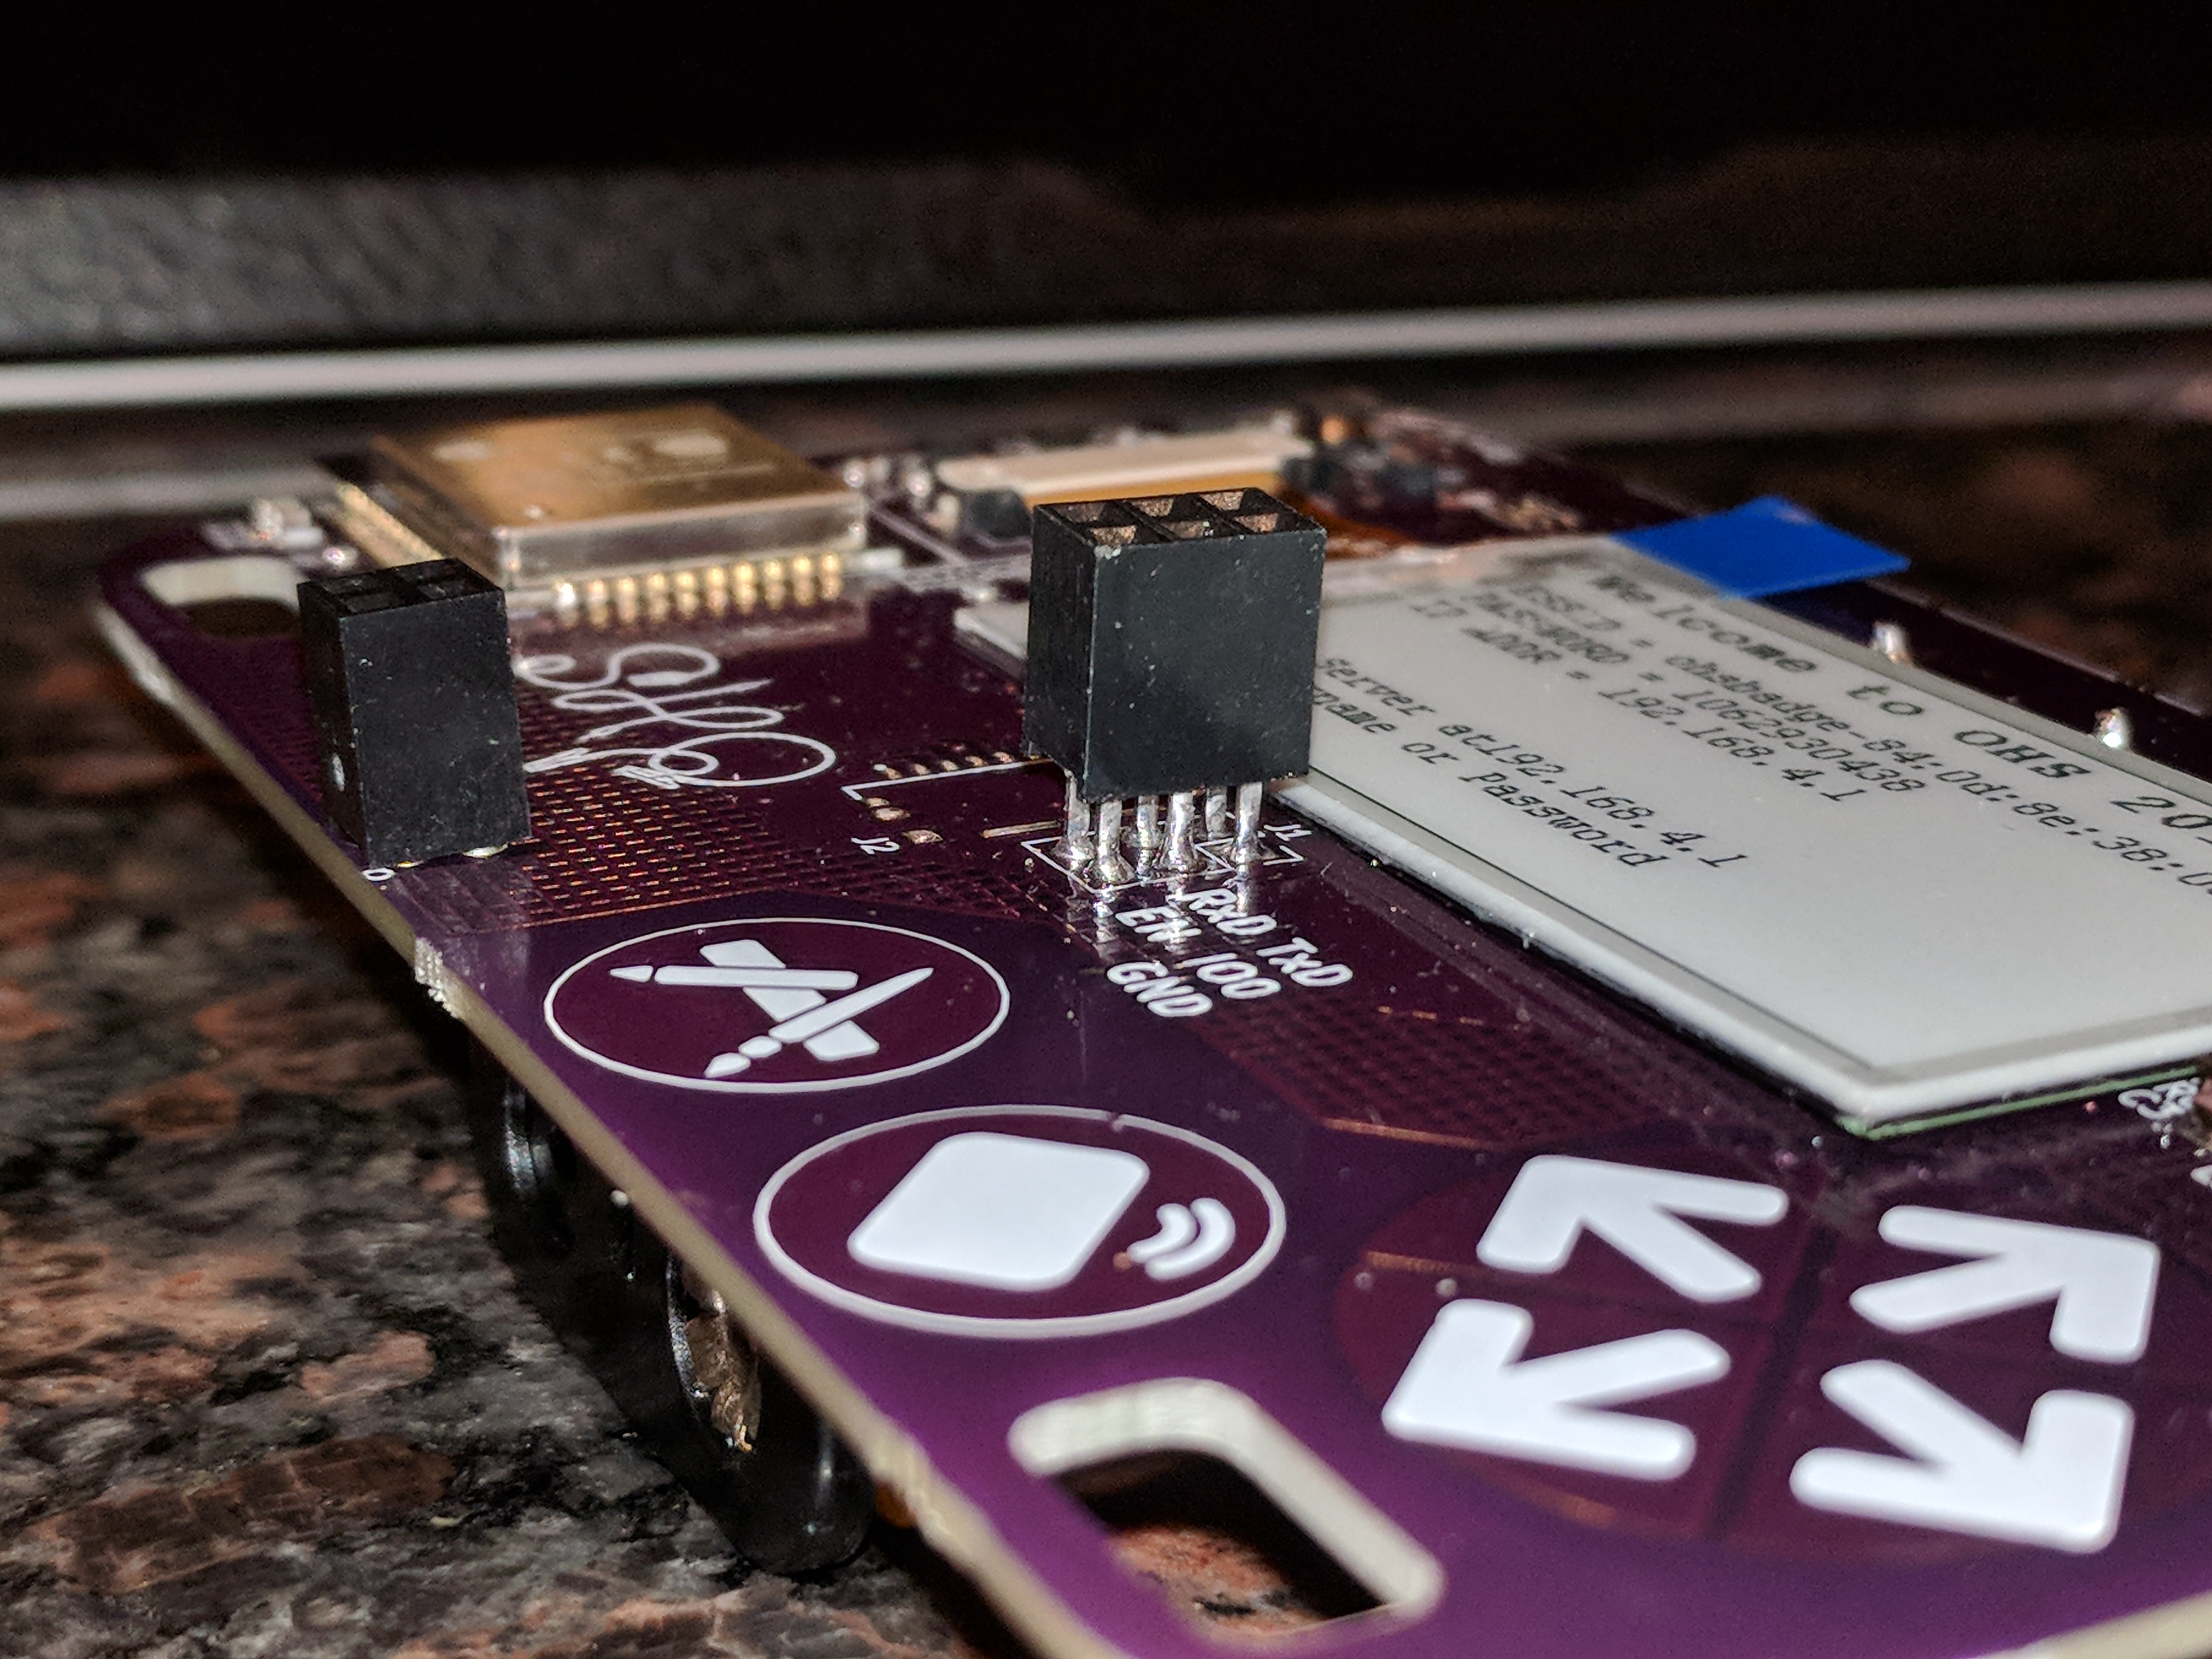
The slide switch on the adapter board will allow the ESP32 to enter programming mode by connecting the IO0 pin on J1 to ground. The push button on the adapter board will reset the board by connecting EN pin on J1 to ground.
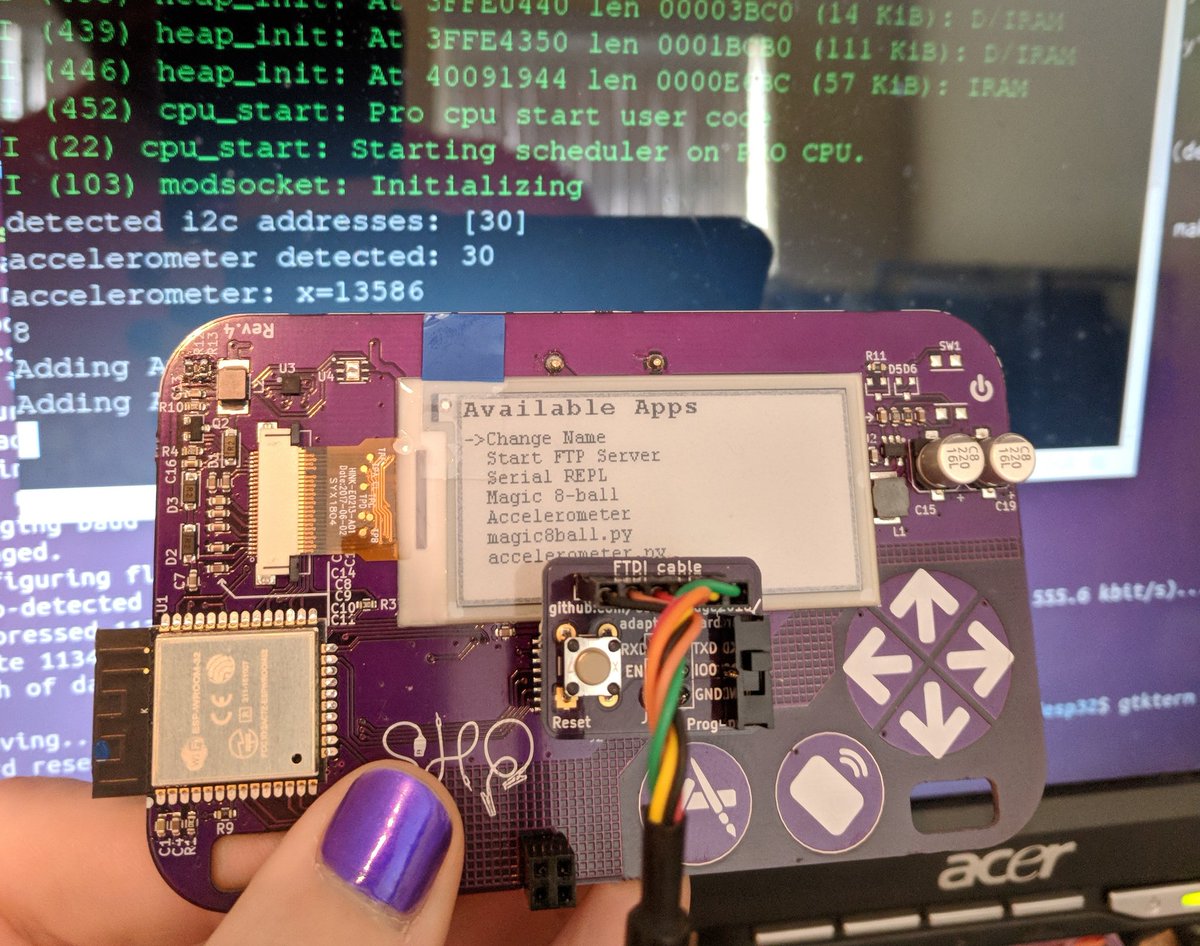
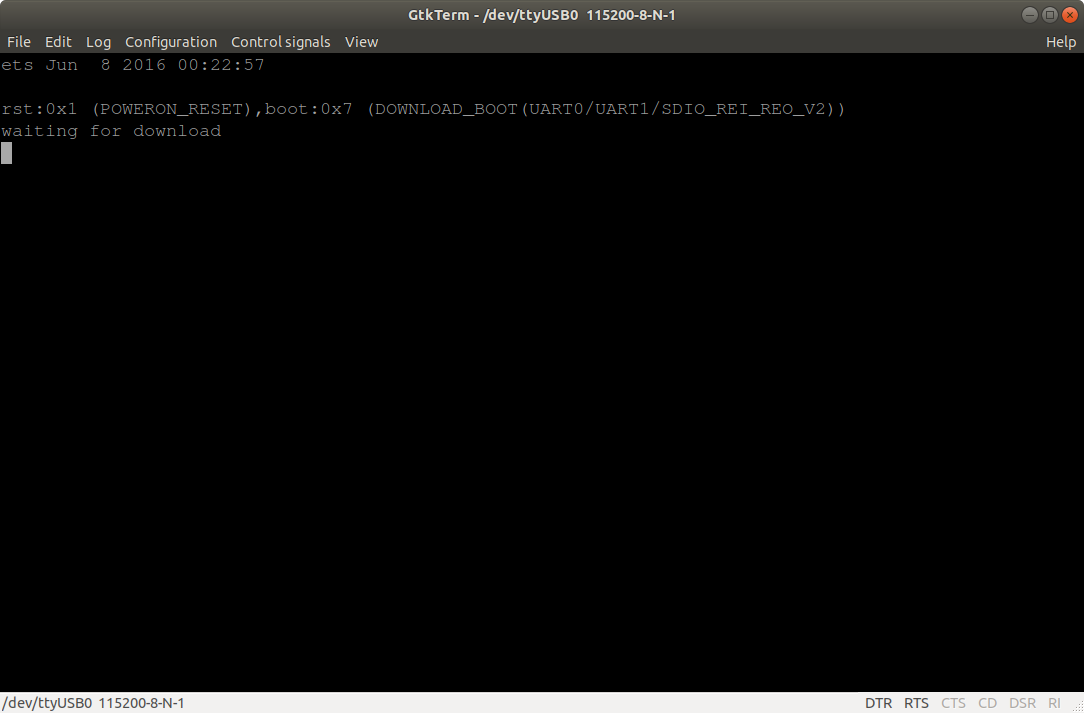
If you have the serial port open in a terminal emulator, then you should see this after switching into programming mode and pressing the reset push button:
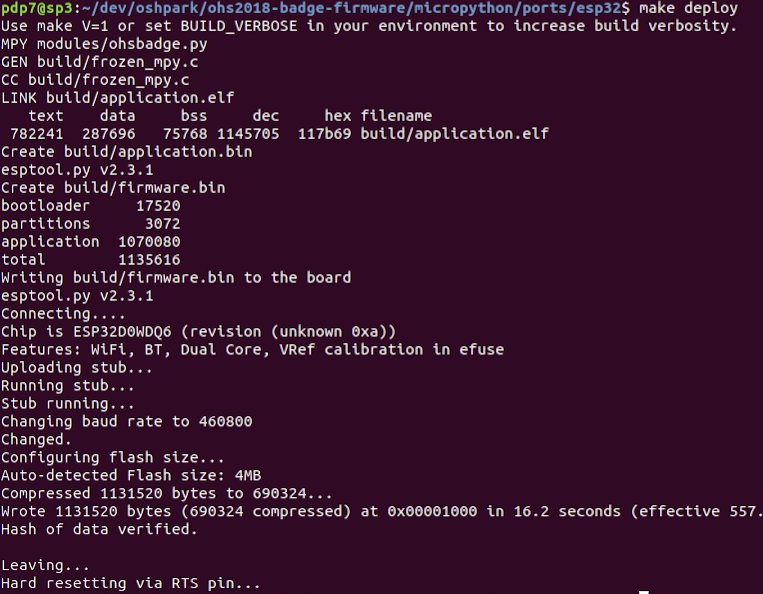
Build the MicroPython firmware for the ESP32 on the badge by following these directions in the GitHub repo README.
To flash the ESP32, close your terminal emulator program so that esptool.py can open the serial port (which is /tty/USB0 on my Linux computer):
Switch from programming mode to serial console mode so that IO0 pin on J1 is no longer grounded. Then open the serial port in your terminal emulator again (115200 baud, 8-N-1) and press the reset push button:
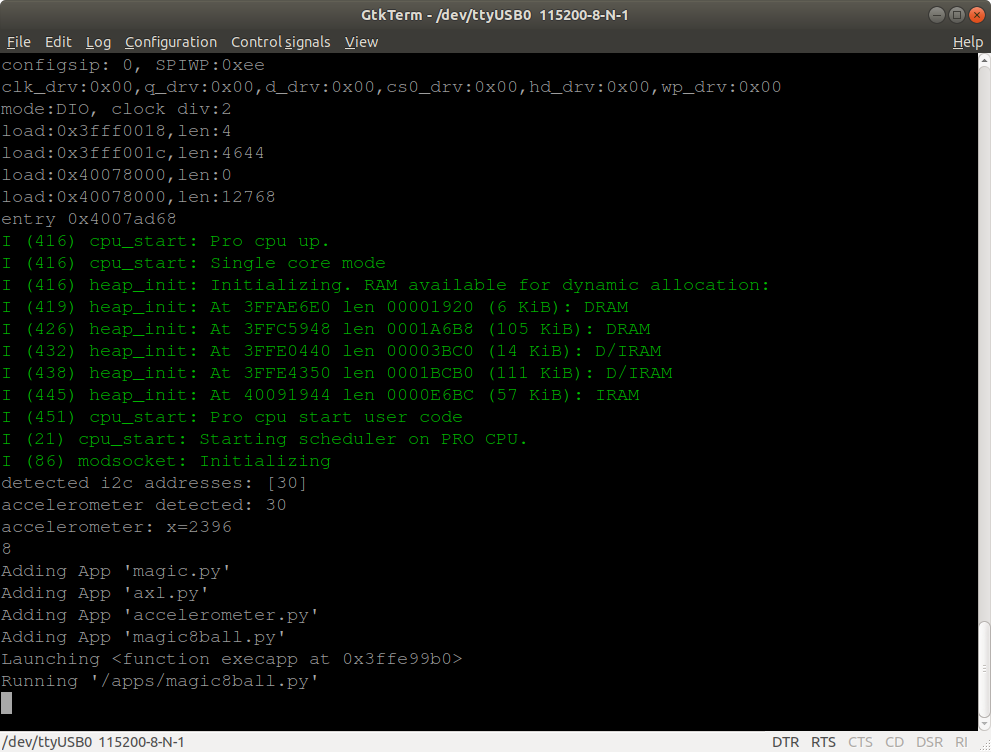
You should see the output from MicroPython firmware running.
To use the interactive Python prompt (REPL), press the menu button on the badge (the icon with pencil and paintbrush) and select Serial REPL from the Available Apps menu:
The terminal emulator connected to the serial port should then display the interactive Python prompt (REPL). You can type in MicroPython code to experiment:
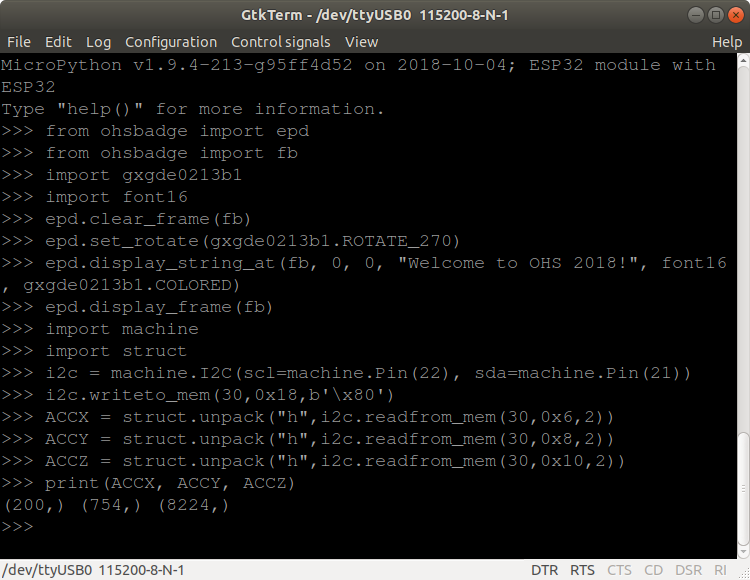
Here is an exmaple that displays text on the e-paper and prints that values from the accelerometer:
import gxgde0213b1
import font16
import machine
import struct
from ohsbadge import epd
from ohsbadge import fb

epd.clear_frame(fb)
epd.set_rotate(gxgde0213b1.ROTATE_270)
epd.display_string_at(fb, 0, 0, "Welcome to OHS 2018!", font16, gxgde0213b1.COLORED)
epd.display_frame(fb)

i2c = machine.I2C(scl=machine.Pin(22), sda=machine.Pin(21))
i2c.writeto_mem(30,0x18,b'\x80')
ACCX = struct.unpack("h",i2c.readfrom_mem(30,0x6,2))
ACCY = struct.unpack("h",i2c.readfrom_mem(30,0x8,2))
ACCZ = struct.unpack("h",i2c.readfrom_mem(30,0x10,2))
print("x={0} y={1} z={2}".format(ACCX[0], ACCY[0], ACCZ[0]))
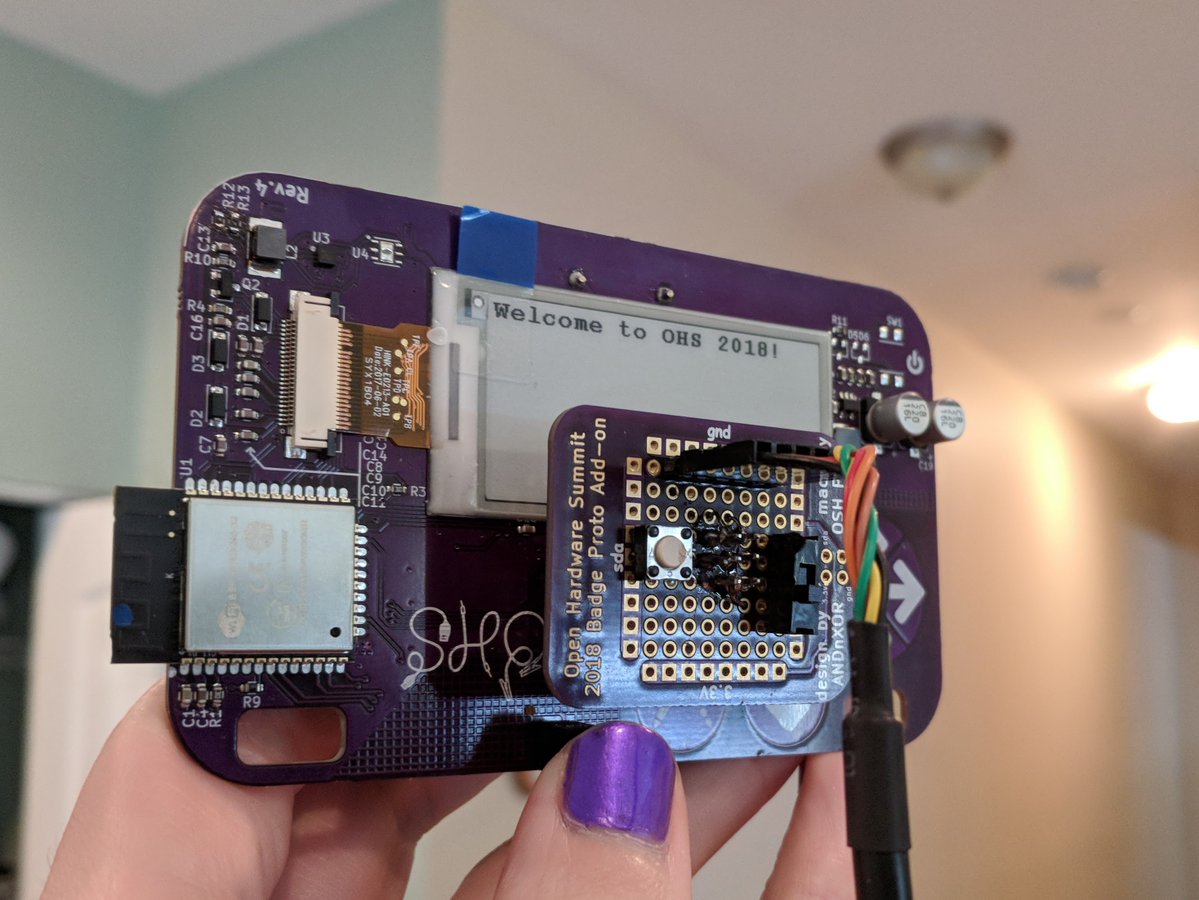
Photo of the text displayed on the e-paper:
Resources:


Thanks to @Steve Pomeroy for creating this MicroPython demo app for the Open Hardware Summit badge:
# created by Steve Pomeroy https://hackaday.io/xxv
# modified by Drew Fustini to run once and exit
#
# blog post:
# https://blog.oshpark.com/2018/10/04/open-hardware-summit-badge-magic-8-ball-app/
#
# photo gallery:
# https://photos.app.goo.gl/f1y8PSHfYAaa4xTu7
#
# transfer to Open Hardware Summit badge using FTP:
# https://oshwabadge2018.github.io/docs.html#uploading-over-ftp

import gxgde0213b1
import font16
import font12
from machine import I2C, Pin, TouchPad
import struct
import time
import urandom
from ohsbadge import epd
from ohsbadge import fb

class TouchButton(object):
   def __init__(self, pin, on_pressed, threshold=400, debounce_ms=50):
       self._touchpad = machine.TouchPad(pin)
       self._on_pressed = on_pressed
       self._threshold = threshold
       self._debounce_ms = debounce_ms
       self._down_ms = None
       self._pressed = False

   def read(self):
       if self._touchpad.read()  self._debounce_ms:
                       self._on_pressed()
                       self._pressed = True
       else:
           self._pressed = False
           self._down_ms = None

# from Magic 8-Ball app by Steve Pomeroy https://hackaday.io/xxv
# github.com/oshwabadge2018/ohs18apps/blob/master/magic8ball.py
class MagicBall():
   def clear_screen():
       epd.initPart()
       epd.clear_frame(fb)
       epd.display_frame(fb)

   def show_message(message):
       epd.init()
       epd.clear_frame(fb)
       epd.display_string_at(fb, 0, 52, message, font16, gxgde0213b1.COLORED)
       epd.display_frame(fb)

   def read_accel(i2c):
       i2c.writeto_mem(30, 0x18, b'\x80')
       x = struct.unpack("h", i2c.readfrom_mem(30, 0x6, 2))
       y = struct.unpack("h", i2c.readfrom_mem(30, 0x8, 2))
       z = struct.unpack("h", i2c.readfrom_mem(30, 0xA, 2))
       return (x[0], y[0], z[0])

   def get_orientation(i2c):
       new_orientation = None
       pos = MagicBall.read_accel(i2c)

       if pos[2] > 13000:
           new_orientation = "upright"
       elif pos[2] < -13000:
           new_orientation = "prone"

       return new_orientation

   def main(f):
           phrases = ["It is certain.", "It is decidedly so.", "Without a doubt.", "Yes - definitely.", "You may rely on it.", "As I see it, yes.", "Most likely.", "Outlook good.", "Yes.", "Signs point to yes.", "Reply hazy, try again", "Ask again later.", "Better not tell you now.", "Cannot predict now.", "Concentrate and ask again.", "Don't count on it.", "My reply is no.", "My sources say no.", "Outlook not so good.", "Very doubtful."]
           i2c = machine.I2C(scl=Pin(22), sda=Pin(21))
           epd.init()
           epd.set_rotate(gxgde0213b1.ROTATE_270)
           epd.clear_frame(fb)
           epd.display_frame(fb)
           prev_orientation = None

           keep_on = [True]

           def exit_loop():
               keep_on[0] = False

           exit_button = TouchButton(Pin(32), exit_loop)

           while keep_on[0]:
               exit_button.read()
               orientation = MagicBall.get_orientation(i2c)

               if orientation and orientation != prev_orientation:
                   if orientation == 'upright':
                       MagicBall.show_message(urandom.choice(phrases))
                   elif orientation == 'prone':
                       MagicBall.clear_screen()
               prev_orientation = orientation

ball = MagicBall()
ball.main()
This Python file can be transferred to Open Hardware Summit badge using the FTP server built into the MicroPython firmware.


Resources:
From Radomir Dopieralski (ꝺeshipu) on Hackaday.io:
A Python-based micro game console, optimized for game development workshops.
I really like the #PewPew FeatherWing as a platform for teaching game development, but the cost of Feather boards needed to use it makes it difficult to organize workshops for larger groups of people. I have previously tried to work around that problem by merging the FeatherWing with the schematic stolen from a Trinket M0 (with an additional flash memory), but the resulting design was complex, difficult to make and still a bit expensive. Now after having designed a few more CircuitPython boards I think I can really cut the costs and make a standalone device with all the functionality of the original shield, but optimized for workshops.
Radomir Dopieralski has created handheld game console programmable with (Micro/Circuit)Python:
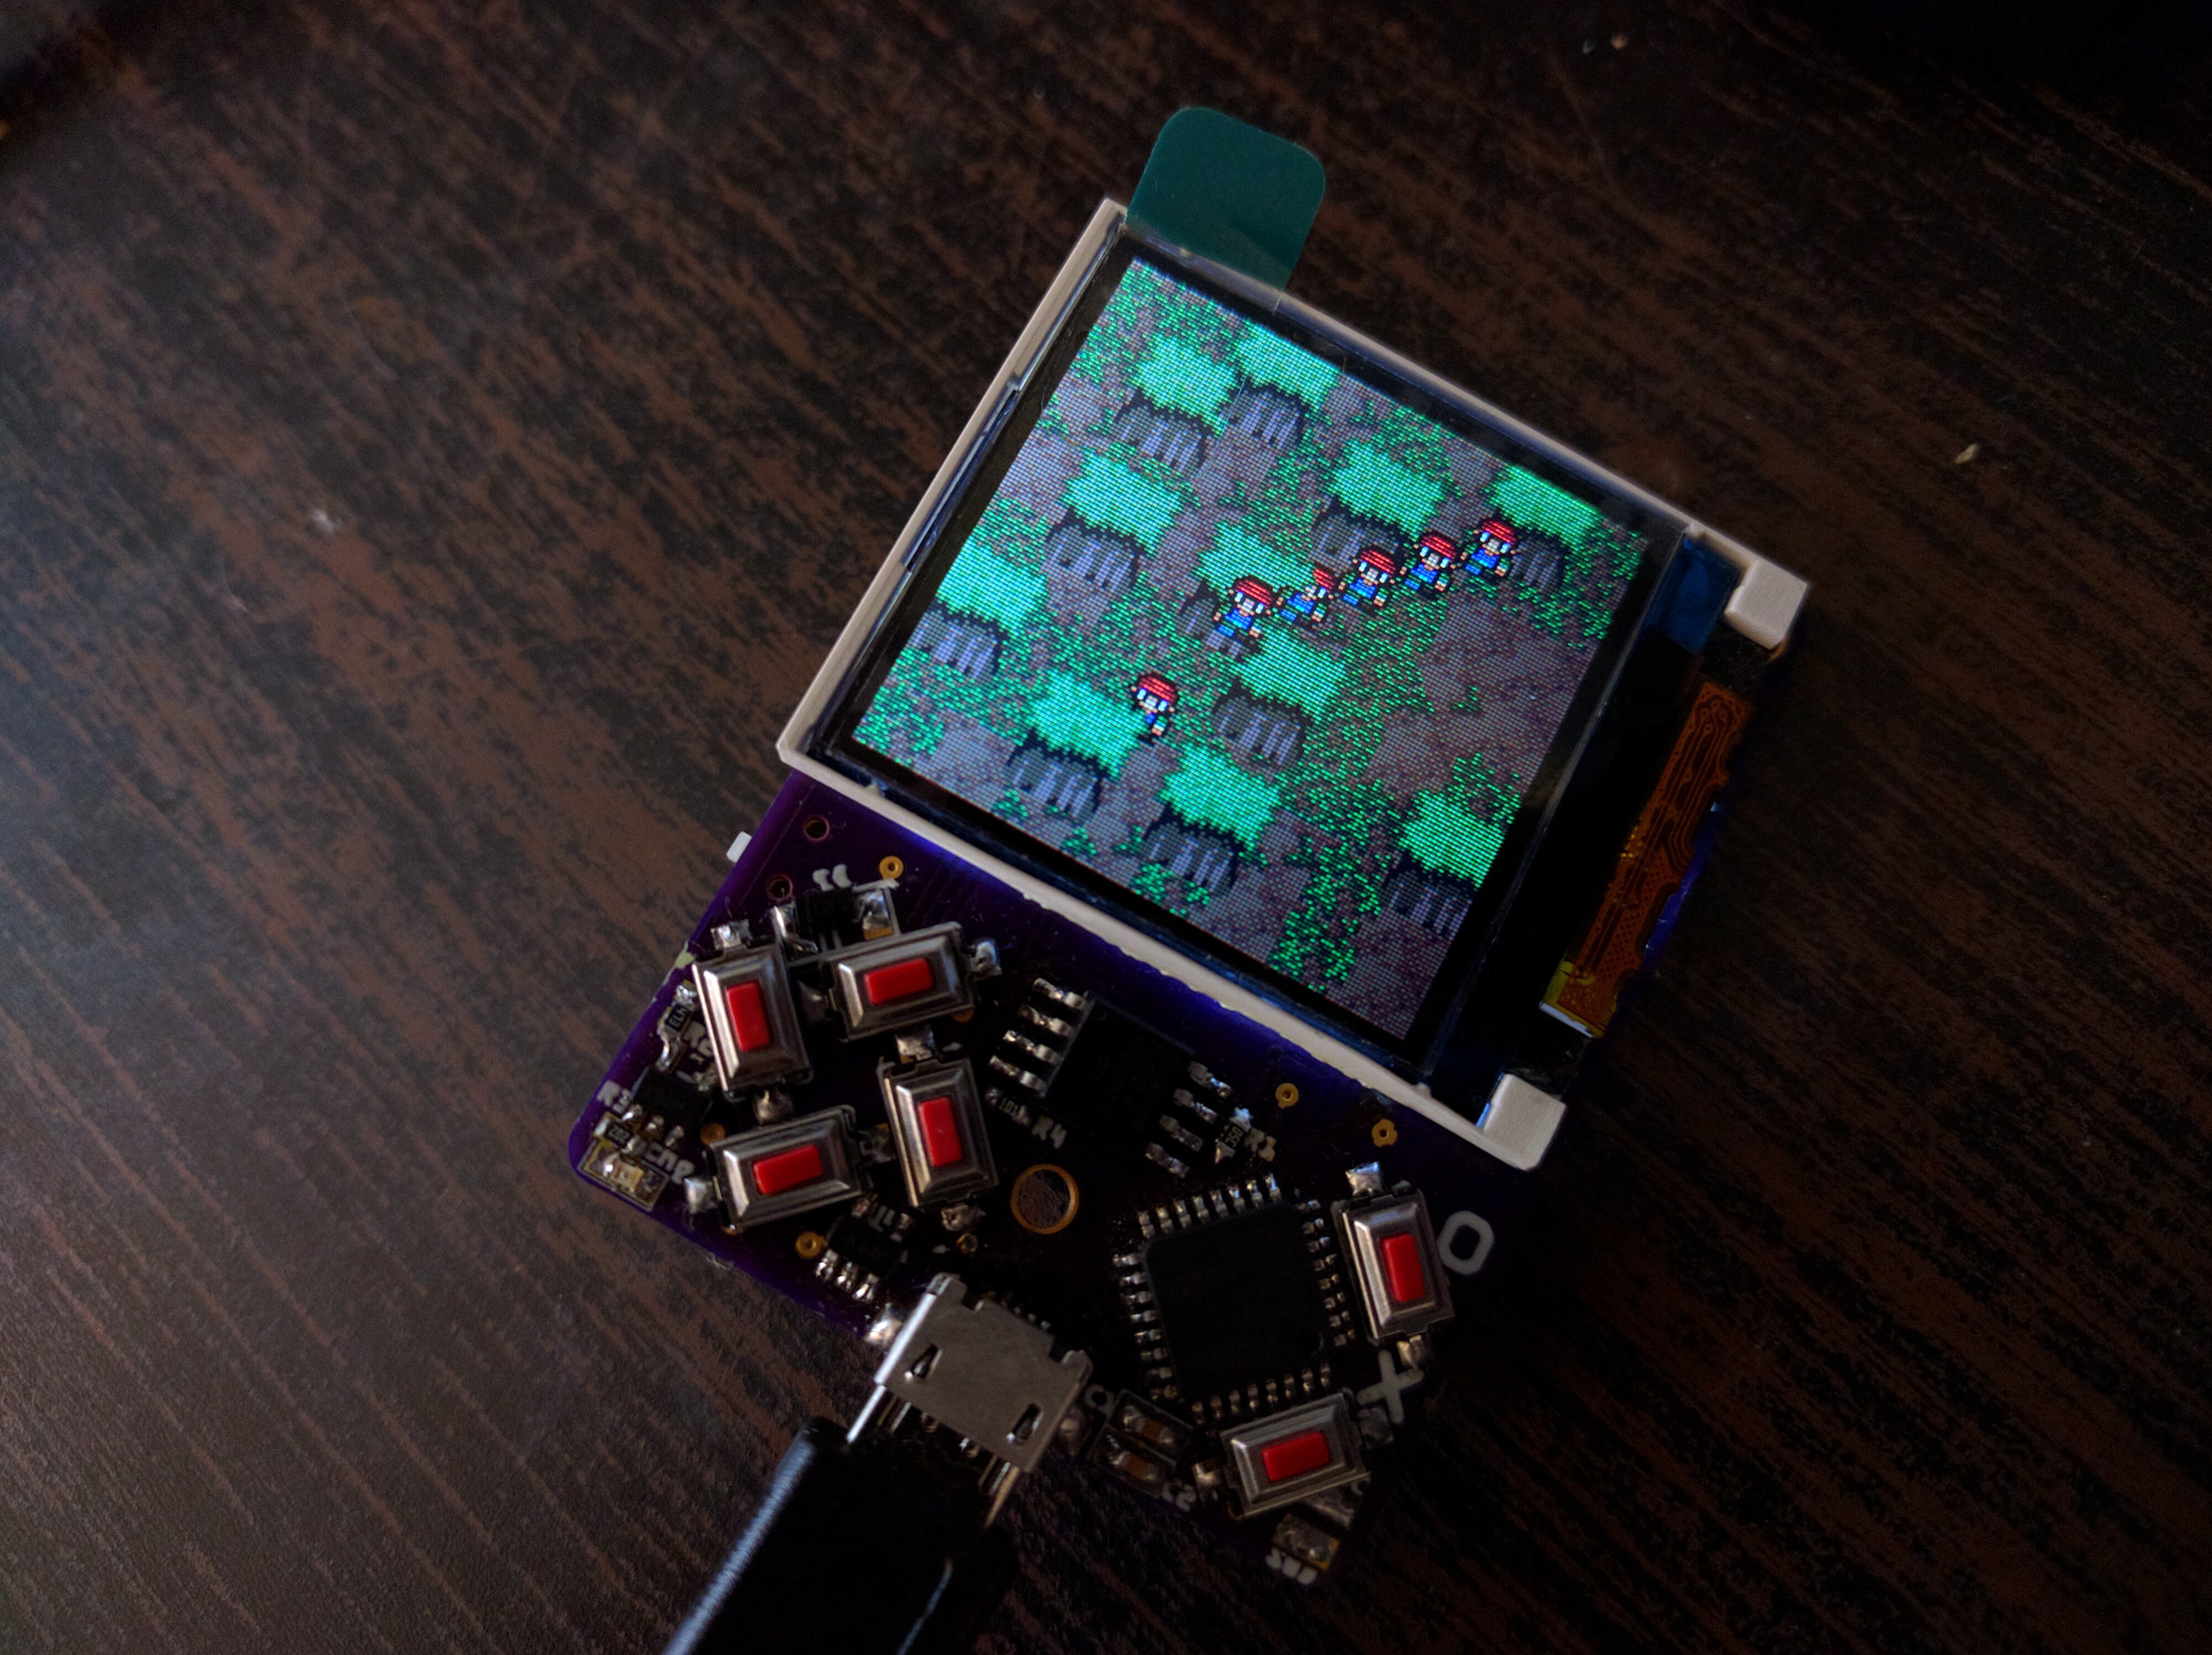
A small game console directly programmable in Python. I always wanted to make this, and after my work on #PewPew FeatherWing I finally decided that I’m ready.
The first version may be a bit of a stretch — I tried to make it as small as possible, fitting in the 5x5cm limit of PCB manufacturers, so that it will be cheap to make the PCBs. Using the cheap ST7735 TFT display, and a cheap ATSAMD21E chip. I also tried to put all the components on one side of the board, but failed with that — the power and reset switch had to go on the back, as well as the buzzer.
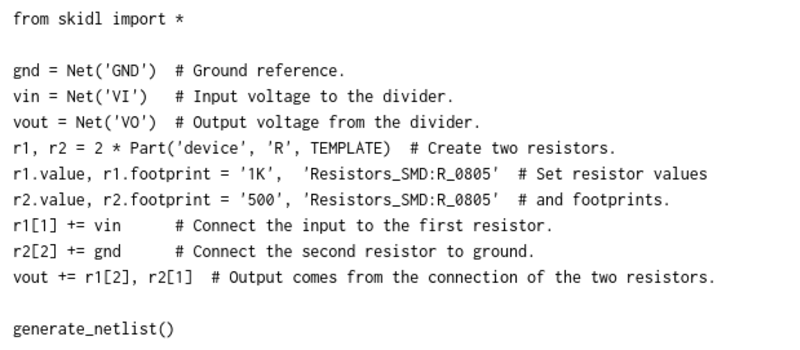
SKiDL is very, very cool. It’s a bit of Python code that outputs a circuit netlist for KiCAD. Why is this cool? If you design a PCB in KiCAD, you go through three steps: draw the schematic, assign footprints to the symbolic parts, and then place them. The netlist ties all of these phases together […]
The source code is available on GitHub:
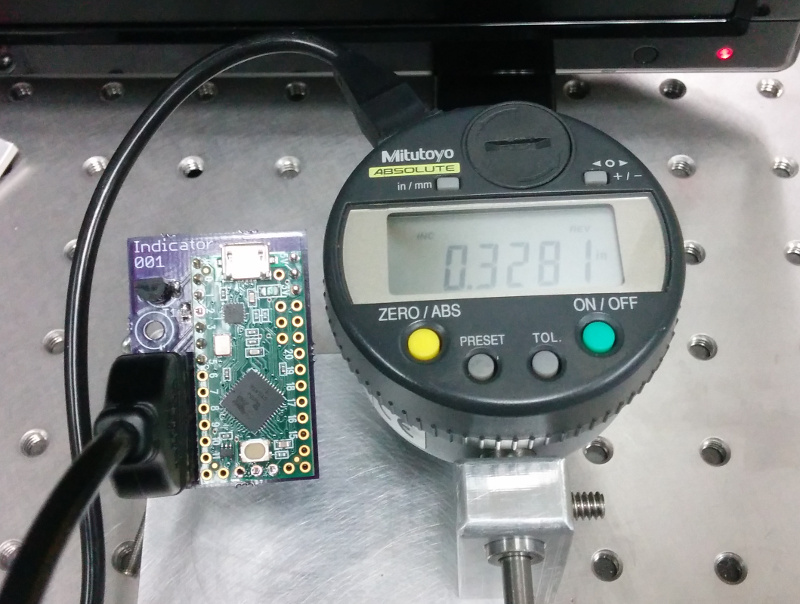
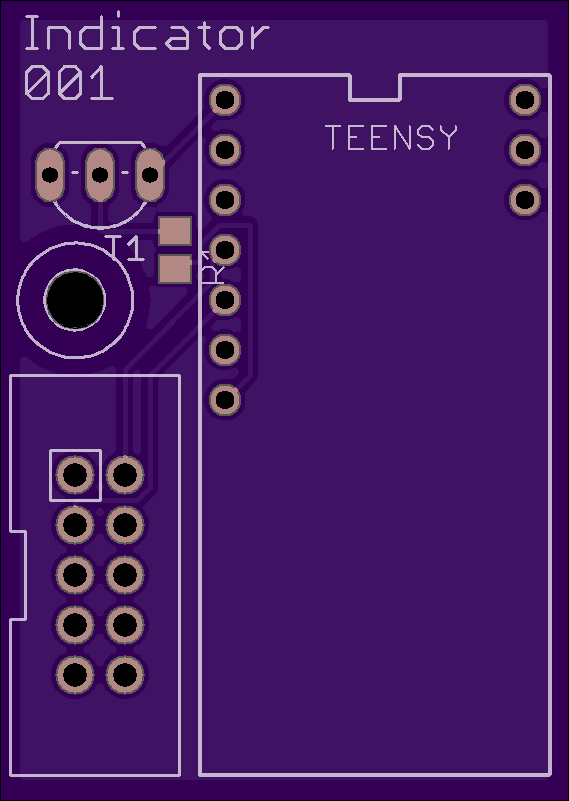
Catherine Holloway created this board to interface Mitutoyo dial indicators with a Teensy:
 Teensy Mitutoyo Interface
Mitutoyo dial indicators can measure small displacements down to micron levels. I use them to calibrate motors used in quantum optics experiments, where every micron is several femtoseconds in the life of a photon.
The design files and source code are available on GitHub:
CatherineH shared the board on OSH Park:
![]()


")


