Printed TS100 Case Beats the Heat with a Bearing

As we’ve said many times in the past, the creation of custom cases and enclosures is one of the best and most obvious applications for desktop 3D printing. When armed with even an entry-level printer, your projects will never again have to suffer through the indignity of getting hot glued into a nondescript plastic box. But if you’re printing with basic PLA, you need to be careful that nothing gets too hot inside.

Which was a problem when [Oleg Vint] started work on this 3D printed case for the popular TS100 soldering iron. But with the addition of a standard 608 bearing, the case provides a safe spot for the iron to cool off before it gets buttoned back up for storage. Of course, you can also use the flip-out perch to hold the iron while you’re working.

As [Oleg] explains on the Thingiverse page for the case, he actually blended a few existing projects together to arrive at the final design. Specifically, the idea of using the 608 bearing came from a printable TS100 stand originally designed in 2017 by [MightyNozzle]. Released under Creative Commons, [Oleg] was able to mash the bearing stand together with elements from several other printable TS100 cases to come up with his unique combined solution.

via Printed TS100 Case Beats the Heat with a Bearing — Hackaday

Quote

The Fascinating World Of Solder Alloys And Metallurgy

Solder is the conductive metal glue that one uses to stick components together. If you get the component and the PCB hot enough, and melt a little solder in the joint, it will stay put and conduct reliably. But it’s far from simple.

There are many different solder alloys, and even the tip of the soldering iron itself is a multi-material masterpiece. In this article, we’ll take a look at the metallurgy behind soldering, and you’ll see why soldering tip maintenance, and regular replacement, is a good idea. Naturally, we’ll also touch upon the role that lead plays in solder alloys, and what the effect is of replacing it with other metals when going lead-free. What are you soldering with?

Intermetallic Compounds

Soldering, and its higher temperature cousin, brazing, are one of essentially two ways create metal-to-metal bonds, and they allow the use of low-temperature techniques that still create relatively stable bonds between two metal surfaces. Soldering is also an interesting chapter in the field of metallurgy, on account of it being based around so-called intermetallic compounds (IMCs).

Welding stands in contrast to soldering, where high temperatures melt the metal on both sides of the pieces that are being joined, permanently fusing them. Welding is a high-strength, high-reliability way of joining metal pieces, but is unfortunately wholly unsuited for delicate electronics where excess heat can damage parts and the goal is more to ‘glue’ electrically conducting elements together than to melt them together.

This also leads us to the reason why soldering and IMCs are such a source of trouble, to the point where IMCs are referred to as ‘evil’. IMCs are essentially bits of the two metal surfaces on either side dissolved into the solder, causing enough of a joining that each side of the joint is more or less stably fused with the solder. Unfortunately such an IMC is a far cry from the stable solid metal of a welding joint, and as a result can be brittle depending on exactly which metals were involved in the solder alloy.

But the IMCs formed in soldering are strong enough, and their formation is at the root of why every solder alloy uses tin. Tin has the property that it is very good at letting other metals dissolve into it. In fact, it’s possible to solder with pure tin, although as we’ll see below, most solder is improved by adding other metals into the mix.

via The Fascinating World Of Solder Alloys And Metallurgy — Hackaday

Quote

Concrete Solder Squid is a Solid Solution

Although it’s possible to buy a soldering setup out of the box, the one that works for you will likely develop over time. Honestly, it may never stop evolving. Sure, you can start with el-cheapo helping hands or a nice hobby vise, but it probably won’t end there. Why? Because no one of these tools will be right for all applications, unless you plan to solder the same thing over and over again. Sometimes it’s just easier to alligator clip a board in place than to slowly manipulate the jaws of a vise, but those helping hands have such a limited range of motion.

Have you been meaning to build a soldering squid out of coolant hose because that stuff just looks so dang cool and bendy? Well, then let Hackaday alum [JeremySCook] show you how it can be done. A few years ago he built a similar squid with a wooden base, but it just isn’t heavy enough, so he redesigned it with a concrete base. He took the opportunity to make some nice tweaks, like zip-tying a small PC fan and 9 V to make an endlessly repositionable ventilation system, and adding a big clip in the back for extra stability while soldering. And of course, threading the solder spool on to one of the hoses is genius.

If you follow [Jeremy] at all, you know he’s been playing around with concrete for a while now, and it’s neat to see him cement his devotion to the stuff by using it in the pursuit of better tools. He’s got the files for the printed mold up on GitHub, and the build video after the break should be all set up by now.

via Concrete Solder Squid is a Solid Solution — Hackaday

Quote

Challenge Your Soldering Skills With Snowy0201

From  on the Tindie blog:

Snowy0201_from_NWMaker_on_Tindie.jpg

The Snowy Owl is the rebel of owls. They live in the north near arctic regions of the world, and unlike other owls, they are active during the day instead of the night. Owls in general are pretty great, which is why this Snowy Owl version of the Surface Mount Device 0201 soldering challenge kit caught my eye.

For this challenge, the resistors on the back of the owl have been changed to a 0201 packages for an additional level of difficulty. These are cellphone-level miniaturization so it will be a challenge. A dual inverter NL27WZ04 is used to implement the ring oscillator, which drives the blinking LEDs.

Think you’re up to the challenge?


Challenge Your Soldering Skills With Snowy0201

Competitive Soldering is Now a Thing

At Hackaday, we’re constantly impressed by the skill and technique that goes into soldering up some homebrew creations. We’re not just talking about hand-soldering 80-pin QFNs without a stencil, either: there are people building charlieplexed LED arrays out of bare copper wire, and using Kynar wire for mechanical stability. There are some very, very talented people out there, and they all work in the medium of wire, heat, and flux.

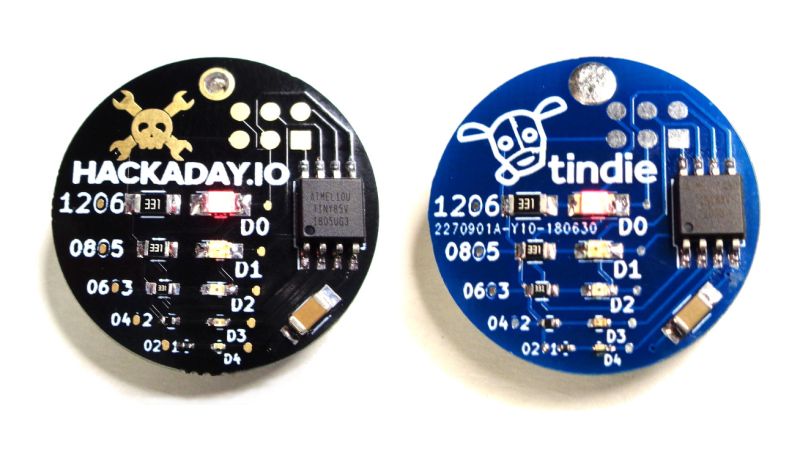
At this year’s DEF CON, we opened the floodgates to competitive soldering. Along with [Bunny] from Hardware Hacking Village and the many volunteers from the HHV and Soldering Skills Village, dozens competed to solder up a tiny kit full of LEDs and microscopic resistors.

The kit in question was an SMD Challenge Kit put together my MakersBox, and consisted of a small PCB, an SOIC-8 ATtiny, and a LED and resistor for 1206, 0805, 0603, 0402, and 0201 sizes. The contest is done in rounds. Six challengers compete at a time, and everyone is given 35 minutes to complete the kit.

via Competitive Soldering is Now a Thing — Hackaday

Quote

I Can Solder Badge on Tindie

From  on the Tindie blog:

I-can-solder

Say it Loud and Proud With The I Can Solder Badge

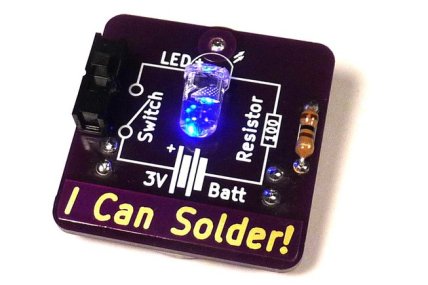
When you take your first steps on the road to becoming a maker, one of the first skills you’ll need to master is soldering. It’s the backbone of just about every electronics project, but it’s not an easy skill to master. Don’t let the fear stop you, soldering opens up a lot of DIY projects for you.

With the I Can Solder Badge, you’ll not only learn the basics, but you’ll also have proof to show the world. This badge project is unique in that it also teaches you about circuits and includes a switch to save the battery power.

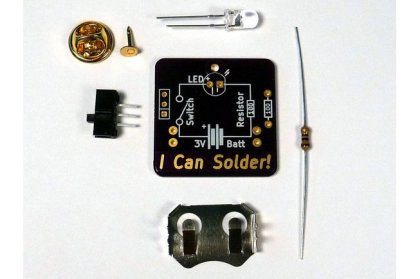
Included in the kit is a purple PCB manufactured in the USA by OSH Park, an RGB LED, a resistor, a switch, and a battery holder for the CR2032. Keep in mind that you’ll need to purchase the battery yourself as it cannot be mailed out with the kit due to USPS guidelines.

I Can Solder Badge on Tindie

How You Can Build Complex Circuits

How You (Yes YOU) Can Build Complex Circuits

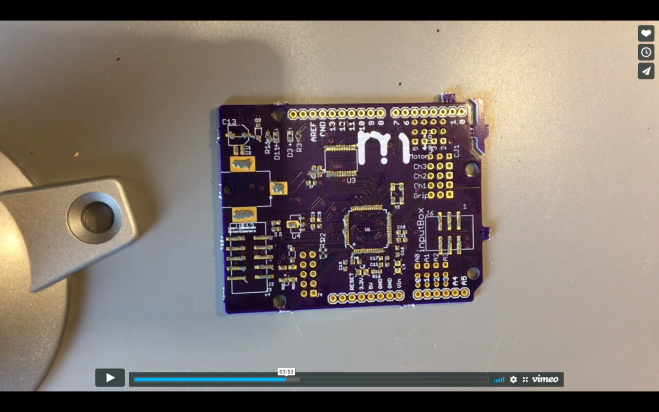
Here at mimicEducationalRobots we farm out most of our production circuit board assembly, but we still assemble all prototypes in house. Most people are surprised to learn how relatively simple the process really is. This blog assumes that a unique PCB of your own design has come out of your wonderful brain, or at least that you’re interested in how we do things here.

Screenshot from 2018-07-18 19-34-24.png

How You Can Build Complex Circuits

I Can Solder Badge

From MakersBox on Tindie:

2018-07-11T05_07_07.063Z-P1080585 (1)

I Can Solder Badge

Learn to solder, and learn a little bit about electronics as well

2018-07-11T05_22_45.042Z-P1080587

Soldering can seem a bit daunting,

but it is easier than it looks and it is a skill that opens a world of DIY projects to you. This project is the perfect way to not only learn how to solder, but to show off your new found skill to your friends and family.

Unlike other simple soldering project, this one will also teach you about circuits, and how they work. And it has a switch to save the battery. More power to you!

2018-07-11T05_23_35.053Z-P1080559

What you get:

  • A perfect purple PCB made in the USA by OSH Park.
  • An RGB LED that will open the all the mysteries of color mixing to you.
  • A resistor, which in addition to being the easiest component to learn how to solder, will also save your battery life.
  • A switch, which far more than the resistor, will save your battery and allow you to sleep at night not wondering how long that color changing LED will continue to light up the room.
  • A battery holder for the CR2032, the best and most cost effective lithium coin cell on the planet*.
I Can Solder Badge

Reflowduino: Put That Toaster Oven To Good Use

From  on the Hackaday blog:

Reflowduino: Put That Toaster Oven To Good Use

There are few scenes in life more moving than the moment the solder paste melts as the component slides smoothly into place. We’re willing to bet the only reason you don’t have a reflow oven is the cost. Why wouldn’t you want one? Fortunately, the vastly cheaper DIY route has become a whole lot easier since the birth of the Reflowduino – an open source controller for reflow ovens.

This Hackaday Prize entry by [Timothy Woo] provides a super quick way to create your own reflow setup, using any cheap means of heating you have lying around. [Tim] uses a toaster oven he paid $21 for, but anything with a suitable thermal mass will do. The hardware of the Reflowduino is all open source and has been very well documented – both on the main hackaday.io page and over on the project’s GitHub.

sidekick-e1525981389910

The board itself is built around the ATMega32u4 and sports an integrated MAX31855 thermocouple interface (for the all-important PID control), LiPo battery charging, a buzzer for alerting you when input is needed, and Bluetooth. Why Bluetooth? An Android app has been developed for easy control of the Reflowduino, and will even graph the temperature profile.

When it comes to controlling the toaster oven/miscellaneous heat source, a “sidekick” board is available, with a solid state relay hooked up to a mains plug. This makes it a breeze to setup any mains appliance for Arduino control.


Reflowduino: Put That Toaster Oven To Good Use

Simple Mechanism Gives Support for SMT Assembly

 on the Hackaday blog:

pick-and-place-e1523119167760.png

Simple Mechanism Gives Support for SMT Assembly

To fight the shakes, you can do one of two things: remove the human, or improve the human. Unable to justify a pick and place robot for the former, [Tom] opted to build a quick hand support for surface-mount work, and the results are impressive considering it’s built entirely of scrap.

It’s just a three-piece arm with standard butt hinges for joints; mounted so the hinge pins are perpendicular to the work surface and fitted with a horizontal hand rest, it constrains movement to a plane above the PCB. A hole in the hand rest for a small vacuum tip allows [Tom] to pick up a part and place it on the board — he reports that the tackiness of the solder paste is enough to remove the SMD from the tip.

Simple Mechanism Gives Support for SMT Assembly