Open Hardware Summit badge: adapter board for USB-to-serial cable

DosSfNPWwAE-ldB.jpg

UPDATE: this PCB design replaces the perf board version

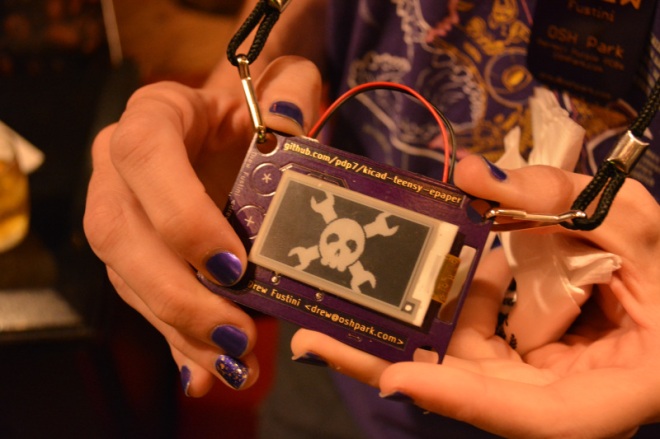
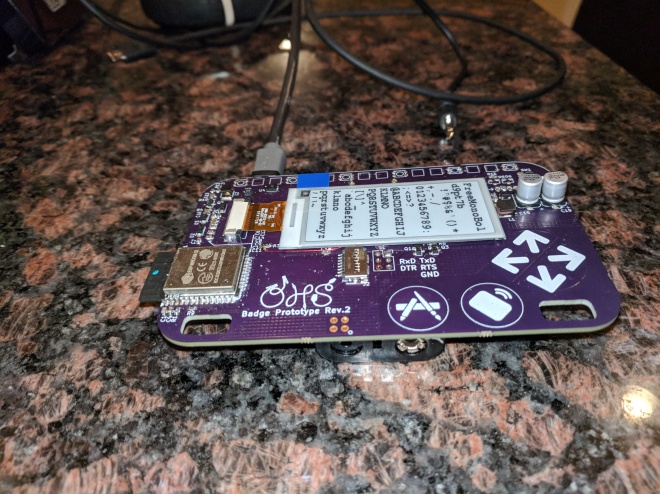
The 2018 Open Hardware Summit badge features an ESP32 microcontroller running MicroPython firmware.  The firmware provides a Python interpreter prompt (REPL) on the serial port which allows interactive programming of the badge!

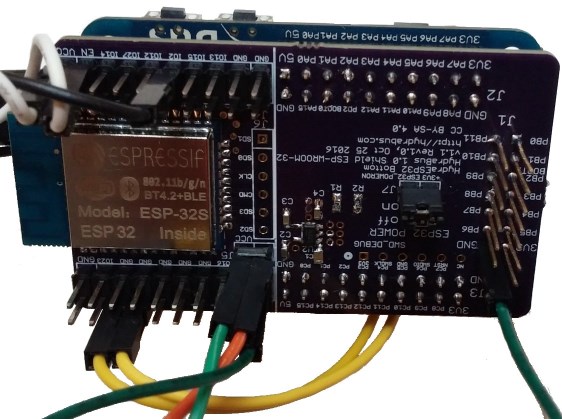
This post describes how to connect an FTDI 3.3V USB to serial cable to the J1 header on the badge.  In addition to the serial console, this adapter board for the J1 header enable new MicroPython firmware to be flashed on to the badge.

DorWBnpX4AAqRR_

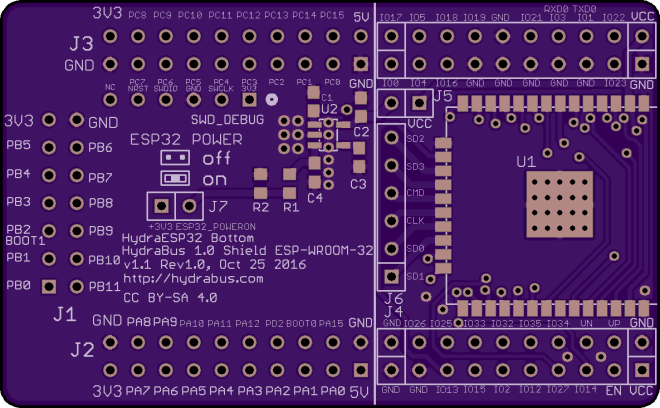
First, solder a 2×3 pin header socket on to the badge at the J1.  Alternatively, a strip of 0.1″ header sockets could be cut into two 1×3 pieces.

IMG_20181003_235654

Here is a Fritzing diagram (PDF) of how to solder this J1 adapter board onto a perf board:

ohs18badge-j1-adapter_bb

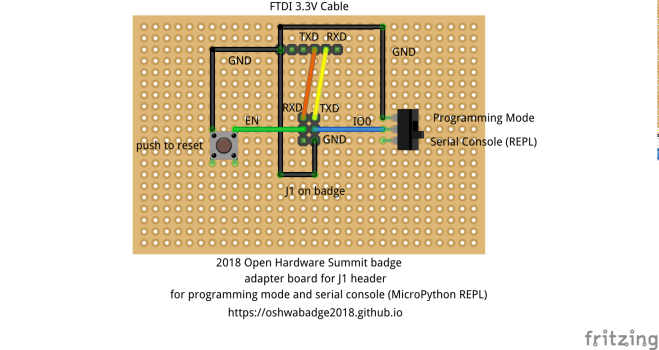
Note: I re-purposed the OHS18 badge add-on proto dev board to act as a generic perf board.

The slide switch on the adapter board will allow the ESP32 to enter programming mode by connecting the IO0 pin on J1 to ground.  The push button on the adapter board will reset the board by connecting EN pin on J1 to ground.

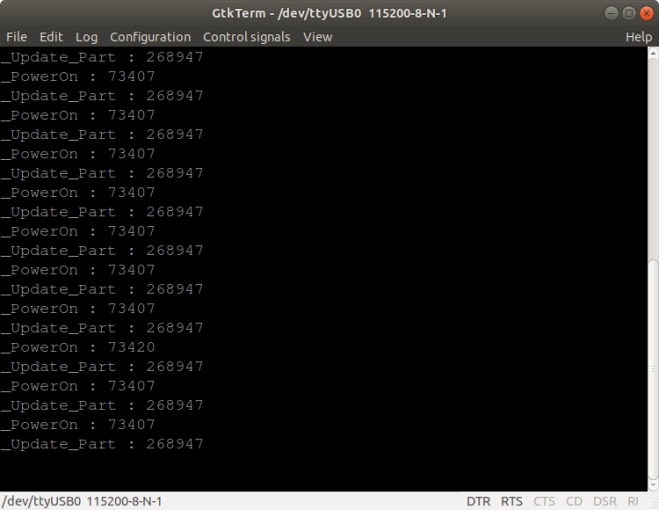
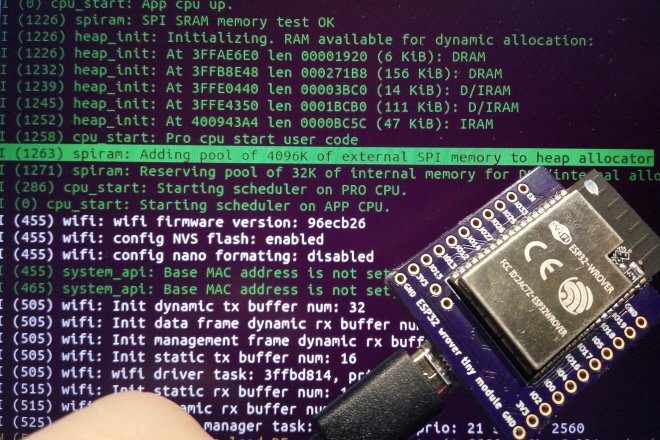
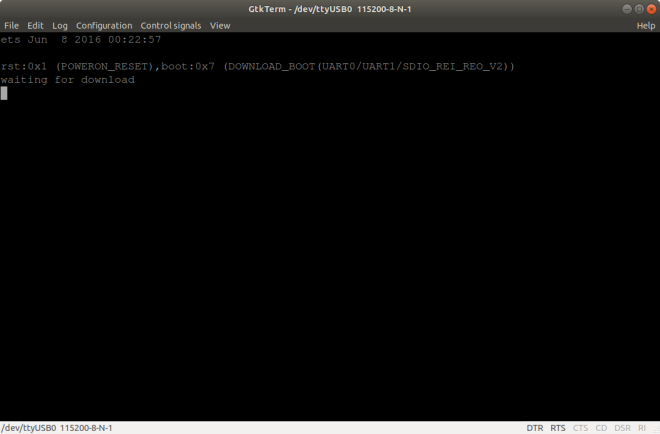
If you have the serial port open in a terminal emulator, then you should see this after switching into programming mode and pressing the reset push button:

Screenshot from 2018-10-03 22-48-12

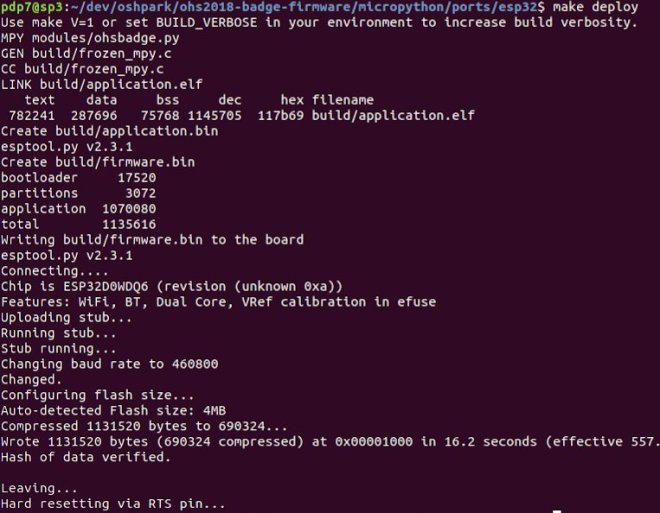
Build the MicroPython firmware for the ESP32 on the badge by following these directions in the GitHub repo README.

To flash the ESP32, close your terminal emulator program so that esptool.py can open the serial port (which is /tty/USB0 on my Linux computer):

DorYWzaXUAAhTBT

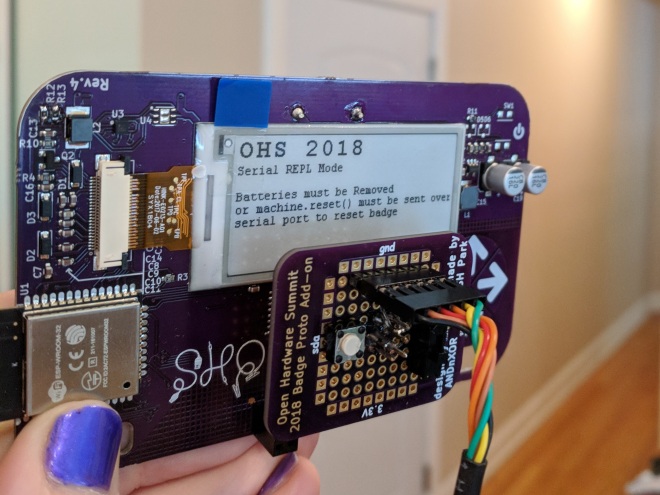
Switch from programming mode to serial console mode so that IO0 pin on J1 is no longer grounded.  Then open the serial port in your terminal emulator again (115200 baud, 8-N-1) and press the reset push button:

DothUWiW4AInYIN

You should see the output from MicroPython firmware running.

To use the interactive Python prompt (REPL), press the menu button on the badge (the icon with pencil and paintbrush) and select Serial REPL from the Available Apps menu:

IMG_20181004_113042 (1)

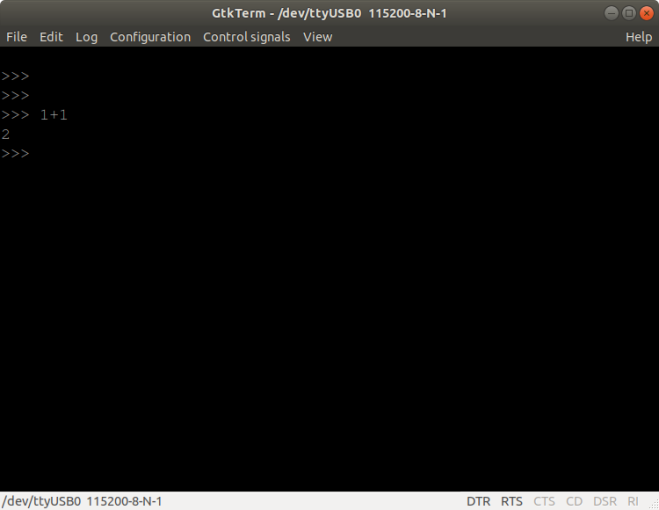
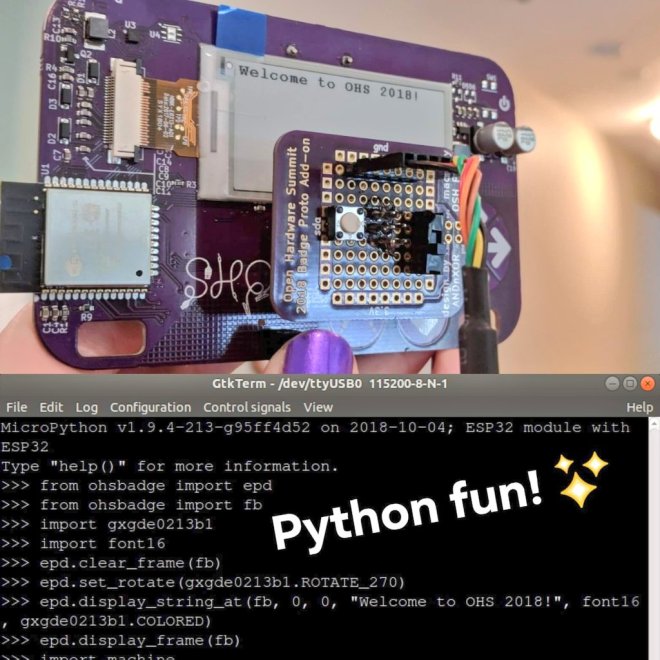
The terminal emulator connected to the serial port should then display the interactive Python prompt (REPL).  You can type in MicroPython code to experiment:

Screenshot from 2018-10-04 11-39-40 (2)

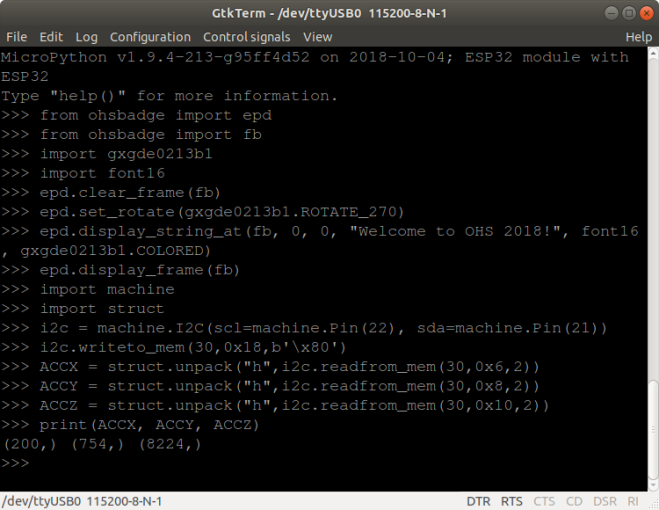
Here is an exmaple that displays text on the e-paper and prints that values from the accelerometer:

import gxgde0213b1
import font16
import machine
import struct
from ohsbadge import epd
from ohsbadge import fb

epd.clear_frame(fb)
epd.set_rotate(gxgde0213b1.ROTATE_270)
epd.display_string_at(fb, 0, 0, "Welcome to OHS 2018!", font16, gxgde0213b1.COLORED)
epd.display_frame(fb)

i2c = machine.I2C(scl=machine.Pin(22), sda=machine.Pin(21))
i2c.writeto_mem(30,0x18,b'\x80')
ACCX = struct.unpack("h",i2c.readfrom_mem(30,0x6,2))
ACCY = struct.unpack("h",i2c.readfrom_mem(30,0x8,2))
ACCZ = struct.unpack("h",i2c.readfrom_mem(30,0x10,2))
print("x={0} y={1} z={2}".format(ACCX[0], ACCY[0], ACCZ[0]))

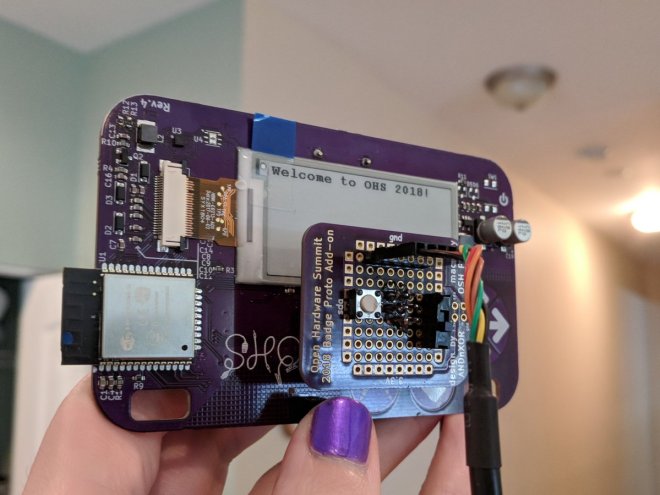
Photo of the text displayed on the e-paper:

DorbVOzX4AUwAQ3

Resources:

Open Hardware Summit badge: adapter board for USB-to-serial cable

Open Hardware Summit badge: Magic 8-Ball app

Thanks to @Steve Pomeroy for creating this MicroPython demo app for the Open Hardware Summit badge:

ohs18apps/magic8ball.py

# created by Steve Pomeroy https://hackaday.io/xxv
# modified by Drew Fustini to run once and exit
#
# blog post:
# https://blog.oshpark.com/2018/10/04/open-hardware-summit-badge-magic-8-ball-app/
#
# photo gallery:
# https://photos.app.goo.gl/f1y8PSHfYAaa4xTu7
#
# transfer to Open Hardware Summit badge using FTP:
# https://oshwabadge2018.github.io/docs.html#uploading-over-ftp

import gxgde0213b1
import font16
import font12
from machine import I2C, Pin, TouchPad
import struct
import time
import urandom
from ohsbadge import epd
from ohsbadge import fb

class TouchButton(object):
   def __init__(self, pin, on_pressed, threshold=400, debounce_ms=50):
       self._touchpad = machine.TouchPad(pin)
       self._on_pressed = on_pressed
       self._threshold = threshold
       self._debounce_ms = debounce_ms
       self._down_ms = None
       self._pressed = False

   def read(self):
       if self._touchpad.read()  self._debounce_ms:
                       self._on_pressed()
                       self._pressed = True
       else:
           self._pressed = False
           self._down_ms = None

# from Magic 8-Ball app by Steve Pomeroy https://hackaday.io/xxv
# github.com/oshwabadge2018/ohs18apps/blob/master/magic8ball.py
class MagicBall():
   def clear_screen():
       epd.initPart()
       epd.clear_frame(fb)
       epd.display_frame(fb)

   def show_message(message):
       epd.init()
       epd.clear_frame(fb)
       epd.display_string_at(fb, 0, 52, message, font16, gxgde0213b1.COLORED)
       epd.display_frame(fb)

   def read_accel(i2c):
       i2c.writeto_mem(30, 0x18, b'\x80')
       x = struct.unpack("h", i2c.readfrom_mem(30, 0x6, 2))
       y = struct.unpack("h", i2c.readfrom_mem(30, 0x8, 2))
       z = struct.unpack("h", i2c.readfrom_mem(30, 0xA, 2))
       return (x[0], y[0], z[0])

   def get_orientation(i2c):
       new_orientation = None
       pos = MagicBall.read_accel(i2c)

       if pos[2] > 13000:
           new_orientation = "upright"
       elif pos[2] < -13000:
           new_orientation = "prone"

       return new_orientation

   def main(f):
           phrases = ["It is certain.", "It is decidedly so.", "Without a doubt.", "Yes - definitely.", "You may rely on it.", "As I see it, yes.", "Most likely.", "Outlook good.", "Yes.", "Signs point to yes.", "Reply hazy, try again", "Ask again later.", "Better not tell you now.", "Cannot predict now.", "Concentrate and ask again.", "Don't count on it.", "My reply is no.", "My sources say no.", "Outlook not so good.", "Very doubtful."]
           i2c = machine.I2C(scl=Pin(22), sda=Pin(21))
           epd.init()
           epd.set_rotate(gxgde0213b1.ROTATE_270)
           epd.clear_frame(fb)
           epd.display_frame(fb)
           prev_orientation = None

           keep_on = [True]

           def exit_loop():
               keep_on[0] = False

           exit_button = TouchButton(Pin(32), exit_loop)

           while keep_on[0]:
               exit_button.read()
               orientation = MagicBall.get_orientation(i2c)

               if orientation and orientation != prev_orientation:
                   if orientation == 'upright':
                       MagicBall.show_message(urandom.choice(phrases))
                   elif orientation == 'prone':
                       MagicBall.clear_screen()
               prev_orientation = orientation

ball = MagicBall()
ball.main()

This Python file can be transferred to Open Hardware Summit badge using the FTP server built into the MicroPython firmware.

Resources:

Open Hardware Summit badge: Magic 8-Ball app

E-Paper Badge is a Hint at Great Things to Come

From All the Badges of DEF CON 26 (vol 3) on Hackaday:

36-epaper-hackaday-shoutout

E-Paper Badge is a Hint at Great Things to Come

Friend of Hackaday, Drew Fustini, came to our Breakfast at DEF CON meetup sporting a name badge of his own design. The E-Paper Badge uses a Teensy LC to drive a 2.15″ E-Paper display. The row of capacitive touch buttons to the left allow the image to be changed, and he just happened to have the Jolly Wrencher in the gallery of choices for this picture.

This badge gets me really excited for this year’s Open Hardware Summit which is at MIT on September 27th. This year’s badge is a collaborative effort between a group on Hackaday.io! It’s basically Drew’s badge on steroids, and he told me the experience of working with a team has been really positive. It seems each time the group hits a hard problem or a pile of work that needs to be done, someone on the team grabs it and runs with it. It’s a great example of both certified open hardware and team development.

Quote

Open Hardware Summit 2018 badge

OSH Park is producing electronic conference badges for the 2018 Open Hardware Summit.  The hardware has been designed Alex Camilo, based on concepts from the ESP trINKet by Mike Rankin.  The badge features an ESP32 microcontroller and a 2.13″ E-Paper display.

6202441533283525215

OSH Park shared project for the Rev 3 by Alex Camilo :

https://oshpark.com/shared_projects/8yeLK5gd

Order from OSH Park

a

b

We expect this to be the final revision.

Timeline:

It is ordered on Super Swift today and should be validated next weekend.  This will allow us to order the full quantity PCB panels in August 13th.  Assembly is estimated to be 10 business days from the day when all components and PCBs are received.

Rev 2 photos:

And for those interested, here is a link to a gallery:

https://photos.app.goo.gl/UhCUX7eRN38tAhsF7

IMG_20180805_031614

Terminal output on Rev 2 prototypes:

The Rev 2 prototypes have NodeMCU boards soldered on to the back to serve as a USB to serial adapter.

One of the Rev 2 prototype boards that Alex sent me has the default e-paper demo:

3633741533555804296

The other has MicroPython installed! 🙂

1079331533555818375

Resources for the 2018 Open Hardware Summit badge:

Open Hardware Summit 2018 badge

Tiny ESP32 WROVER pSRAM board

Tiny ESP32 board from the store on Tindie with optional battery header and pSRAM:

Screenshot from 2017-11-15 00-17-12.png

Tiny ESP32 WROVER pSRAM board

It’s a little ESP32 Board. Perfect for controlling or sensing stuff in the real world and sync it to the internet! Despite that it features the ESP32 WROVER Module. This means it got 4MB FLASH and 4MB RAM. That’s an absolute incredible amount of RAM. I honestly have no clue for what I will ever need 4MB in my embedded Projects.

Screenshot from 2017-11-15 00-25-49

Why did you make it?

I wanted a small ESP32 Board with the pSRAM and which works and doesn’t eat your whole time to get it working and find it’s issues and quirks.

I’ve used the CP2102 Serial converter because this is the one, which works the best way to program the ESP32. Even Espressif uses this serial converter on their own dev boards.

2017-11-14T20:11:04.072Z-IMG_20171114_204145

What makes it special?

It’s propably the smallest ESP32 Board with pSRAM. Despite the size it’s ideal for battery operation. It uses under 200uA in Deep Sleep mode!

2017-11-14T21:18:21.815Z-IMG_20171114_221457

Tiny ESP32 WROVER pSRAM board

thingSoC Grovey on Crowd Supply

thingsoc_modelthingSoC is an Open Source socket system for IoT development and has just launched a new Crowdy Supply campaign:

thingSoC “Grovey”

Build any IoT or Networked device you can imagine!

c24rwnwveaaa4cm

The thingSoC Grovey! platform gives you the freedom to choose from hundreds of existing sensors, actuators, and radios to quickly create new electronic systems, in plug together configurations that were not possible before. Easily mix together different CPUs, Radios, and Peripherals, like Servos, Motors, Relays, Sound and Lights, and then program them in your choice of Integrated Development Environments (IDE).

The thingSoC Grovey! series combines access to the Seeedstudio Grove system, and the Mikrobus “Click” system, to give you the widest selection of radios, sensors, and actuators available today.

The thingSoC Grovey Series files are available on GitHub:

thingSoC Grovey on Crowd Supply

HydraESP32: HydraBus and ESP-32S

The Espressif ESP32 features a 32-bit 240 MHz dual core processor with  Wi-Fi and BLE. HydraBus created this shield for ESP-WROOM-32 or ESP-32S.

HydraBus__Shield_ESP_WROOM_32_v1_1_Rev1_ESP-32S_final_small.jpg

HydraESP32 v1.1 Rev1 with ESP-32S is alive

This shield can be used with or without HydraBus board, you can even cut HydraBus specific right side (on the line) to have a tiny ESP-WROOM-32 breakout board.

hydrabus has shared the board on OSH Park:

3e0d0b0e77d75a618d3eaf4b1949fc75

Order from OSH Park

HydraESP32: HydraBus and ESP-32S

MicroUSB powered ESP8266 Oled Board

logo.jpgMike Rankin created this board with a tiny OLED display controlled by an ESP8266:

MicroUSB powered ESP8266 OLED Board

I created this design as a challenge to make a design under 1″ x 1″ in size.

 The hardware is an ESP-01 ESP8266 Wifi module, linear power supply, microUSB connector and a few oled display parts.

The design files and source code are available on GitHub:

imagesESP8266_OLED


Here is a video of the assembly and operation:

miker has shared the board on OSH Park:

ESP8266 OLED Board Rev3

2387161476639855524
Order from OSH Park

MicroUSB powered ESP8266 Oled Board

Olimex: ESP32-WROOM-32 WiFi/Bluetooth module is in stock

ESP32-WROOM-32 modules are in stock now! Again these are from the very first lot and with limited supply. To give chances to more developers to try them we will not allow more than 3 modules per order. This module is good only if you develop your own board. For these who are not good with […]

via ESP32-WROOM-32 WiFi/Bluetooth module is in stock! — olimex

Olimex: ESP32-WROOM-32 WiFi/Bluetooth module is in stock