Chronio DIY Watch

 writes on Hackaday:

Chronio DIY Watch: Slick and Low Power

[Max K] has been testing the battery life of his self-designed watch under real-world conditions. Six months later, the nominally 3 V, 160 mAh CR2025 cell is reading 2.85 V, so the end is near, but that’s quite a feat for a home-engineered smart watch

Chronio DIY Watch

Ladder board for simple Automation

chmod775 designed this compact, standalone board to be programmed with a simple visual language:270681483106954815.jpg

Focus

Focus born with the purpose of making a prototype board that simplify every aspect of programming.

Spent the last hour writing down the main concept of the Visual Programming Language for the Focus!  It’s just a simple sketch, but I wanted to share it with you the main reason why I’m building it.

Ladder board for simple Automation

Vertically Mounted Arduino-Compatible Board

Clovis Fritzen designed this Arduino-compatible, vertically-mountable board that exclusively uses through-hole components:

arduino-vertical-676x507

Vertically mounted Arduino for Breadboard

I personally love the concept of electronic boards connected in “slots” (vertically attached to a horizontal board), like most industrial-grade PLC’s or even our desktop’s expansion cards (video, sound memory): it saves a lot of space and adds more functions to the system, all at once!


The PCB is for sale on Tindie:

tindie-logo2x

Vertically mountable Arduino – PCB only

This is an Arduno-Nano compatible controller that can be vertically mounted to bredboards and boards


Vertically Mounted Arduino-Compatible Board

LED Matrix Generator for EAGLE

Ted Yapo is designing a display for his  LED Oscilloscope Mk. II and decided to automate the process:

6979361486485114739

16×32 Display Design

I painstakingly drew the schematic for 512 LEDs in this display, then endured the drudgery of laying out the board. The whole process took about 45 seconds. Yes, I wrote a few Eagle User Language Programs (ULPs) (elapsed time after the scripts were written and debugged). The previous time I wrote one was last century to lay out a circular LED clock face. I figured it was about time I regained those skills.

8920781486146501489-1

The EAGLE ULPs are on GitHub:

led-matrix-generator

 Eagle scripts for LED matrix display generation

LED Matrix Generator for EAGLE

Brake Lamp Flasher for Motorcycle

Bryan Cockfield of Hackaday writes:

Brake Light Blinker Does It with Three Fives

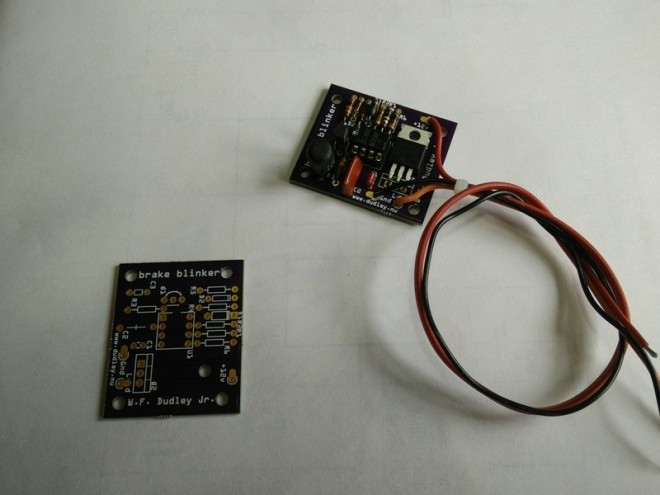
Sometimes you use a Raspberry Pi when you really could have gotten by with an Arudino. Sometimes you use an Arduino when maybe an ATtiny45 would have been better. And sometimes, like [Bill]’s motorcycle tail light project, you use exactly the right tool for the job: a 555 timer.

boardsMore details on William F. Dudley’s project page:

Brake Lamp Flasher for Motorcycle

The 555 is a clever chip; not only will it supply the oscillator for the flashing effect, it has a reset pin that can be used to force the output to a known state (low) when (other circuitry tells it that) it’s time to stop flashing. Thus the brake light will be steady “on” after a few flashes every time the brake is applied.

brake_blinker_1_schem

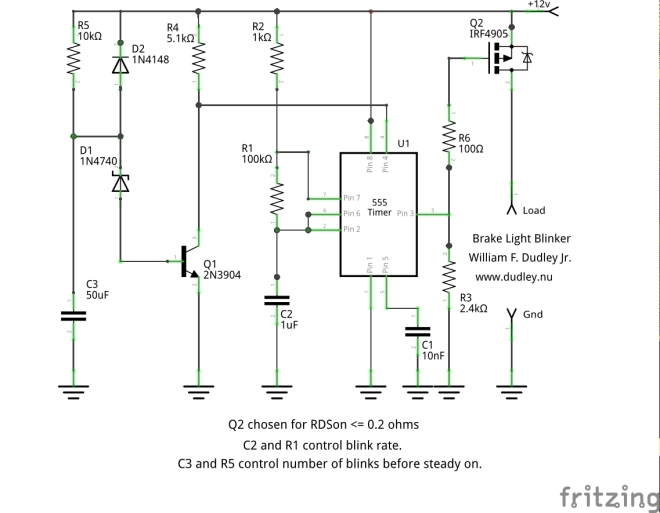
The 555 is happy to run directly off the nominal 12 volt vehicle electrical system, so no voltage regulator is needed. The 555 is almost immune to electrical system noise, so no worries about your Arduino code going off into the weeds if there’s a spike from the electrical system.


Brake Lamp Flasher for Motorcycle

OnChip Open-V Arduino Compatibility

OnChip has posted a Crowd Supply update on their plans for Arduino compatibility:

arduino-open-v_jpg_project-body.jpg

Open-V Arduino Compatibility

Arduino compatibility can mean a lot of things to a lot of different people, so we’ll try to be as concrete and specific as possible. For the Open-V, Arduino development tools, and interoperating on a hardware level with existing Arduino shields.

wire-bonds-zoomed_jpg_project-body.jpg

We’ve updated our live, web-streamed demos to include an Arduino mode in addition to the assembler and C modes we already have. You might also notice the relatively new Blockly modes and a refined layout of the demo page. Go write some code and see the results live streamed!

Screenshot at 2017-02-12 20-18-49.png

OnChip Open-V Arduino Compatibility

Bristlebot with LDRs Becomes Light-Following Bristlebot

Bristlebot with LDRs Becomes Light-Following Bristlebot

Bristlebots are great because no coding is required – they’re completely analog circuits that just go! But if you wanted them to go in a specific direction, how would you do that? Facelesstech has released their design for a light-following bristlebot that uses two LDRs to drive either side of the bristlebot (so you could turn it, somewhat – see video below for demo!). It’s pretty simple and pretty clever.

img_20160815_165948 (2).jpg

The KiCad design files are available on GitHub:


Bristlebot with LDRs Becomes Light-Following Bristlebot

Learn, Teach and Make with the Tinusaur

Last week we’ve launched our Indiegogo crowdfunding campaign and, as of a few minutes ago, we’ve reached 1/3-rd of our goal already. In case you’re not familiar what the Tinusaur project is about … A small board with a tiny chip on it that comes as an assembly kit – a small package with parts and you […]

via Indiegogo Campaign is Almost Halfway Through — The Tinusaur

Learn, Teach and Make with the Tinusaur

Making a USB DAC + Headphone Amp [update]

img_20170202_181622

It’s been a while since I last wrote *ahem* lies *cough* on this project. I am currently a little bit torn whether I should keep writing it here or start posting to my new hackaday.io presence… Anyway here is a brief update: TL;DR I now have a working standalone unit — USB in, headphone out […]

via Making Myself a USB DAC + Headphone Amp — Interim Update — Frog in the Well

Making a USB DAC + Headphone Amp [update]